Many of us have been in situations where we needed to erase all the data from an iPad. Maybe you wanted to sell your iPad, or you had just bought one, but the original owner had left all their apps in it. Or you simply wanted a fresh new look on your iPad. However, how to delete apps on iPad? Don't worry! You can delete apps from ipad easily as follow.
Part 1: How to Delete Apps on iPad Permanently
There are actually quite a number of ways of how to remove apps from an iPad. But, the easiest way to do it is by using dr.fone (Mac) - Data Eraser (IS) (or dr.fone - Data Eraser (IS)). This program takes all the work away, and shows you exactly how to delete apps on iPads.
Key Features of the Program:
- It allows you to erase only what you need to delete.
- It has 3 convenient deleting modes: 'erase all data', 'erase deleted files' and 'erase private data'.
- It comes with a secure 'permanent delete feature' such that, any files deleted from your iPad, cannot be recovered.
- It also has an express clean-up feature that scans your iPad for junk files and temporary files.
- Additionally, it allows you to backup your iPad to your computer to free up storage space.
Step-by-Step on How to Delete Apps from iPad
Step 1: Start the software and connect your iPad
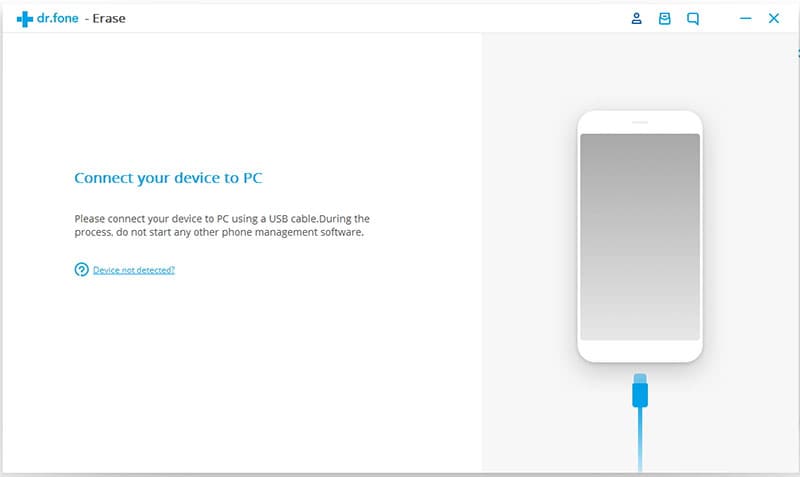
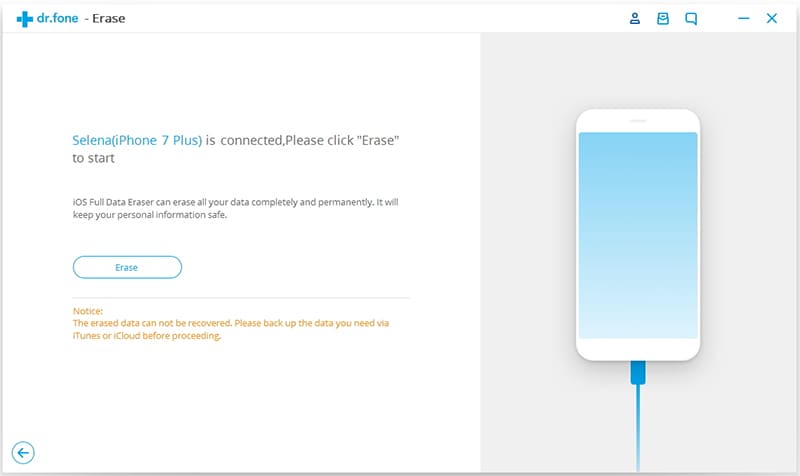
Download and install dr.fone (Mac) - Data Eraser (IS) program on your Mac. It can work on any Mac including MacBook Pro, MacBook Air and iMac. Then launch the program and connect your iPad to the Mac using your USB cable. The program shall then recognize your iPad, and display its information on the main window.
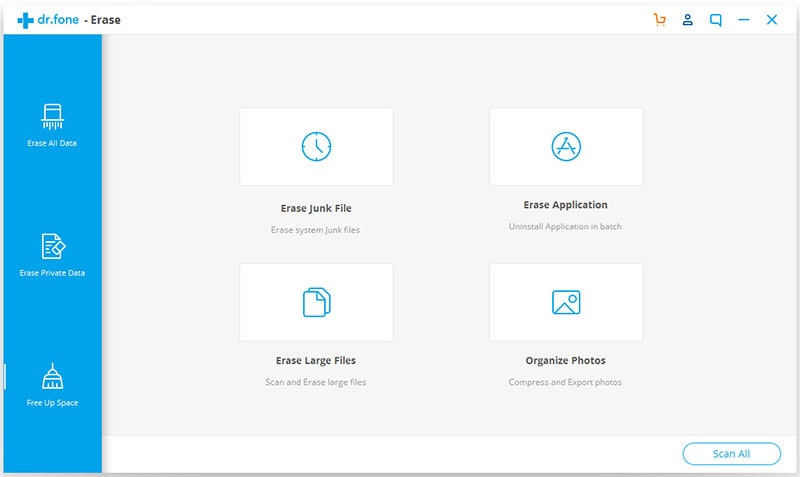
Step 2: Pick the Express Clearup mode
In this case, you need the "Delete Junk Files" mode. To the left of the main screen, you'll see a menu. Click on the "Express Cleanup" option. The main screen will then show how much space you have on your iPad and the number of days since your last cleanup. Then click on "Start Scan" button. The program shall then search your iPad for junk files. After the scan is complete, all your junk files will be listed on the computer screen.
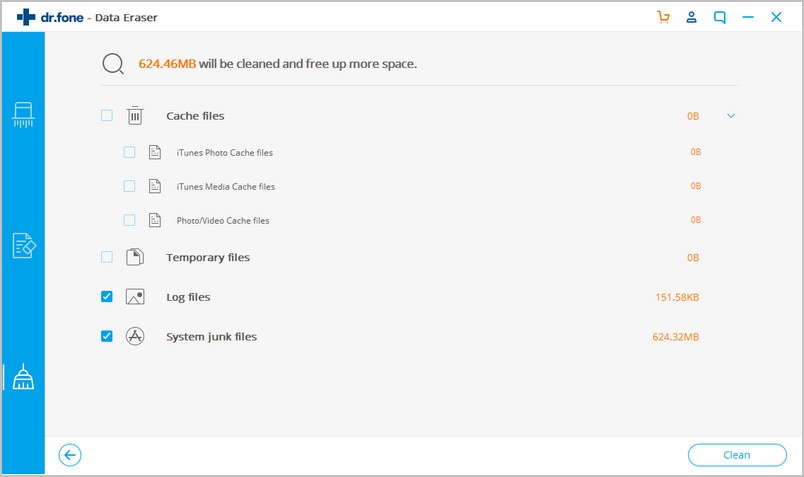
Step 3: Click "Cleanup" to start deleting apps from iPad
You have the option of selecting which junk files you want to delete. After that, click on "Cleanup" on the bottom right of your main screen. After the cleanup is complete, the program will show the total size of junk files that have been deleted. You will be shown the amount of space that you have freed on your iPad. You are also given the option to re-scan your device for junk files. If you don't feel the need to re-scan your iPad for junk files, simply click on "Done". That's it. You now have a junk file free iPad.
Part 2: How to Remove iPad Apps Manually
Instead of using a program, you also have the option of directly deleting iPad apps manually. It may not be as convenient as using the dr.fone - Data Eraser (IS) program, but it can still be done. So, if you're trying to uninstall iPad apps downloaded from the AppStore, here are 2 different ways to do just that:
Method 1. Tap & Wiggle
- Tap and hold the icon of the app you want to uninstall, until it starts wiggling.
- Some of the apps might have a little 'X' on the top left corner of the icon(If the app doesn't have an 'X', it's a default app, and you cannot delete it).
- Tap the 'X'.
- A small dialogue box shall then appear.
- Tap the 'Delete' option in the dialogue box.
- This will delete/uninstall the app and all its data.
Method 2. Using the settings
- Go to your phone settings by tapping the 'settings' icon.
- Inside 'settings' look for 'general'.
- Inside 'general' look for 'usage'.
- In 'usage' select the 'storage' section.
- All your apps and the storage they currently use will be displayed.
- Tap on the apps name, then tap 'Delete App'.
- Your app and all its data shall then be deleted.
Method 3. Using the iTunes Library
The previous methods are useful if you want to delete the apps from your iPad, but still keep them in your iTunes library. If you also want to delete them from your iTunes library, then this method is for you.
- Go to iTunes and select your Apps library.
- Click the app that you want to delete.
- Then press the delete button.
- A dialogue will appear asking if you want to keep the app or move it to the trash.
- Pick the 'trash' option.
- This will delete the app from your iTunes library.
- The next time you sync your iPad, the app you deleted in your iTunes library will automatically be removed from your iPad.
Part 3: Troubleshooting on Can't Delete Apps on iPad
Sometimes, when trying to delete apps from your iPad, you might encounter some problems. Luckily, most of these issues have very simple solutions.
- Issue 1. The 'X' is not appearing. While trying to delete an app, the 'X' might fail to appear.
- Issue 2. The app is stuck in 'waiting' or 'loading'.
- Issue 3. Your iPad freezes while deleting an app
Solution: Maybe you are not holding the app icon long enough for the 'X' to show. Hold the app icon lightly for a few seconds for the 'X' to appear. If it still doesn't show, a restart might help. Hold the "Sleep/Wake" button until "Slide to power off" appears. After a few seconds, turn the device back on. The 'X' should now appear when you hold an app icon. If it still doesn't work, maybe you have a "restriction setting" issue. Go to your iPad settings, select "general", then choose the "restrictions" option. Enter the password set for restrictions. Now set the "Deleting Apps" to "green" (On). The 'X' should now appear while deleting your app. If the 'X' still doesn't appear, then it's possible that the app you are trying to delete is a default "in-built" app. These types of apps cannot be deleted.
Solution: This is usually caused by an iTunes sync issue. Connect your iPad to your Mac and go to your iTunes library. Delete the app from your iTunes library and then sync your iPad. This will remove the app that is stuck in 'waiting' from your iPad.
Solution: A fresh restore from backup might be your only option. If you have a backup on iTunes, you can use it to solve this issue. Simply connect your iPad and choose the "restore" option. You will be prompted to choose a backup (if you made one). If there is no backup, you have the option of a fresh restore which will clear all your apps. Luckily, all you need to do is go to the app store "purchase section" to get all your apps back.
Part 4: How to Cancel Apps Update on iPad
Sometimes, you need to cancel the apps update process on your iPad. You might have started it by mistake, or it may have started automatically.
- Immediately pause the app that is updating.
- Then sign out of your Apple ID by going to "Settings" then "App store" then "Apple ID".
- Now reboot your iPad by holding the power button and home button until you see the Apple logo.
- Power it back on and sign in using your Apple ID.
- This should work to stop any updates before they get far.
To avoid such accidents in future, you can choose to turn off automatic updates as follows:
- Go to your iPad settings using the "settings app".
- Scroll down and select "iTunes and App Store".
- In the "Automatic Downloads" section, go to "Updates" and switch it to "Off".
- You are now safe from future automatic updates.


