Making the most of the sixteen Gigabytes of space available on your iPhone is one of the challenges you encounter on a daily basis. You can quickly run out of space for photos. It is often a significant challenge updating to a new version of iOS. For everything you want to store there may be moments when even 128GB or 64GB is not enough. Are you searching for hints on how to manage storage on iPhone? Have you moved from place to place looking for the best ideas on how to manage storage on iPhone? Follow these hints to make the best of your iPhone's storage space.
How to Manage Storage on iPhone
Step-by-Step Guide to Manage Storage on iPhone
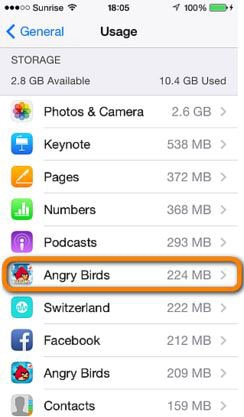
Step 1. The first thing to know is understanding the main reason of getting rid of old applications. In case you have installed several apps on your iPhone, they can be consuming an enormous amount of space on the device reduced storage system. Games remain one of the largest problems to manage memory iPhone system. The idea of getting of applications and games can help to free up an enormous amount of space on your iPhone. There is every possibility to get rid of apps from your home screen. Nevertheless, this method will help to separate the installed applications by size.
It will also enable you to see the amount of space every application is occupying. You should not bother about misplacing the applications installed in time past. With your Apple ID, you can still get all of the downloads. It means that you will have the opportunity to redownload any application, purchased or free from the App Store, time and again. You can make use of iTunes to copy all documents and information related to the application before getting rid of it. This point is when you want to backup any application before deleting it.
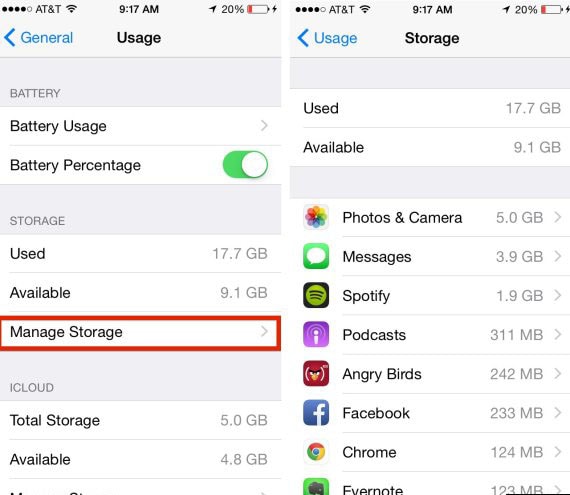
Step 2. The next line of action is to open up the "Settings" application and click on "General". Provided you have accomplished the second phase, go ahead to click on "Usage". In the "Storage" portion, you will have to click on Manage Storage. At this point, you will be expected to wait for the application list to appear or load. It is important to know that this process may take a couple of minutes. On this note, you need to be patient enough to see the app list load for a better result. Hurrying may simply make you lose the right information on how to operate.

Step 3. Now, go ahead to click an application you do not want to make use of again. You will discover the amount of space the information relating to the application is consuming. In fact, it will help you to know the applications that should not be on your iPhone device.

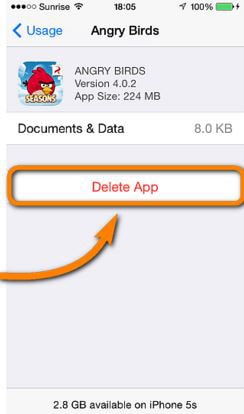
Step 4. Click on "Delete App". You will have to click on "Delete App" twice to affirm that the application is required to be removed. It will also help to get rid of all the data and documents associated with the app in question. The process should be repeated for every application you want to remove on your iPhone device. Even if you have some apps that will not be beneficial again, simply add it to the list that should be removed. It may just be eating up enough storage space on the device. To manage space iPhone storage system is easy if you understand how to get rid of unwanted applications.

Step 5. The final step confirms the repetition of the "Delete App" process for every unused application on the iPhone device. By frequently cleaning out your application, there is every possibility to potentially free up a lot of space.
Download dr.fone - Data Eraser (IS) to Delete Unnecessary Data on iPhone
dr.fone - Data Eraser (IS) - Delete Data on iPhone with 100% Unrecoverable
- The software will clean junk files and speed up iPhone
- It can permanently overwrite files that have been removed
- Using the dr.fone - Data Eraser (IS) will help to delete information without recovery
- It will save your personal details without any problem


