You probably keep very important photos on your iPhone, but have you ever asked yourself what will happen if your iPhone is lost, severely damaged or stolen? If you save photos from iPhone to iCloud, iTunes, Mac, PC and more, you can still be able to access them with ease. In this article, focus on the most popular methods for saving photos from iPhone to iCloud, iTunes, Mac, and PC.
4 Methods to Save Photos from iPhone
1 Save Photos from iPhone to iCloud
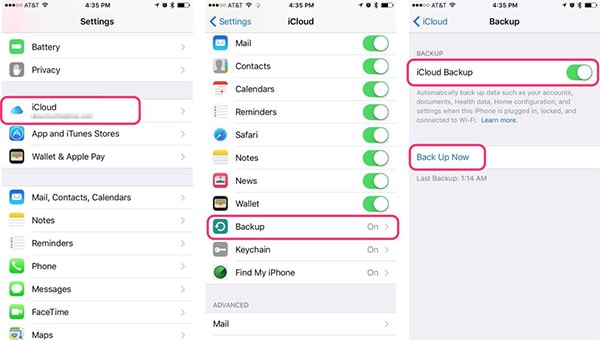
Tap the "Settings" app on your iPhone’s home screen. Tap on "iCloud". Select "Backup" from the provided list of options. Turn on the "iCloud Backup". Tap on "Back Up Now". The backup process will take some time, especially if you have never backed up your iPhone data on iCloud. Plug in your iPhone to charge as it backs up your data (including photos.) You can use your iPhone while saving pictures from iPhone to iCloud.

2 Save Photos from iPhone to iTunes
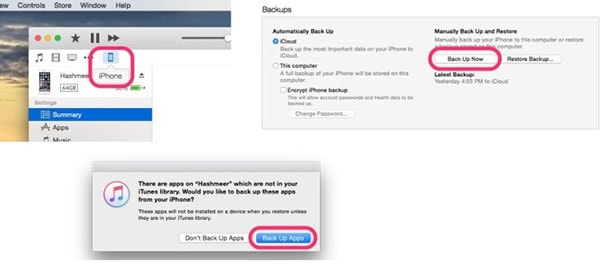
Connect iPhone to Mac with the USB cable that came with your iPhone. Launch iTunes software and when you see the main software’s window go to File> Devices> Back up. Under the "Backup" section, click the "Backup Now" button. A pop-up about transferring the apps and purchases may appear. It's up to you to select what you prefer but it is recommended that you should backup both of them to iTunes. Be patient as iTunes backs up your iPhone data. You should not disconnect the devices until the backup is complete. You will then be able to update your iOS.

3 Save Photos from iPhone to Mac
Connect your iPhone to your Mac with the original USB cable. Unlock your iPhone using your passcode. A prompt is likely to appear asking you whether you trust the computer. Tap trust and continue. Photos app for OS X will then open automatically on your Mac. If that doesn’t happen, just launch the Photos app.
Photos app will then display an import screen with all the photos as well as videos on your iPhone. In case the import screen does not appear, you will simply click the "Import" tab located at the top of the Photos app. Click on the photos that you want to save from iPhone to Mac and then click on "Import Selected" button. When the photos have been successfully saved from iPhone to Mac, a message will appear asking if you would like to delete or keep the photos on your iPhone. You can delete or keep them and then disconnect iPhone from Mac.

Step 4 Save Photos from iPhone to PC
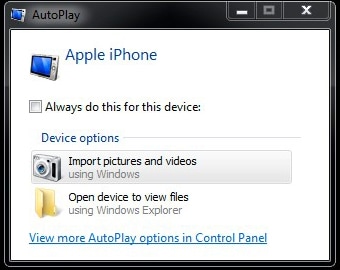
Connect iPhone to Windows PC using the original iPhone USB cables. Autoplay will launch once Windows detects your iPhone. Different options will be displayed on your PC’s screen. Click on "Import pictures and video" and then Windows will guide you. You will be asked to select the photos and videos that you want to save to your PC and once you make your selection the photos will be saved from iPhone to PC. The time taken will depend on the size of photos you are saving from iPhone to PC and the condition of your two devices. Disconnect your iPhone from PC once the process is successful.

Use any of the detailed guides provided above to save all your favorite pictures from iPhone and you will never regret when your device is stolen, lost or damaged. Moreover, you will be able to erase your iPhone data permanently when you decide to recycle, donate or sell it, without being worried of your photos.
Download dr.fone - Data Eraser (IS) to Delete Unnecessary Data on iPhone
dr.fone - Data Eraser (IS) - Delete Data on iPhone with 100% Unrecoverable
- It allows users to delete the unnecessary and junk files from their devices and speed up performance.
- dr.fone - Data Eraser (IS) comes with a user-friendly interface which makes it simple to use.
- It features 5 data erasing modes, including Erase Private Data, Express Cleanup, Photo Compressor, Erase All Data and Erase Deleted Data.
- The software is a complete data eraser as it can delete all types of data.


