You might be working hard to ensure that all your important files are backed up, but some of your files may suddenly become inaccessible, missing or lost due to accidental deletion, unintentional formatting, and other unknown reasons. You shouldn't be worried since almost all of the data recovery situations can be easily managed with an excellent do-it-yourself data recovery software like TestDisk Data Recovery. In this page, we focus on the best alternative method to TestDisk Data and we also discuss how to use TestDisk Data Recovery to retrieve lost data.
Part 1. An Easier Alternative Method to TestDisk Data Recovery for Mac and Windows
iSkysoft Data Recovery for Mac (or iSkysoft Data Recovery for Windows) offers a secure, simple and fast way to recover emails, documents, music, videos, photos, archive files and other lost files due to hard drive crash/damage, virus attack, operating system failure, file corruption, accidental deletion, formatting and other unknown scenarios. It comes with advanced, all in one flexible settings and powerful features that set new standards in the software development industry.
The program takes you from the state of panic and frustrations to a state of rejoice. Using the latest powerful scanning algorithms, it recovers data from almost all devices, (Mac computers, memory cards, digital cameras, hard drives/SSD, players, USB flash drives and more). Furthermore, Recoverit (IS) scans only the existing data on your drive through a risk-free, read-only process. Nothing will be changed, and your data won’t be destroyed in any way.
Why Choose This TestDisk Data Recovery Alternative Software:
- The program scans and recovers files from your devices with a fast speed compared to other alternatives.

- "Deep Scan" thoroughly scans lost data from the entire system, increasing data recovery success.
- Users can save their time by scanning only the data of selected file types.
- Recoverit (IS) is the most comprehensive program for recovering files from HFS+, HFSX, FAT16, FAT32, exFAT, and NTFS files systems.
Step-by-Step Guide to Use TestDisk Data Recovery Alternative Software
Step 1 Download and Launch the Program
As you may already know, continued operation on the drive from where your lost files were saved, including searching and downloading of a software, can lead to permanent data loss. Therefore, if you want to recover data from a Mac-based drive, you'll have to get another computer and use it to download Recoverit (IS). You'll then install it to a USB flash drive and recover the lost files with the program installed on the USB flash drive. From the main interface, select the data types to recover. then click on the "Next" button.

Step 2 Select Data Recovery Mode
Then a new window like the one below will appear. Here, you'll select the drive where you have lost your files and then click on the "Start" button at the top of the software's interface. If your drive isn't listed, click the refresh icon and it will appear.

Step 3 Recover Lost Data
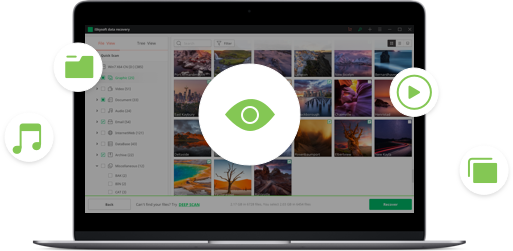
A new window appears on the screen once the scanning process is completed. It's where you can preview files and determine file validity before recovery. Recover your data by first checking the files on the scan results and then select the "Recover" button located at the top of the program's interface. Save the files to the selected path and not to the same drive where the lost data were saved.

The "Deep Scan" will allows the software to do the deep scan on the TestDisk drive and search more files for you.
Part 2. How to Use TestDisk Data Recovery to Recover Data
Data Recovery is a simple but powerful open source data recovery utility that’s primarily designed to help users recover lost partitions, and make nonbooting disks bootable again. These problems are commonly caused by faulty software, virus attack, and human errors such as accidental deletion of a partition table. The process of recovering a partition table with TestDisk Data Recovery is easy, especially for advanced users. Individuals with little knowledge about data recovery techniques can also use the program to collect information on their non-booting drive and send them to a professional tech for further analysis. TestDisk can also do the following:
- Fix Fat tables, partition table, and recover deleted files.
- Undelete data from ext2, NTFS, exFAT, and FAT.
- Copy files from ext2, ext3, ext4, NTFS, exFAT, and FAT partitions.
- Locate the ext2, ext3, ext4 Backup Superblock.
- Fix MFT using MFT mirror.
Step-by-Step Guide on How to Use TestDisk Data Recovery to Recover Data
Step 1 Log Creation
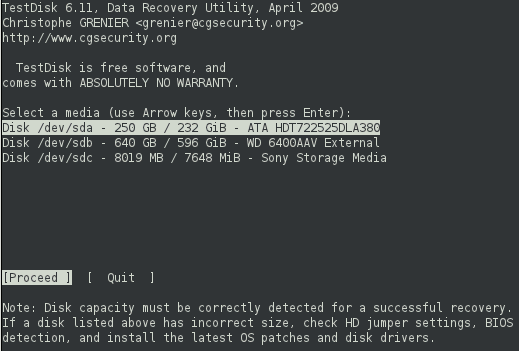
First, go to https://www.cgsecurity.org/wiki/TestDisk_Download and download TestDisk. Install it on your computer and then launch it. Once the program is successfully launched choose "Create" so as to instruct it to create a log file that contains technical information and messages. Press the enter button to proceed to the next step. The program will detect all your hard drives and list them with their correct sizes. Use the up/down buttons to select the hard drive that needs recovery and then press the enter button to proceed.

Step 2 Partition Table Type Selection
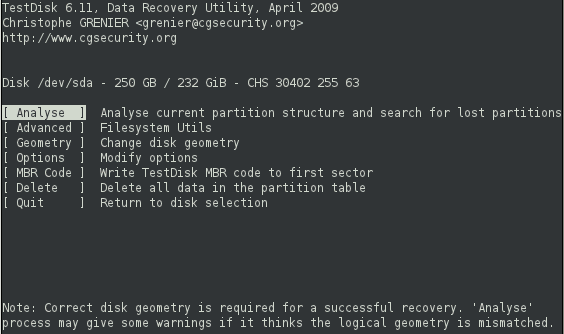
The software will display partition table types like the ones shown in the image below. Select the default one, in this case, its "Intel" and hit the "Enter" button. For a normal recovery attempt, just select the "Analyze" option with the "Enter" button so that you can use it to check your current partition structure, and even search for the lost partitions.

Step 3 Recover Lost Data
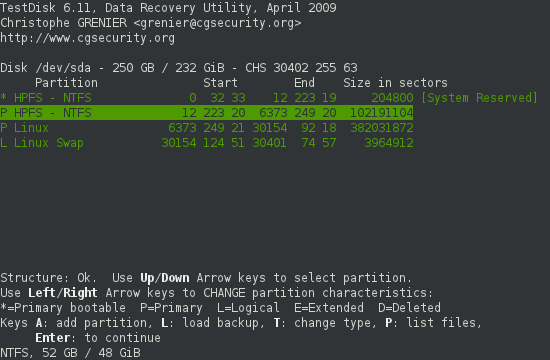
The next screen will display a listing of your current partition structure. Hopefully, you'll find the lost partitions here. If that doesn't happen, you'll have to opt for a quick or deep search to scan the lost partitions.

TestDisk provides you with an option to write the recovered data to the disk. You just need to press the "Enter" button and then you'll be taken to the main menu. Select "Write" and then hit the "Enter" button.
Shortcomings of TestDisk Data Recovery Method:
- The "Deep Search" option takes a lot of time to scan the lost partitions.
- If there is a problem with drive detection, data recovery is likely to fail.
- The program isn't perfect for newbie and less experienced users.
Part 3. Comparison of Recoverit (IS) and TestDisk Data Recovery
|
Software |
Supported Operating System |
Pros |
Cons |
|---|---|---|---|
|
Recoverit (IS) for Mac |
Fully compatible with Mac operating systems, and there is also a Windows version designed for Windows users. |
i. You can preview your lost files after the scan is completed, and even distinguish the good and bad files before recovery. ii. The wizard mode and simple interface allow both beginners and experts to recover data with ease. iii. You can pause or restart the scanning process and even save the scan results to resume the recovery process when you have time. iv. The professional program is available at an affordable price and you can also download the trial version for free. |
None |
|
TestDisk Data Recovery |
TestDisk can run under Windows, DOS, Linux, MacOSX, SunOS, FreeBSD, Open BSD and NetBSD |
i. TestDisk is a free portable software that doesn't even require installation. ii. It recovers NTFS and FAT32 boot sectors from their backups. iii. The software rebuilds NTFS, FAT12, FAT16 and FAT32 boot sectors |
i. Users can't preview the data to be recovered nor determine their validity before recovery. ii. The program doesn't have graphical user interface (GUI) and therefore not suitable for less advanced users. |


