As an avid laptop or desktop user, you are likely to lose some of your most important files due to unexpected errors, such as system crashes, hardware failure, file corruption, etc. If your computer can't boot from the internal hard drive, you have 2-options to recover your data. You can either remove the drive and connect it to a working computer, or perform a bootable hard drive recovery. But the internal components of your computer are delicate and can easily get damaged while trying to open PC in order to remove the HD. So it’s obvious that bootable hard drive recovery is the safest option to salvaging your data.
Part 1. What Should be Done Before You Perform Bootable Hard Drive Recovery
For a successful bootable hard drive recovery, you must find a way to gain access to your computer. You can either use a bootable CD, bootable external hard drive or bootable USB flash drive. These devices allow you to boot up your computer from the disk rather than from the internal hard drives. So before you can perform bootable hard drive recovery, you must create a bootable hard drive recovery disk.
Step-by-Step Guide to Create a Bootable Hard Drive
What You Need:
- At least a 4GB USB flash drive (make sure that you backup the contents of this drive)
- Windows 10 ISO file (You can download this from the web)
- A PC that runs on Windows 10
Note: All the words that you need to type while using this tutorial excludes the quotes
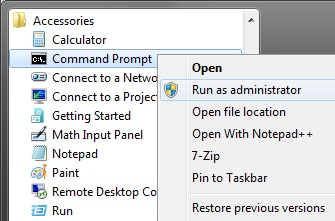
Step 1: Open "command prompt" as an administrator and execute the diskpart command. Just search for cmd, then right-click and select "Run as administrator". Type "diskpart" and click the enter button. Alternatively, you can open the "Start Menu", type "diskpart" and select "Yes" if prompted to give permission.
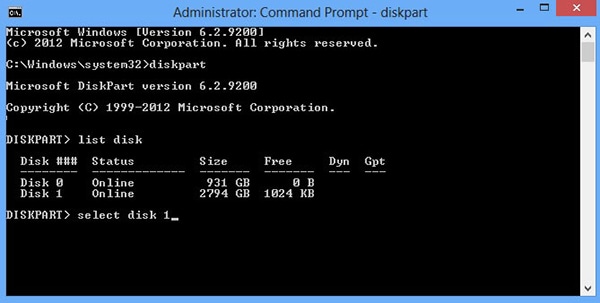
Step 2: Insert the USB drive on the computer, type "list disk" and click the enter button. Go through the "Size" column to determine the number of your USB drive. In this tutorial, our drive is Disk 1. Type "select disk 1" and click the enter button. Wipe the USB drive by typing "clean" and clicking the enter button.
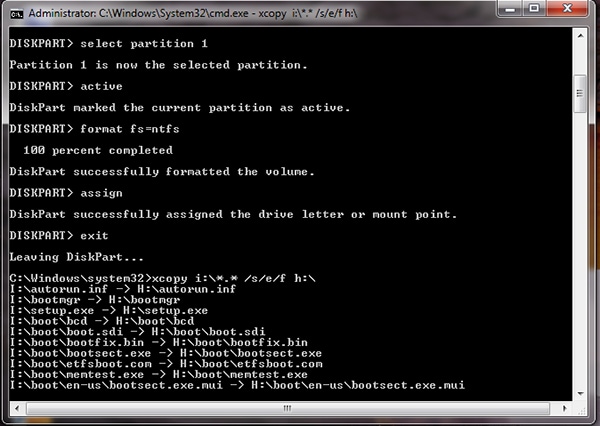
Step 3: Now we have to prepare our USB drive for Windows 10 ISO files and ensure that it’s bootable. Type "create partition" and hit "enter". Type "select partition 1" and click the enter button. Proceed by typing "active" and hitting the enter button. Type "format fs=fat32" and click the enter button. Your drive will be formatted in Fat32 format using "Quick" routine.
When the above process is complete, type "assign" and click the enter button. A new drive letter will then be assigned to the drive so that it can be accessible. Your drive is likely to open automatically. If it doesn't, go to "My Computer" or "This PC" and you'll find it. In our case the assigned drive letter is H.
Note: You can now extract ISO image file contents by opening them either in Windows Explorer/ using an extraction tool like 7-Zip and copying them to the drive. Alternatively, you can also mount ISO image file using a mounting tool and then let the command prompt do its work.
Step 4: Close diskpart and then open cmd again. Type "xcopy g:*.* / s/ e/ f h:". Note that "g:" represents the mounted ISO file while "h:" represents the USB drive. Finally, type "exit" and click the enter button. You can now insert the USB drive on your computer and install Windows 10 (from the drive) by simply booting from it.
Part 2. How to Perform Bootable Hard Drive Recovery
For a successful bootable hard drive recovery, you need to download iSkysoft Data Recovery for Windows). This is a file recovery software that scans drives and other storage media to find, salvage and recover any lost or hidden data, including documents, photos, videos, emails, archive files, etc. It comes with 4-comprehensive and unique data recovery modes that allow users to retrieve files lost due to all data loss scenarios-sudden deletion, hard drive corruption, formatting, system crash, virus attack, improper operation, volume loss, etc.
Recoverit (IS) is simply the fastest, safest and most reliable solution to retrieving lost data. The program is fully compatible with Windows XP/Vista/7/8/8.1/10. No prior data recovery experience is required in order to use it. In fact, the software features a “Wizard” mode that outlines the step by step process on how to recover lost data. Furthermore, it comes with user-friendly settings that let you recover data at your own pace.
Why Choose This Bootable Hard Drive Recovery Software:

- The "Deep scan" option scans the whole file system, increasing your data recovery success rate.
- Videos, emails, audio files, documents, etc, can be previewed before recovery.
- It supports data recovery from FAT32, FAT16, exFAT and NTFS files systems.
- The software scans your storage media quickly and recovers your data in original quality.
- Recoverit (IS) uses a read-only process to scan your drive and won't damage or delete your data.
Step-by-Step Guide for Bootable Hard Drive Recovery
Step 1 Set the Computer to Boot from USB Drive
Just plug in the bootable USB flash drive into your computer. Start or restart your computer and pay attention to the messages that appear on your screen showing special keys. Immediately & repeatedly press the boot option key until the boot menu appears. Generally, the boot option key depends on your computer brand. On the "Boot Menu" select USB-HDD using the ↓ or ↑ keys and hit enter to confirm. You can now restart your computer and make your computer boot from USB flash drive rather than from the internal hard drive where your files got lost.
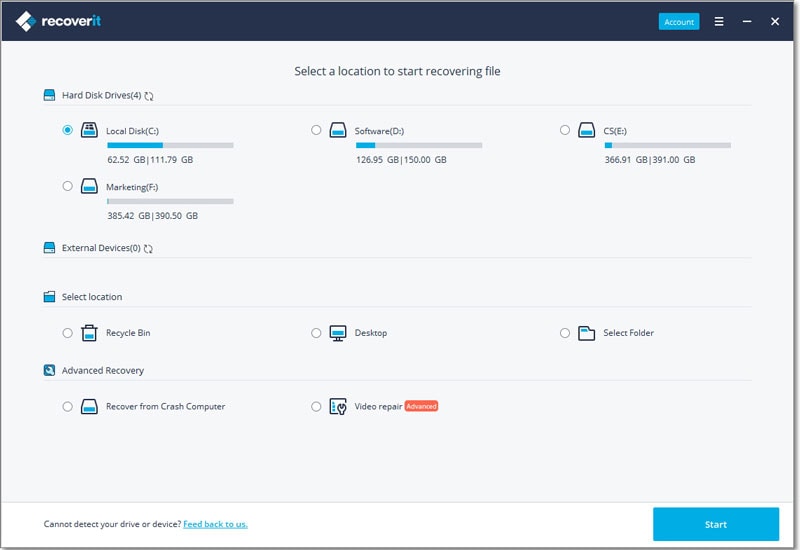
Step 2 Download iSkysoft Bootable Hard Drive Recovery for Windows
Use another Windows computer to download the software, install it on a different USB flash drive and then perform data recovery while the program is installed on the USB drive. Click the "Partition Recovery" tab in the primary window and the program will display all the drives on your computer. Select the internal drive you would like to recover data from and then click the "Next" button. The software will then start scanning the partitions on your drive.

Step 3 Start Scanning
All the deleted or lost partitions will then be shown in the window. Just check the partition you want to recover and then click the "Start" button to start the scanning process.

Step 4 Complete Bootable Hard Drive Recovery
After successfully scanning for the lost files, mark the ones you want to retrieve and then click the “Recover” button to restore them.
