File corruption is one of the most common causes of data loss. It is also unfortunately one of the least talked about problems and most people usually have no idea what to do. If this is what you are experiencing, worry not as we will give you 4 simple ways to do corrupted data recovery. By the time you read the ending to this article, you will be equipped with the necessary knowledge to help you get over this hurdle and most importantly, get your data back.
Part 1. How to Recover Corrupted Data from Windows Using Linux
The following is a guide to help you recover lost data from a corrupted Windows installation using Linux. The things you need to make this happen include a computer with a working CD/DVD drive, a Linux Live CD, a portable hard disk and at least basic knowledge about BIOS features.
Step-by-Step Guide to Recover Corrupted Data from Windows
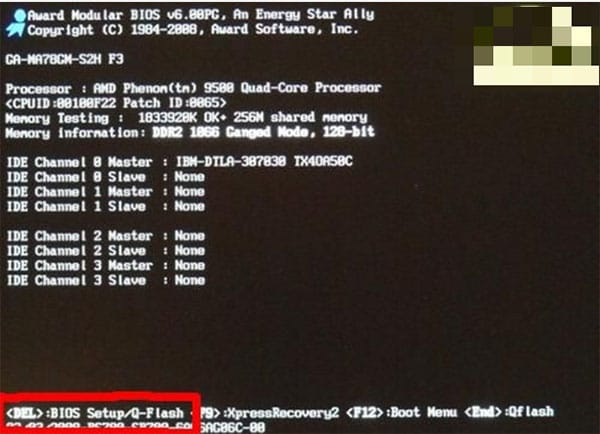
Step 1. Begin by starting your computer. Press the button that needs to be pressed for BIOS setup (it may be different for most computer). Mine is "DELETE".
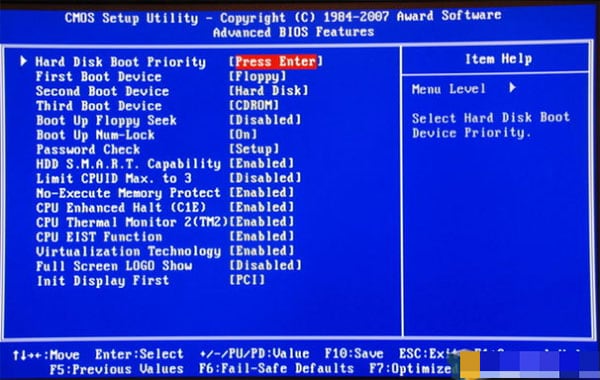
Step 2. Once in the BIOS screen, navigate to the "Advanced BIOS features". You can use the direction keys and then press enter. Once here, navigate to "First Boot Device" and then press enter. Select "CDROM" and press Enter. Press Escape to get out of advanced BIOS features. Now navigate to the "Save & Exit Setup" and press enter. Pres Y for yes when asked to save changes. The computer will restart. Insert the Linux Live CD in the drive.
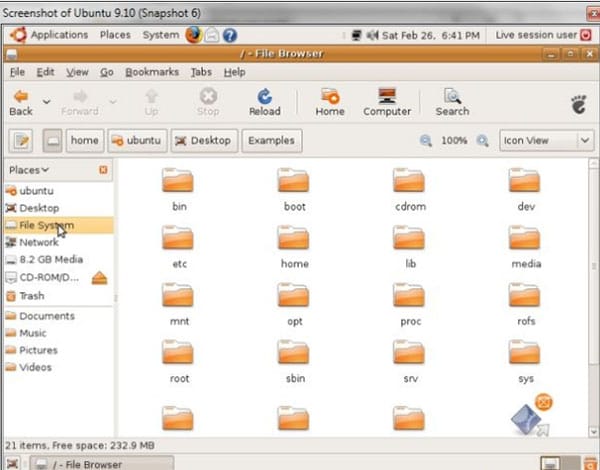
Step 3. The computer should boot from the Live CD. You should then see a language selection screen. Select the language and press enter. In the next screen, select "Try Ubuntu without making any change to your computer" and then press enter. Ubuntu will then proceed to boot from the CD. Once the Ubuntu has booted, you will see the Ubuntu desktop. You can then simply select data from any partition and copy it to an external drive. Once you have copied all the data you need, shut down the computer and then format the drive and begin installing new data.
Part 2. Linux Alternative Way to Recover Corrupted Data from Windows
If you don’t know anything about BIOS or don't want to risk anything going wrong due to the highly technical procedure described above, we have a much simpler solution for you. This is iSkysoft Data Recovery for Windows, a program that is designed to help you quickly and easily recover data from your corrupted Windows installation without having to alter the system.
Key Features of Recoverit (IS):
- It supports preview function, you can check the scanned files quality and contents before you recover them.
- It supports to recover data from digital camera, USB, hard drive, iPod player and other devices.
- This software supports to recover loss data due to software crashes, accidental deletion, unexpected power outages, virus infection and even improper operations.
- Recoverit (IS) also has Mac version, which supports macOS Sierra and all other versions.
Step-by-Step Guide to Recover Lost Data
Step 1 Launch Recoverit (IS) for Windows
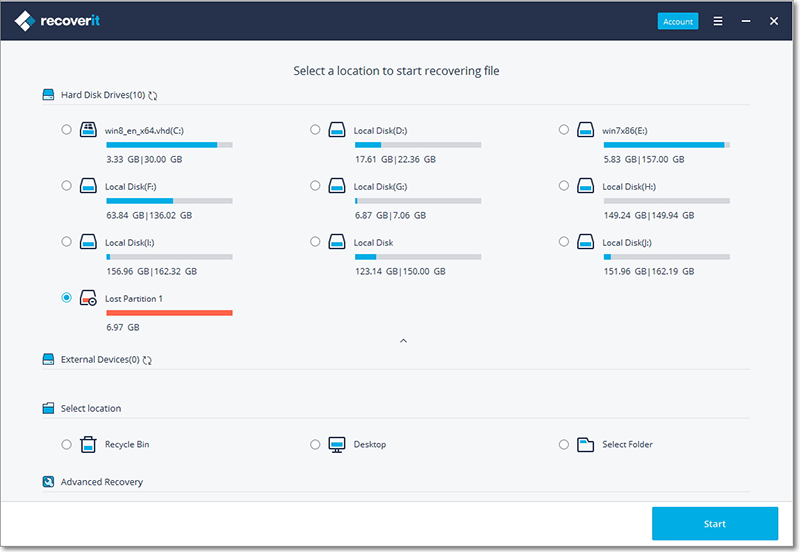
Download and install the program to your computer. Be sure to install the program on a separate drive to avoid overwriting the losing data. Launch the program and then select "Raw File Recovery" from the main window.

Step 2 Scan the Hard Drive
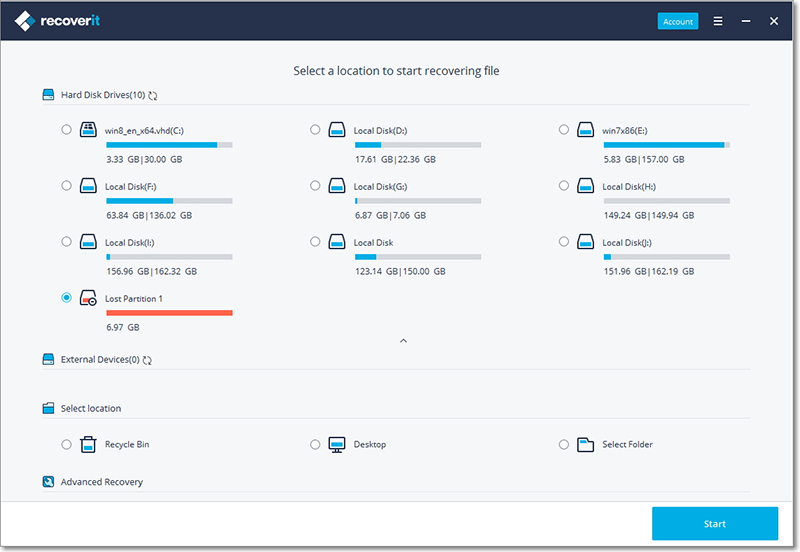
In the next window, select a partition that contains the missing files from the list and click "Start" to begin the scanning process. You can choose to scan "For All Files" or only "For Deleted Files".
Part 3. How to Recover Corrupted Data from Mac Using the Safest Tool
If you encounter the same problem on a Mac, iSkysoft Data Recovery for Mac will come in very handy. The program is also just as easy to use and with relatively the same features as its Windows counterpart. Here's how to use it.
Step-by-Step Guide to Recover Corrupted Data
Step 1 Launch Recoverit (IS) for Mac
Just as the Windows version, you can also download the Mac version from its official website. Install it on Mac, and then you will get a window showing the 6 file type options of this software. You can check one or more from them and click "Next" button.

Step 2 Scan the Hard Drive
Next you can select the partition or drive which contains the lost data. Then click "Start" button to start to scan this partition or drive to find your lost files. You can click use filter feature to select a specific file type to scan, like images, videos, audio or documents.

Step 3 Recover Lost Data from Mac
Not need to wait a long time, you will see all the scanned data listed on the next window. You can click them to preview the content and quality. Find the data you want to get back, you can click "Recover" button to begin the recovery process. When it is over, please save the recovered files to another drive.

Part 4. What is Data Corruption and How to Prevent it
Data corruption happens when a code is intentionally or unintentionally changed from its original from. It can happen quite randomly and although most people usually don't know how or why it happens, there are several measures you can take to ensure you are not a victim of data corruption.
The following are just some of them:
- Constantly analyze your hard drive to ensure that it remains healthy. You can utilize HD Tune which is a hard drive analysis utility.
- Malware can be a major cause of data corruption so it goes without saying that you should invest in good anti-virus software so as to ensure that malware is detected before it can cause any major issues.
- You can also easily guard against data corruption by upgrading your hardware. This may seem like hard work but it may prove to be worth it in the long run. Just don't do It yourself especially of you don't know anything about computer hardware, have a specialist help you with all the processes involved.
- Consider changing your drives. Relatively newer drives are less likely to experience data corruption than those that have been in use for a long time. It may be due time to replace the aging drive and prevent data corruption issues.


