"Hello, all! I am a big time user of Outlook and communicate with my clients through it for every message. However, accidentally I deleted a couple of emails from different customers, which cost me a lot of time in following the logistics. Is there a better way to recover Outlook emails with ease?" --- From a user.
Recovering Outlook emails is no longer a tedious process. The reason to due to the availability of the technology and the programs. These programs help you in the retrieval of the emails in a few simple steps. In this task, we are proceeding to look at the best three methods that are available to recover emails from Outlook.
Part 1. The All-in-one Way to Recover Outlook Emails
It would be pleasant to recover all the lost emails at the touch of a button. Yes! You can do it with the help of iSkysoft Data Recovery for Mac (or iSkysoft Data Recovery for Windows) software. The program has an excellent algorithm that helps in retrieving data within a few minutes from any device.
In addition to revival part, the other functionality is the recognition part, where it can identify any file available, making it easy to retrieve everything in simple steps. The flexibility offered by the program is because of the several modes it contains. Every click has a particular action that makes it easy to scan for the required data.
Why Choose This Outlook Email Recovery Software:

- The tool ensures you convenient data recovery within several steps.
- Applying "deep scan" mode, you can either recover the recently files or to save files from the partitions.
- It could also identifies different files according to their types or folder locations.
How to Easily Recover Outlook Emails by Yourself
Step 1 Choose the File Formats
Upon opening the launch screen, you will notice the options through which you can recover data. You will be seeing the following Recoverit (IS) screen on your computer window. In this screen, Recoverit (IS) will ask you to choose the file formats that you are willing to recover. Selecting "Email" tab from the list of available categories. Press the "Next" button at the bottom to continue to the next screen.

Step 2 Click the Scanning Partition
In the subsequent screen, you will see locations that iSkysoft will scan. These include common location, hard disk, external removable device, and I cannot find my partition options. Choose the respective option from the choices and press the "Start" button to launch the scanning process.

Step 4 Find the Outlook Emails
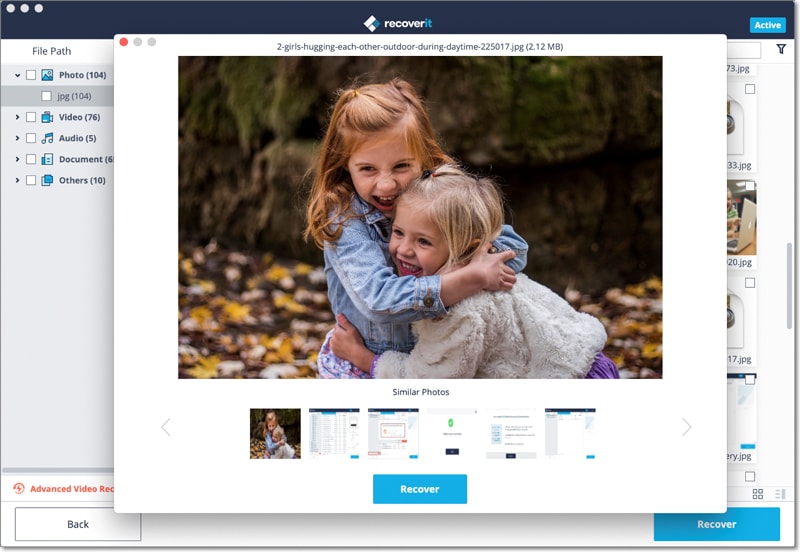
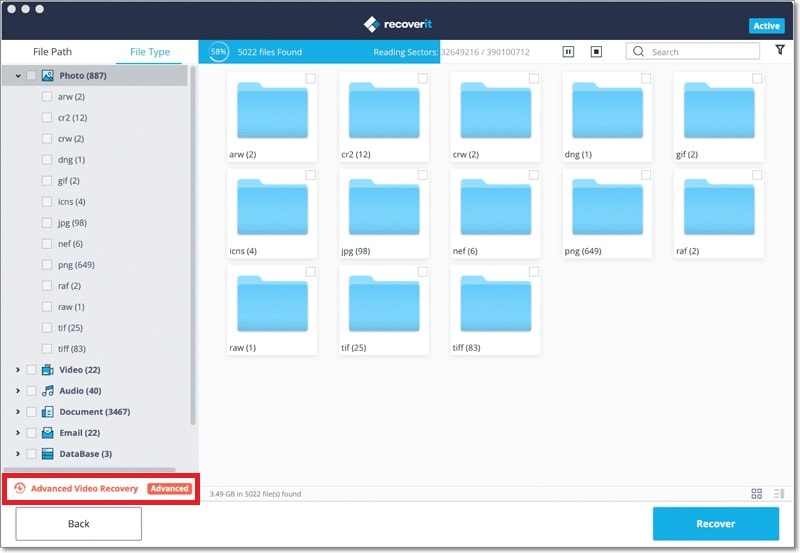
You can scan for the information in a few seconds by choosing quick scan technology. Once the scan is complete, it will display the results in the window. You can find the files as "Files View" and "Tree View" structure. You can click on a specific file to preview the content. Mark the required files, and press the "Recover" button to save them onto your Mac.

Step 5 [Alternative Mode] Turn to "Deep Scan" Mode
There were no results using the standard procedure, iSkysoft will give you the chance to use deep scan mode. Check the "Deep Scan" option at the bottom of the window to scan for data.
Part 2. How to Recover Sent Email in Outlook Using the Common Way
The following steps are helpful in retrieving sent email using Outlook.
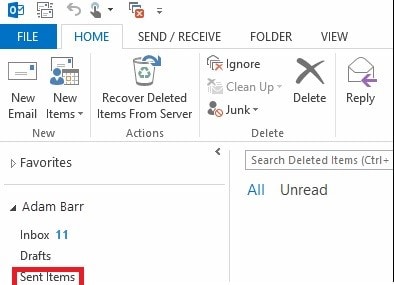
Step 1. Launch Outlook application and sign in with your ID and password. Navigate to your email folder list and choose the "Sent Items" from the side ribbon as shown in the figure below.
Step 2. Selecting it will open the messages that you have sent. You can quickly select a message that you wish to recall. At the identical time, make sure that the Message tab is open. From the Move group, click "Actions" to collapse the icon. From the list of drop-down icons that appear, choose "recall this message" option.
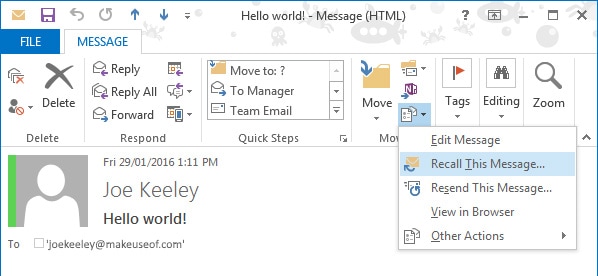
Step 3. As Windows 7 offers a built-in backup program, you can directly use the option to create a backup. Primary, you have to launch the program by pressing the Windows icon and typing "backup" in the search box. Once the results appear, you will notice the following screen.
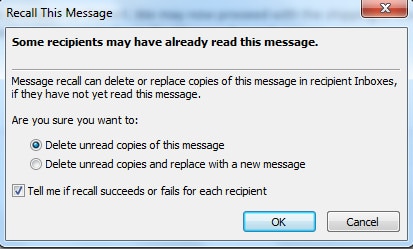
Step 4. Microsoft Outlook also gives you the opportunity to let you know whether the recall was successful or a failure. You can choose this option as shown in the picture above while you recall a sent email. Once you decide this option, you will be able to see tracking icon that appears alongside the message that will provide you the summary of the results. Upon clicking okay, the recipient will receive a message stating to delete the original email.
Part 3. How to Recover Archived Emails in Outlook
To recover archived emails in Outlook, follow the below steps:
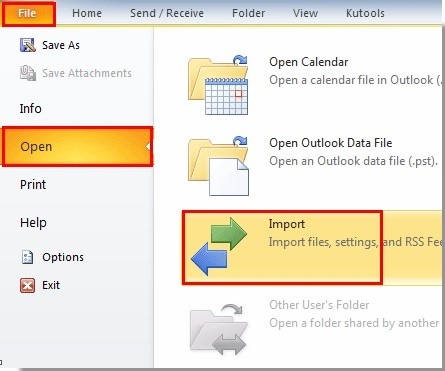
Step 1. Open Outlook application, click "File"and choose "Open and Import".
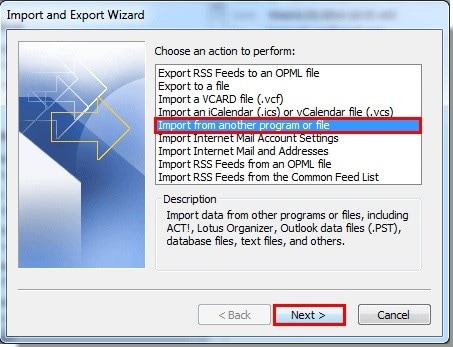
Step 2. In the import and export wizard, look out for "import from another program or file" feature and click the "next" button.
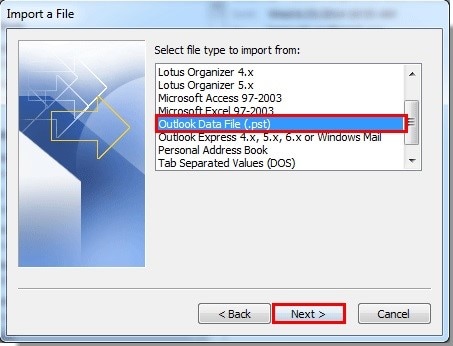
Step 3. When the import a file dialogue box appears, scroll down and look out for "Outlook data file (.pst)" file type and press the "Next" button at the bottom.
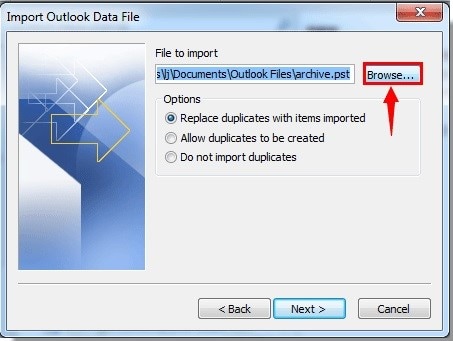
Step 4. A new pop-up window will open up which will ask you to choose the file. You can click the "Browse" button as shown in the picture below.
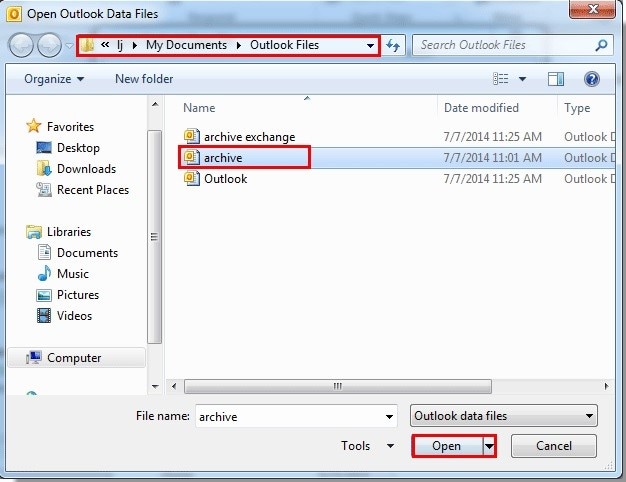
Step 5. Choosing the option will open Outlook files dialogue box. As a default, you will be able to look at the Outlook files folders automatically. From the available list, search for archive file that you wish to restore and then press the "Open" button.
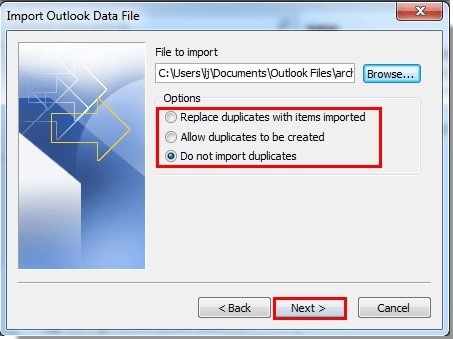
Step 6. You will now return to the Import Outlook Data File pop-up dialogue box. From the available options, pick up a particular choice, and press the "Next" button.
Part 4. How to Recover Outlook Emails after Reinstall?
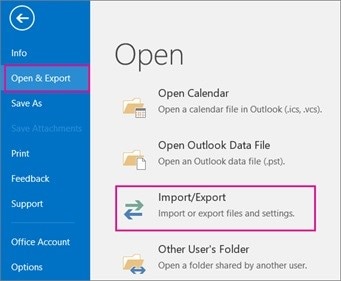
Step 1. Launch Microsoft Outlook and click the "File" tab and navigate to "Open" feature. Click on the "Import" from the right side of the window to open the export wizard window.
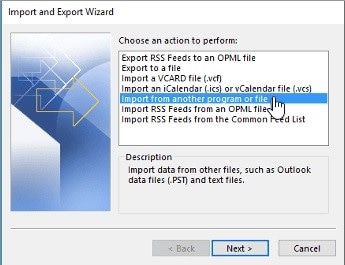
Step 2. In the pop-up window, choose "import from another program or file” option and press the "Next" button.
Step 3. From the "Select a file to import from" option choose Outlook data file (.pst) as the selection. Press "Next" to proceed to the subsequent step. Use the "browse" button to select the .pst file.
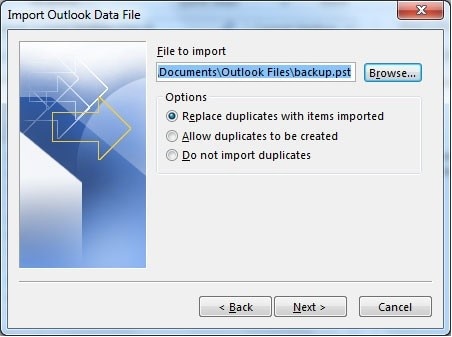
Step 4. You can now navigate to the different partitions of the hard disk to choose the .PST file which will help you in restoring the Outlook emails after reinstallation of the software. The folder can have a different name based on how you have created the folder. In addition, you can also have multiple PST files or folders. From the available folders, choose the latest file and press the "Next" button from the window. Ensure that "replace duplicates with items imported" option is active.
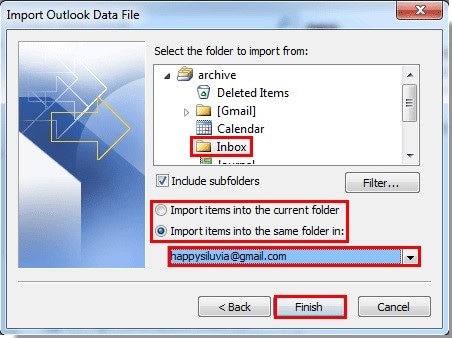
Step 5. You can now open the folder that contains the emails, usually inbox, and then select "import items into the current folder" option and finish the recovery process. The completion of the process depends on the data or the size of the archive folder. Before clicking on the "Finish" button, wait for the process to complete.
Although there are several ways through which you can retrieve Outlook emails from the methods above, choosing Recoverit (IS) for Mac or Windows is the easiest solution. All you need to do is answer three simple questions that will help in retrieval of emails from Outlook with ease.
Apart from retrieving emails, Recoverit (IS) is also capable of transferring data from one device to another, retrieve data such as music, videos, documents, and other files from an Android device or iOS device to Mac or Windows PC. Additional functions include the direct transfer of data between two devices over the Wi-Fi connection without the need for iTunes application.
As you have understood the importance and the procedure through which you can recover Outlook emails, it is time for you to decide on the best system that will ease your process in the recovery of emails from Outlook. Ensure to consider all the options before you move ahead as recovering emails can be tedious and requires an application that simplifies the process of retrieval. Download the trial copy of Recoverit (IS) for Mac or Windows today and experience the potentiality of it before opting for another procedure.


