Pictures say a thousand words and bring back good old memories in the future. The development of camera for a smartphone has given an excellent opportunity to capture all those precious moments without a retake. Nonetheless, like any other tech gadget, smartphones, iPads, and other gadgets are prone to a virus attack, corruption of the system during a system update, or accidental deletion. The first thing that we think about is the images contained in the device. We become tensed and worried, and the situation deteriorates if we do not have a backup. So how to retrieve deleted pictures is a must be solved problem.
Part 1. How to Retrieve Deleted Pictures
The post talks about the use of a third-party tool, the iSkysoft Data Recovery for Mac (or iSkysoft Data Recovery for Windows) which is a safe recovery tool. With the help of the software, it is possible to retrieve all the deleted pictures from your iPhone, iPad, an iPod. The latest algorithms and scanning technologies assist in the recovery of the data using innovative methods.
Why Choose This Software to Retrieve Deleted Pictures:
- Flexible recovery settings
- One-click pause and start scan
- Scan and select the file types
- Filter file formats using folder trees
- Distinguish valid and invalid files before recovery

Step-by-Step Guide on How to Retrieve Deleted Pictures
Step 1 Download the Photo Recovery Tool
You can download the software by visiting the official website of iSkysoft. After completing the installation, launch it by clicking the icon on the desktop. You will notice four recovery methods appearing on the product window. You have to choose "Photo" tab from the main window, and click "Next" button later on.

Step 2 Search for Deleted Pictures
The program is capable of retrieving corrupted files, accidentally deleted images, and emptied the trash. You will notice the following screen appearing, where the program will display the partitions on the hard disk. You can select a particular partition/volume and click the "Start" button to retrieve the recoverable files. If you do not see the external connected drive, use the "Refresh" icon.

Step 3 Retrieve Deleted Pictures
After finishing the scan, the program will display the recoverable files along with the validity attribute. The file arrangement is according to the file format and path. Therefore, you can easily click the images from the left pane to view the recovered files from the connected device. Selecting a file will show you a glimpse of the content in the preview screen. Use the check boxes to mark the files, and press the "Recover" button to extract them from the device. You just need to mention the saving location.

Part 2. How to Retrieve Deleted Pictures from Photos
Apple made subtle but significant changes to Photos. The already familiar Trash folder within the iPhoto is no longer available. If you have unintentionally deleted images from the Photos app, then continue to read ahead how you can recover them.
The first time you sign into your Mac and try to get a back deleted image, you will be wondering where the Trash folder exists in the Mac OS X operating system. Previously, it was possible for you to recover the deleted images from the iPhoto application using the Trash folder, which you could quickly access it from the sidebar. Nonetheless, there is no option of Trash in the Photos application. Even if you could access the sidebar, you will not be finding any Trash folder.
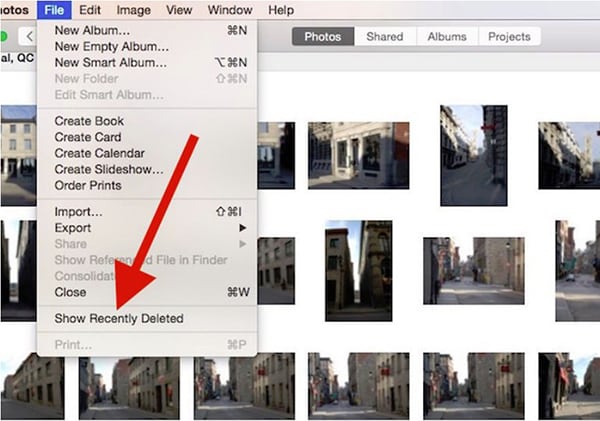
The process of retrieving images is simple is you know where to look and how to complete the action. Open the Photos program on your Mac and head to "Show Recently Deleted" option that is available under the "File" tab. It is in this folder that you will see the presence of all the deleted pictures, along with the details of the remaining days left for every image before the application removes them permanently. The process is similar to the "Recently Deleted" album that was present in the Photos app for the iOS. However, the Mac features no such facility on the Albums view.

Once you see the photos present within the folder, you can begin retrieving them to your Mac. You will further notice the presence of additional images if you are using any other iOS units and iCloud Photo Library. Apple provided the opportunity for iCloud to hold the deleted photos in the deleted folder for 30 days, after which, the application erase them permanently. To begin retrieving the images, you can mark a particular file and click the Recover button at the top. The program will add the picture back to the photo library along with its properties and original date.


