Photos are precious to every person as they like to keep them safe for future. They act as a reminder of their fun old days with their loved ones. The photos may be of their school/college graduation, birthday, marriage or some other occasion. The fact that people like to preserve their old photos can't be refuted and is the same with every person. But what if you accidentally lose your favorite photos that you had stored on the computer during upgrading to Windows 8? It will not only be frustrating but also disheartening to lose your photos from the computer. You may want to know how to recover formatted photos from Windows 8. You can know more about photos recovery from Windows 8 in this article.
3 Steps to Recover Formatted Photos from Windows 8

Recovering photos or other data from the computer may depend on various factors and the operating system is one of them. As old recovery software/tools will not work on Windows computer. Good recovery software will help you recover formatted photos from Windows 8 and Recoverit for Windows is one of them. iSkysoft Data recovery is the among the top recovery software that you can find online and it is powered by the advanced algorithm to fast and secure recovery.
Why Choose This Formatted Photo Recovery Software:
- It is a fast and reliable tool to recover formatted photos from Windows 8.
- You can recover not only photos, but it is effective for audio, documents, emails, video and other types of files.
- It can recover files from hard drives, memory cards, USB flash drives, phone storage and other storage devices.
- It allows previewing files before recovery.
Steps to Recover Formatted Photos from Windows 8 PC / laptop
Step 1. Download the Software
Visit the official website of Recoverit and download the data recovery tool for Windows and install it. Launch the Recoverit by clicking on the desktop shortcut and select the types of file that you want to recover. In this case, it would be photos. Then Click "Next".

Step 2. Begin the Scanning Process
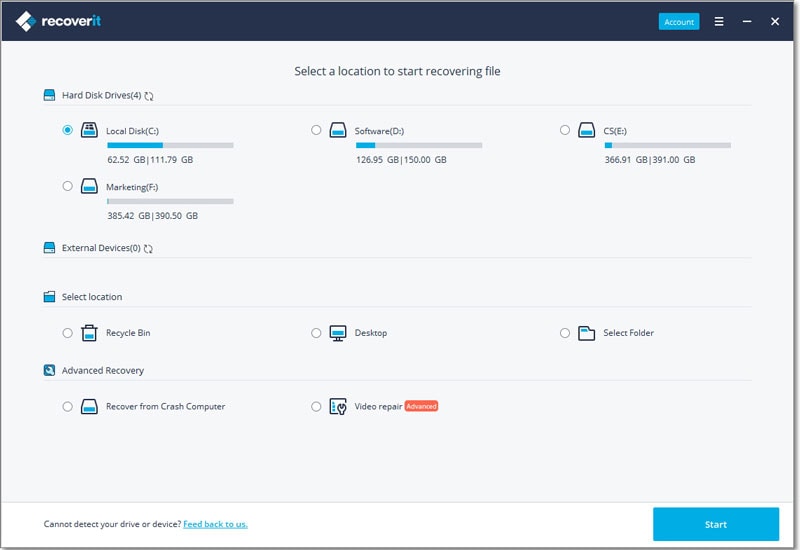
Then you need to select the drive or hard disk partition from where you want to recover formatted photos from Windows 8. Select the location and click "Start" to begin the scanning process.

Step 3. Recover Formatted Photos from Windows 8
When the scanning process is over, you can select a file found at that location and click "Preview". If the quick scan didn't find the photos that you want to recover, click on "Deep scan" to perform an in-depth scan of the drive to find your photos.
When your files that you were looking for are listed in Recoverit, click on "Recover" button and select the path where you want to save the recovered files.


