Contents
- 2. Windows 10 Download & Install
- 2.1 Windows 10 Download
- 2.2.Windows 10 Free
- 2.3 Windows 10 Review
- 2.4 Windows 10 Upgrade
- 2.5 Windows 10 ISO
- 2.6 Windows 10 Features and Price
- 5.1 Windows 10 Trial Copy
- 5.2 Windows 10 YouTube
- 5.3 Windows 10 Versions
- 5.4 Windows 10 Office
- 5.5 Windows 10 Media Player
- 5.6 Windows 10 Software
- 5.7 Windows 10 Multiple Desktops
- 6.1 Downgrade Windows 10
- 6.2 Windows 10 Problems
- 6.3 Windows 10 vs Yosemite
- 6.4 Cortana vs Siri vs Google Now
- 7.1 Free Music Downloader for Windows 10
- 7.2 Record Audio on Windows 10
- 7.3 Burn DVD on Windows 10
- 7.4 Free DVD Creator for Windows 10
- 7.5 Free YouTube Downloader for Windows 10
- 7.6 PDF Software for Windows 10
- 7.7 PDF Editor for Windows 10
- 7.8 Data Recovery for Windows 10
- 7.9 iPhone Data Recovery for Windows 10
- 7.10 Video Software for Windows 10
- 7.11 Edit Video on Windows 10
- 7.12 Video Converter for Windows 10
- 7.13 iTunes Alternative for Windows 10
As more and more users complain about the functionality of windows 10, many individuals who have a previous version of Windows, are wondering if Windows 10 is really ready. Amongst the abundance of graphical related problems that users have been complaining about online, one of the most annoying problems is that they can't burn DVD on Windows 10. This can prove to be a headache to say the least. While one may assume that they can downgrade from Windows 10, due to this DVD burn related error, unfortunately, once you upgrade to Windows 10, you cannot downgrade to a previous version of windows.
Fortunately however, this appears to be a software related to this problem and not an operating system. As such, by utilizing a credible third party software, you can alleviate that problem as soon as you finish reading this article.
Burn DVD on Windows 10 with the Best DVD Creator
If you have been having a problem with burning DVDs ever since you upgraded to Windows 10, you'll be glad to know that you can utilize iSkysoft DVD Creator for Windows (or iSkysoft DVD Creator for Mac) to solve the "can't burn DVD or CD on Windows 10" problem. Based on the abundance of positive reviews that can be found online, which have been made by Windows 10 users, this program has had the highest success rates in comparison to other third party burner programs that are compatible with Windows 10. This is partially due to the fact that the creators of the software created this relatively new program, specifically with Windows 10 compatibility in mind.

iSkysoft DVD creator is essentially a more feature packed, superior version of Microsoft's flawed Windows DVD creator. The program in itself, comes with a wide range of DVD templates that you can utilize to create a unique DVD from ordinary videos. In addition to that, you have the option of being able to create a photo show that can run in sync with your favorite background music of choice. Moreover, one of the best features about this program is its flexibility as far as compatibility goes. Not only can you burn DVDs from a wide array of different video formats such as MPG, F4V, AVI, WMV, MKV and 3G/3G2, additionally, you can create DVD movies from web videos as well, such as online video sites like YouTube, Vuze and even Facebook.
Key Features
- Extremely Fast - Burn DVDs in minutes, not hours.
- Flexible Encoder - Immortalize your home movies regardless if it's from your computer, Android smartphone, iPhone, iPad or digital camera.
- Brand New Interface - Forget the complexity of other DVD burner programs, simply drag, drop and start the burning process in 1-3 minutes tops.
- Wide Array Of DVD Templates - Customize everything to your liking, such as predefined chapters, plus chapter titles and main menu options such as music, background image/video.
- Powerful Toolbox - Video editor to edit before burning, photo slideshow to burn images to DVD, one-click burn disk/bluray disk, etc.
How to Burn Videos to DVD on Windows 10
Burning a video DVD or photo show DVD with DVD Creator is fast and easy on Windows 10. In as little as 4 simple steps, you can complete the whole process.
Step 1 Import Your Videos
The first thing is open the DVD creator. On the top left hand corner of your screen you will see a section that says "Import" and at the bottom, you'll see a section that says "Drag videos or photos here". Then you can click the “Import” tab to locate your files, via file browser. Alternatively, if you know exactly where the video is, you can click and hold the video, and drag it to this section.
Step 2 Choose a DVD Menu Template
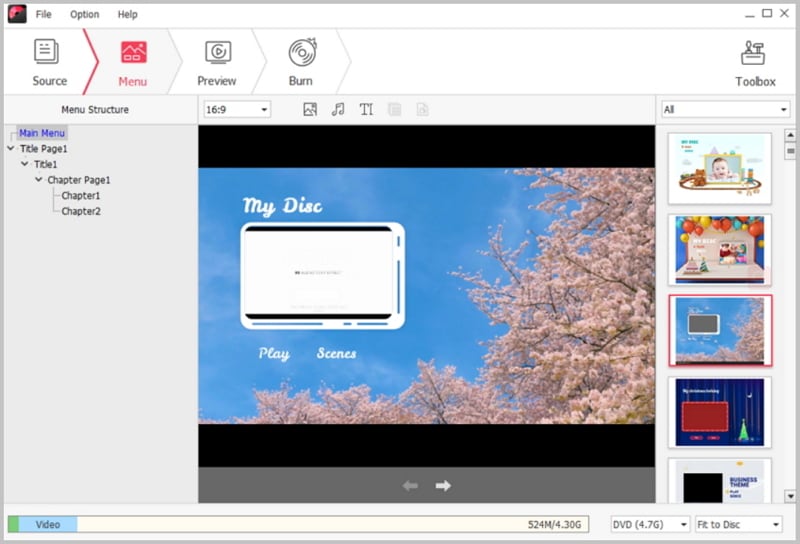
The next thing you can choose to do, is to select a DVD menu from the list of menu templates that appear on the right hand side of the screen. To do this, simply scroll down, to see all the sections that are available and click on the template that you desire. After that, click the portion that says "My DVD" and insert the title that you wish to use.
Step 4 Burn Your DVD
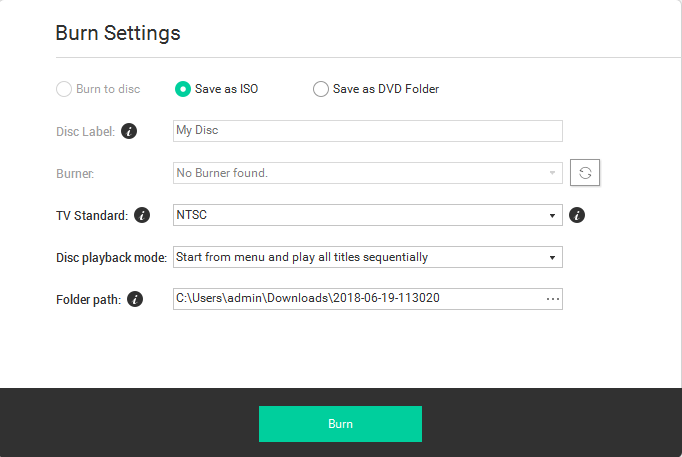
Once you are satisfied with your creation, click the "Burn" tab. Then a screen will appear to ask you to insert the location of your DVD drive. If you have multiple DVD drives on your computer, go to "My Computer" to see the name of the drive that has your blank DVD, and ensure that this is the same drive that you select, while you are at the Burn section of the software. Finally, click "Start" to initiate the burning process.
Video tutorial on how to burn DVD with iSkysoft


