Contents
- 1. iPhone Data Recovery Software
-
2. Recover iPhone Files
-
8. Recover iPhone SMS
Losing your important test messages (SMS) on your iPhone is one of the worst things to happen to you. Whether it is unintentional or due to some system processes, losing important SMS is sure to annoy almost anyone and give him/her a headache. If you have a backup of it, it definitely won't be a problem, you can simply restore SMS messages from your backup and the lost important text message will be back in no time. But what if you don't have that handy backup? What should you do to recover lost SMS from iPhone? What software is capable of retrieving deleted text messages from iPhone? This article will show you how to get back deleted text messages on iPhone.
Part 1: Recover Deleted iPhone Messages (Including iPhone SE and 6s)
Retrieving deleted text messages from iPhone is never a daunting task. Almost anyone can perform the iPhone SMS recovery process. There are plenty of iPhone text messages recovery software available on the market. iSkysoft iPhone SMS Recovery is one of the best to recover iPhone SMS in 3 ways. Not only that, the software is also capable of retrieving lost photos, contacts, notes, reminders, call history, calendar, Safari bookmarks and many other data from your iPhone. This iPhone text messages recovery software is fully compatible with Mac OS X 10.6 or above, including the latest OS X 10.11 El Capitan.
Key Features of iSkysoft iPhone SMS Recovery
Anyone can handle it to recover data from their iPhone SE/6s Plus/6s/6 Plus/6/5s/5c/5/4s/4/3GS.
- 3 Recovery Modes: Allows to recover data directly from iPhone, extract iTunes and iCloud backup files.
- Up to 18 File Types: Recover lost text messages, MMS messages, iMessages, contacts, photos, videos, notes, etc.
- Various Data Loss: Retrieve data lost for deletion, factory settings restore, jailbreak failure, iPhone lost or broken, etc.
- Preview: Lets you read and preview found data before recovery.
- Flexible Recovery: Selectively recover any item you want from iPhone and iTunes backup files.
User Guide to Directly Recover Text Messages from iPhone (iPhone SE & iPhone 6s Supported)
Step 1. Start by launching the program and having your iPhone connected to your computer. Once the application's window appears, you will be presented with two options for recovery. To recover text messages that you may have deleted, select "Recover from iOS Device". This will recover messages directly from your iPhone via a thorough scan of your phone's file system.
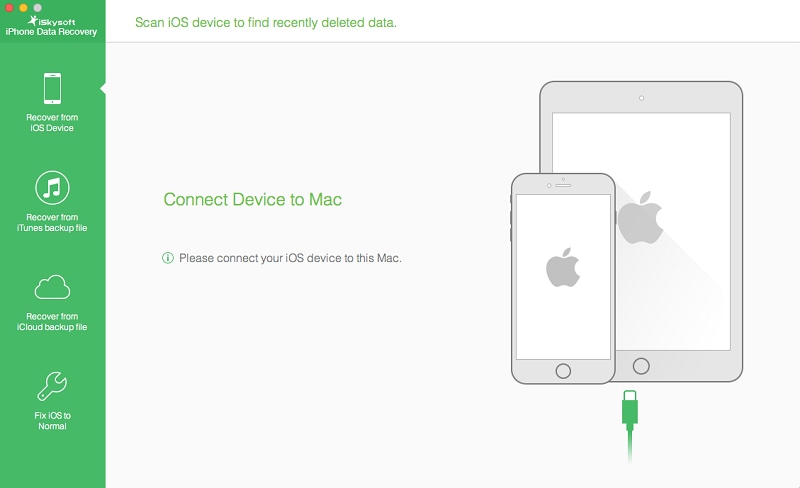
Step 2. Click on the "Start" button for the application to start searching your phone's file system for deleted messages.
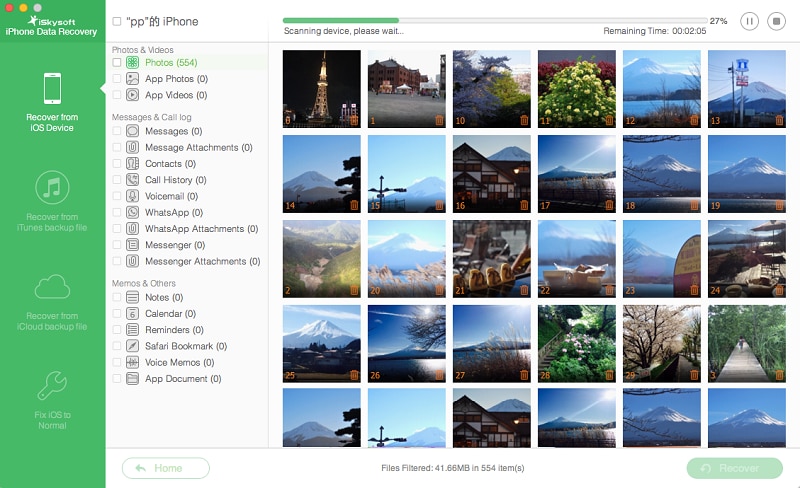
Step 3. After scanning, the software will display all messages that can be recovered under the Messages category. You may recover them all or select a number of messages to be recovered. Proceed with the recovery by hitting the "Recover" button at the lower portion of the window.
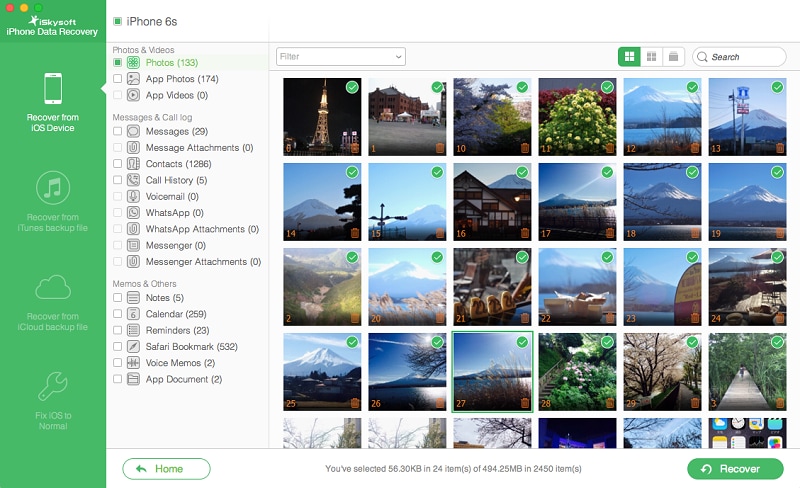
Video Tutorial: How recover deleted text messages from iPhone
Part 2: Recover Deleted Messages from iTunes Backup
The iSkysoft iPhone Message Recovery will still be handy in this method. It will, however, use a different implementation to recover your deleted messages. This method, however, requires that you have synced or created a backup using iTunes previously.
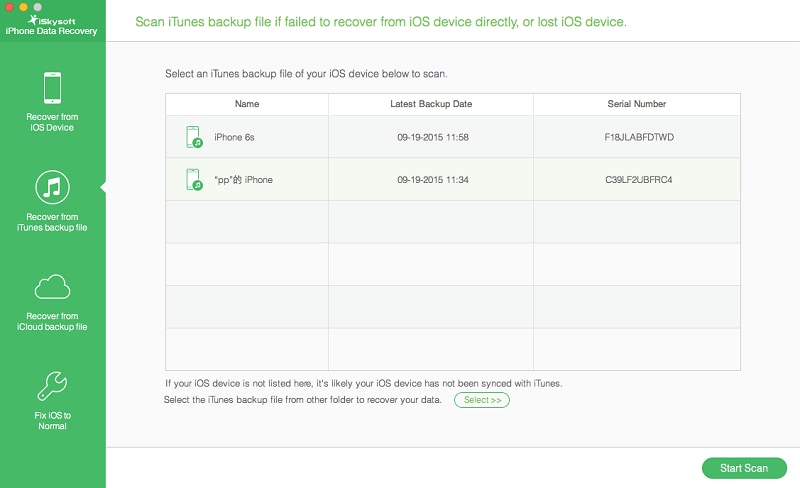
Step 1. When the application launches and displays the main window, select "Recover from iTunes Backup File". All backups created using iTunes will then be displayed. Select the backup containing the messages you want to recover. You may repeat the process should you want to recover more messages from other backups. Hit "Start Scan" once you've chosen a backup. This will prompt the software to scan the backup for messages and all other data including music, videos, photos and more.
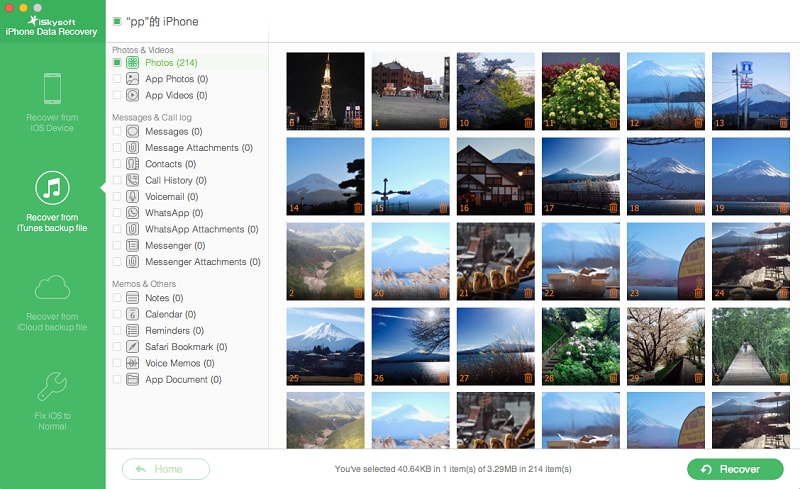
Step 2. Scanning may take a little while and you may opt to pause or cancel. But once the software has finished scanning the backup you've selected, all recoverable files will be displayed and made available for preview. Head to the Messages category to look for the messages you may want to restore. Once found, select your messages and click on "Recover" to save them to your computer.
Video Tutorial: How recover iPhone text messages from iTunes backup
Part 3: Recover Deleted Messages from iCloud Backup
The third workaround you can try is to use an iCloud backup to restore deleted text messages. If you don't want to restore the whole iCloud backup to your iPhone, you still can use iSkysoft iPhone SMS Recovery to selectively recover text messages to your iPhone. Follow the steps below.
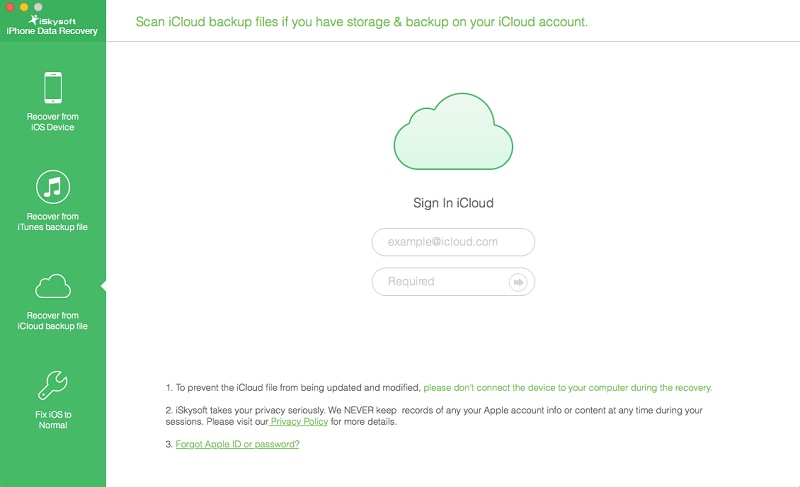
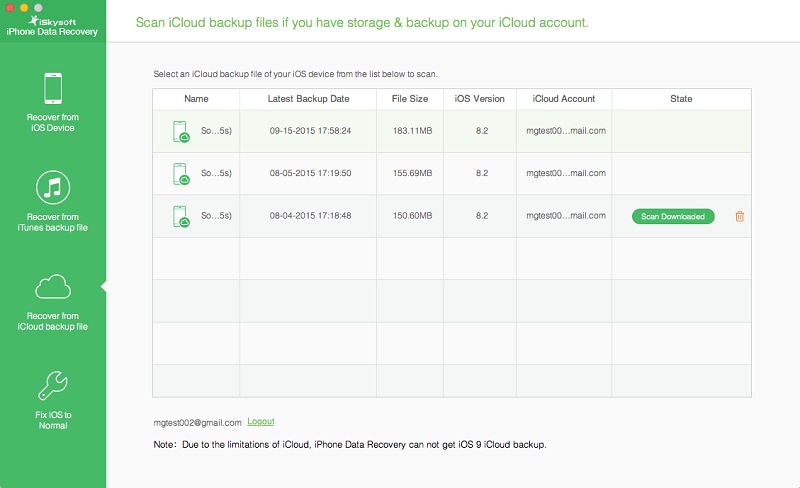
Step 1. Choose "Recover from iCloud Backup File" after running the program. Then sign in with your iCloud account.
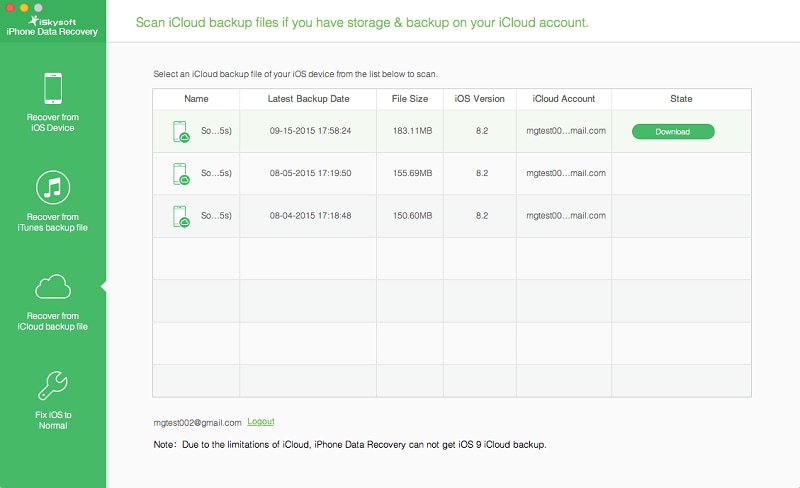
Step 2. Once you've got in, choose the backup file which contains your messages and click "Download" to get it on your computer.
Step 3. The downloading will take you some time. Once it's done, click on the "Scan Downloaded" to extract the backup file, so that you can preview the content and take the messages you want.
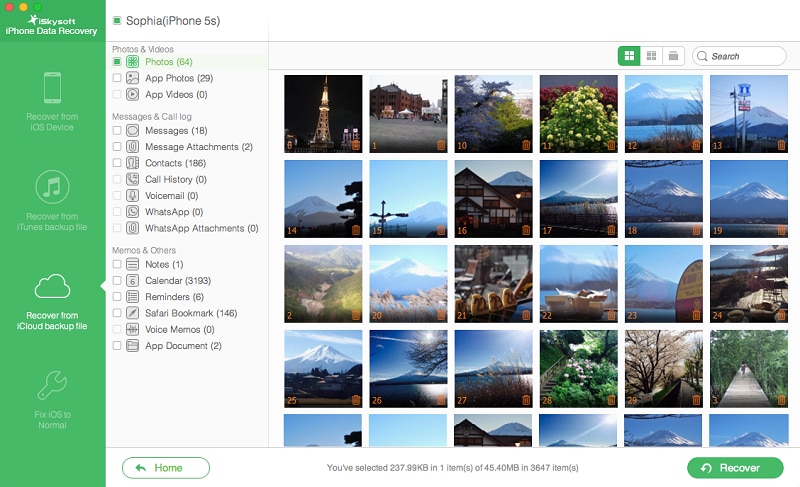
Step 4. Now, you can preview and the choose the messages by the category of "Messages" on the left. Tick the items you want and click "Recover". You can save your deleted messages from iCloud backup to your iPhone now.
Video Tutorial: How recover iPhone SMS messages from iCloud backup
Part 4: About iPhone Message Issues
You might have realized by now that there are several ways that you might be needing in the near future to keep all your messages intact and safe, most especially if you have accidentally deleted them. Keep in mind, however, that there are still several issues you may encounter and you need to be really sure about what to do when you experience such issues. To help you be more prepared, take time to read about some of the most-reported message issues from iPhone users:
Whenever you have problems with iMessages, you'll have to make sure you're using a device with iOS 5.0 or later, a very reliable Wi-Fi connection, and an Apple ID or phone number that's registered with iMessage via "Settings", then "Messages". To solve this problem, check your iMessage status for service issues that may be causing the problem. If you're sure that you're registered with iMessage and there aren't any issues that may possibly cause the problem, try restarting your device and resetting network settings on your iPhone.
Before proceeding with troubleshooting, verify that your SIM card is working perfectly fine and your iPhone has a strong and reliable cellular network connection through a cellular network provider. To troubleshoot, go to "Settings" on your iPhone and switch off airplane mode. Ensuring that your phone's cellular signal is consistent and strong, restart your iPhone. Once it boots back up again, go to "Settings, General, Reset, then Reset Network Settings". The last step is to try removing your SIM card and inserting it again.
You may experience this problem if you put your SIM card into another device that does not support Apple's iMessage feature. This is very common for iPhone users transferring to Android phones. While this issue may seem quite a real headache especially if receiving and reading important messages on a daily basis is your thing. Do not worry, though, as solving this problem is pretty simple. Before actually using your SIM on another device, on your iPhone, just head to "Settings", then "Messages". Turn iMessage off to allow you to receive messages via the exact same SIM card on devices that don't support iMessage such as Android devices. Keep in mind that if you weren't able to turn off iMessage, it will continue to receive iMessages from other iOS devices for up to 45 days, instead of using SMS or MMS.
While there may be a number of issues you may encounter as an iPhone user, remember that there are always several workarounds and approaches to solve your problems. Should you have issues with your messages and other iPhone concerns, feel free to browse the Internet for resources and possible solutions as a lot of iPhone users like you may have already encountered and solved the problem. Take not, however, that if you aren't really confident in troubleshooting on your own, it would be better to seek the help of experienced personnel in Apple stores.


