With the arrival of iOS 8, it is vital and necessary to prepare your iOS devices beforehand. An upgrade always requires space on your device but you may not have any, what with all the photos, videos, movies, and music which you have stored on your iPhone or iPad. And you don't want to lose those files either, when the upgrade comes barging onto your device.
So what do you do? Stop panicking because we are here to help. Read on.
How much iPhone storage does the iOS 8 upgrade need?
When iOS 7 arrived, device users needed 700MB of space for the operating system and the apps to download properly. Now iOS 8 demands more than 1GB. Yes, you read that right - 1 Gigabyte. 1,000MB.
This means that you need to do some serious cleaning out of your phone before the iOS 8 upgrade. You can do it by closely looking at what you have on your phone, and deciding whether to nuke it or not. Be really serious about this. Do you need 10 photos of the same thing? Do you need that video of someone falling over? Delete, delete, delete. Then do the following:
# Delete Photo & Video
The videos are probably the biggest space hogger on your phone. And you have probably been snap-happy with your camera, so the number of photos is probably past the 1,000 mark. Right?
The best method (and the fastest) is to use Dropbox or iCloud. But I would choose Dropbox over iCloud for the following reasons. One, iCloud doesn't give you a lot of space, two, iCloud is slightly slower. On the other hand, Dropbox has got this act down tight, and you can rely on them 100%. Their syncing is a lot faster.
But for the purposes of this article, let's use Dropbox. Assuming you have already installed the desktop app for Dropbox, the first thing you need to do is go to your Dropbox sync icon in the Windows taskbar and right-click it. Go to "preferences" and then "import". Tick the box for camera upload. Then connect your iDevice to your computer using the USB cable, and then a box will pop up asking if you want to import the contents of your phone. Naturally say yes, and let it do its work.
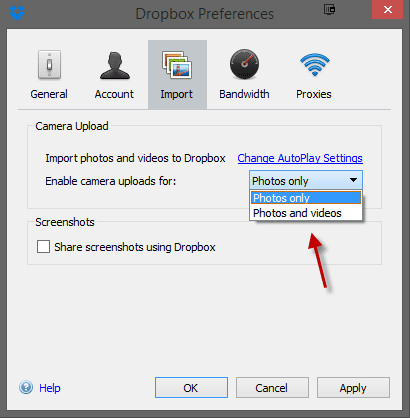
It will create a folder in your Dropbox account where each photo and video will be placed. Obviously videos will take longer, and speed is dependent on your internet connection.
When it has finished, you can now completely wipe all photos and videos from your phone. Well done. How much space did you save?
# Movies, Music, Apps
These three have been merged, because you can do the same method for all of them. Use iTunes.
You may already have the files backed up to iTunes, syncing as you go. But you may not have, for reasons of space on your computer. So we need to get them back again.
Use your USB cable to connect your iDevice to iTunes. A few moments later, you will see your device show up on the left hand side of iTunes.
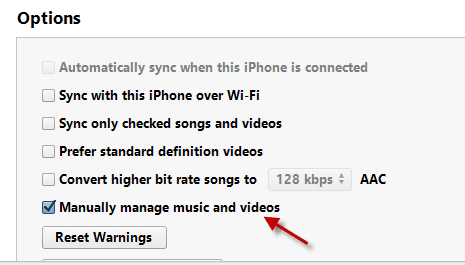
The list under "Devices" is what you have on your iDevice. Click on the "<i>name</i>iPhone" and you will find the main screen for your iDevice. Cast your eyes downwards and you will see a box with options. Tick "manually manage music and videos". This will stop syncing and allow you to move the files yourself. It is much easier this way.
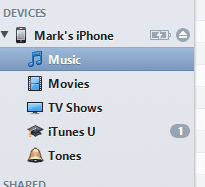
Then go back to the main iTunes screen and select a category beneath "nameiPhone". Decide which files you are deleting (if any) and remove them. When you have a list of what you want to keep, then highlight them all (Edit-->Select All) and drag them to the top. The top is your computer. iTunes will then sort the files into their correct categories. Check the computer to see if they are there.
Repeat this process so you have backed up all of your movies, music, and apps. When you can see them on your computer, you can delete them from your iDevice.
# Clear Your Cache
Finally, you can claw back a few megabytes by clearing the cache of some apps. If you search for a solution to this on Google, you will mostly find people pushing their own apps, insisting that theirs is the best. But honestly, the best way is to go to Settings-->General-->Usage-->Storage. There you will find all of your installed apps. Then the fastest way is to delete the apps. I know, it's radical. But deleting them also deletes all the crap that came with it over time.
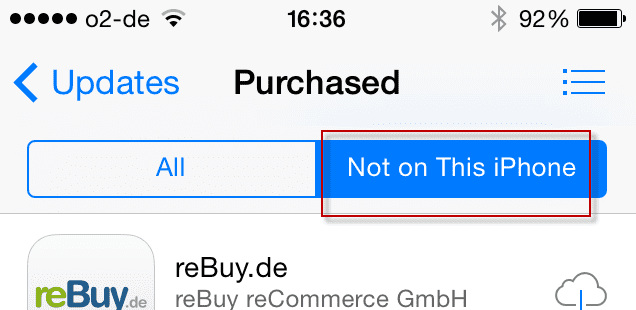
It's easy to get your apps back though. Just go to App Store-->Updates-->Purchased. Then tap "not on this iPhone". You will then see a list of all the apps you have ever downloaded. Simply tap all the ones you had and they will all quickly reinstall - without the crap.
It may be a bit annoying doing all of this, but if you didn't do it, you would be cursing if iOS 8 completely wiped all of your files, and there was no backup. Spend 15-20 minutes getting this done, and you will then have peace of mind. Plus some extra space on your phone or pad.
Tips: Backup the data above before deleting
Don't what to lose those photos, videos and music due to iOS 8 upgrade? Here is a solution below: You can use dr.fone for Mac to get them backed up on your computer first.
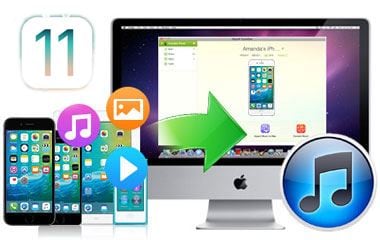
Transfer iPhone/iPad/iPod touch music, videos and photos to Mac and iTunes.
One-click backup to iTunes and manage your songs, videos, and photo albums.
- Copy music from iPhone, iPod, iPad to Mac or iTunes.
- Export videos from iPhone, iPad, iPod to iTunes/Mac.
- Transfer all photos from photo album to Mac or iTunes.
- Copy playlists with rating and play counts to iTunes.


