It's a cool thing to get the newest iPhone SE. It almost contains everything that iPhone 6s gets, for example, the same camera and processor, with less bucks. It means you can take the high quality iPhone Live photos as well. However, you'll also face the problems that all iPhone 6s users face: can't make iPhone Live Photos work on Google Slide, can't share iPhone Live Photos to Instagram, or can't share iPhone Live Photos with other none iPhone 6/6s/SE users. Never mind. This article tells you how to keep iPhone SE Live photos live by converting them to animated GIF images as well as how to convert videos from iPhone SE to GIF images too.
- Part 1. How to Convert Live Photos to Animated GIF Images
- Part 2. How to Convert iPhone SE Videos to GIF Images
Part 1. How to Convert iPhone SE Live Photos to Animated GIF Images
Live photo in iPhone SE contains 3 seconds video and a still photo. You can see instead of in JPG format, it is in a .mov format. No. Never think it is a video too. When you export live photos from iPhone SE to computer, they become ordinary still photos. You can trydr.fone to turn them to GIF images before exporting them to your computer or sharing online. Here are the steps.

dr.fone - Turn Videos and Photos to GIF Images
dr.fone is a specially designed for Apple device users to manage medial files, including transfer music, videos, photos, iTunes U, Podcasts, etc. from iPhone, iPad and iPod to iTunes Library, computer, and another Apple or Android device, and vice versa. Now the update version comes with converting iPhone live photos to animated GIF images and turn photos and videos on iPhone, iPad and iPod to GIF images. It has separated version for Windows PC and Mac. You can download the trial version on your computer to have a try!
Step 1. Connect iPhone SE with computer
Use the USB cable to connect your iPhone SE, and plug it into the USB slot on your computer. Launch dr.fone and click the "Trust" button on your iPhone SE. By doing this, the software will detect your iPhone SE automatically, displaying the iPhone SE information on the main window.

Step 2. Convert iPhone SE live photos to GIF images.
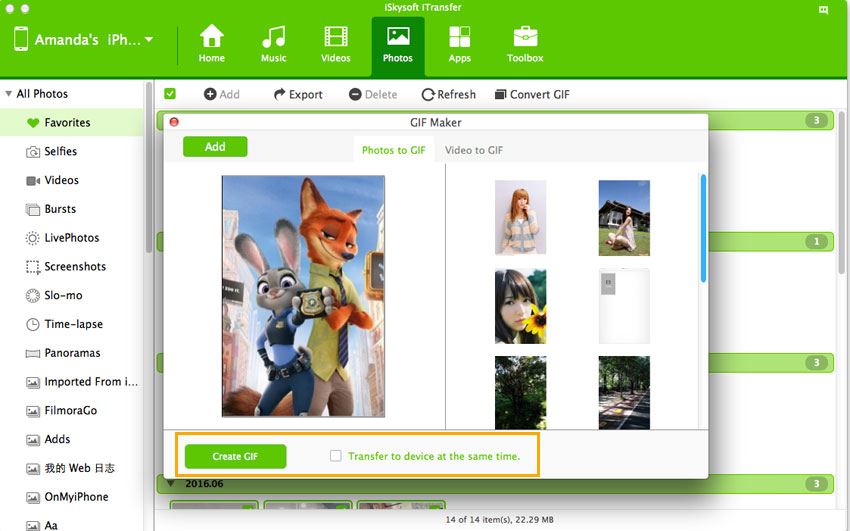
Click "Photos" at the top menus to enter the photo management window. From there, find the category – iPhone Live Photos. Click to open it. From there, choose the iPhone SE live photo you want to convert to GIF and click "Convert to GIF"(Mac version) or "GIF Maker" (Windows version). After then, set up the frame rate and output size, click "Create GIF" to save the GIF image. By default, the GIF images will be saved to the default destination on your computer. You can also set up your own folder to save it.

Part 2. How to Convert iPhone SE Videos to GIF Images
Besides converting iPhone SE live photos to GIF images, dr.fone also supports converting photos and videos to GIF images. As for converting iPhone SE photos, I think it is a great feature for users who like to use the "Burst Mode" in iPhone. Users can turn the still photos into an animated GIF image, as if it is a short video. Let’s see how to convert iPhone SE photos and videos to GIF images.
Step 1. Install dr.fone on computer
Click the download button to download and install dr.fone on your computer. Use the digital cable to connect iPhone SE with your computer. Launch dr.fone and tap the "Trust" option on your iPhone SE. If connected successfully, then your iPhone SE will be displayed in the main window of the software.

Step 2. Convert videos on iPhone SE to GIF images.
Click "Videos" to display all the videos in your iPhone SE. The videos you’ve taken with your iPhone SE are in the Photo category. Choose a video and right click to choose "Convert to GIF" to a GIF making window. From there, set up the duration for the GIF image and frame rate. Click "Create GIF" to save it.


