- Part 1. How to use iTunes to import playlists from iPod, iPhone and iPad to iTunes on Mac
- Part 2. How to use dr.fone for Mac to copy playlists from iPod, iPhone, iPad to iTunes in Mac El Capitan
Sometimes, you want to transfer your playlist or music from your iPhone, iPad or iPod but iTunes does not allow that. This is because iTunes has so many restrictions to what you can do with your iPhone, iPad and iPod. Thankfully, there are a number of applications that can act as iTunes for you with even more and better functionality than the iTunes itself. Although, there are lots of them, the best one is dr.fone for Mac. It is the most reliable and has the most to offer.
Do you want to transfer your playlist from your iPhone, iPad or iPod? Do you want to transfer your music, videos, podcast etc from your iPhone, iPad or iPod to your Mac or other devices? dr.fone is the best tool to use for all these purposes.
Part 1. How to use iTunes to import playlists from iPod, iPhone and iPad to iTunes on Mac
Step 1. Connect your iPhone, iPad or iPod to your Mac computer and open the iTunes software. Click on the iPhone, iPad or iPod icon to access the content of the iPhone, iPad or iPod.
Step 2. Under devices, look for the playlist you want to copy to your computer and right click on the playlist name. In the options, select "Export".
Step 3. Name the playlist and select "XML" as file type at the bottom and click save. Make sure you save the file to an easy location like the desktop.
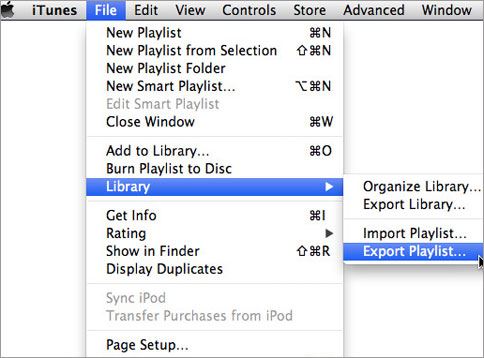
Step 4. Go to the “File” menu, open “Library” and select “Import Playlist". Choose the XML playlist file you exported or saved earlier.

The playlist from your iPhone, iPad or iPod has now been saved to your iTunes. Go to the playlist menu of your iTunes to view the playlist. You also need to have the music from the playlist in your iTunes library for the music to play.
Part 2. How to use dr.fone for Mac to copy playlists from iPod, iPhone, iPad to iTunes in Mac El Capitan
dr.fone gives you the opportunity to reproduce all your media files to the iTunes Library on your PC from your iPhone, iPad and iPod unlike iTunes to another iOS device with ease. It also lets you rip music, transfer album artwork and music information. To summarize, it allows you to do things that iTunes won't let you do.
Step 1: To copy playlists from iPod, iPhone, iPad to iTunes on Mac, connect your iPod, iPhone or iPad to your Mac computer and run the dr.fone app.
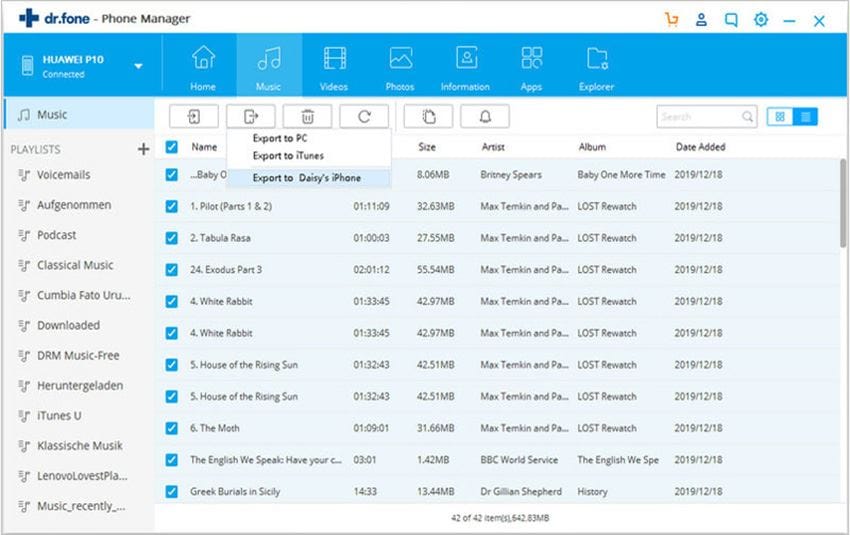
Step 2: The information of your device will be shown. Click the "Music" tab at the top of dr.fone window. In the left sidebar You will see the list of your playlists. Right click on the playlist you want to copy and select the "Export to iTunes" option. It will immediately start copying the playlist to your iTunes library. Or you can select "Export to PC" to copy the whole playlist to you local PC.
Features of dr.fone
- * Share without limit: iTunes limits the things you share from your devices but with dr.fone, there is no limit to what you share. You can transfer music, videos, playlists, album artwork etc to your computer and to other devices.
- * Transfer any media file to your device: dr.fone allows you to transfer media files from your iTunes and computer to your iPhone, iPad or iPod in no time.
- * Convert the media file: dr.fone offers you an option to convert the media file to any format that will suit your iPhone, iPad and iPod. So, you don't have to worry about the compatibility of the media file because dr.fone will make it compatible.
- * Best iTunes Companion: dr.fone does what iTunes can’t: copy songs, playlists, videos, photos and more from iPhone, iPad and iPod to Mac El Capitan. It works with iTunes perfectly.
- * Easy to use: The dr.fone has a very easy and simple interface. Everything is self explanatory and you don’t need any extra knowledge to use the software. It is also very fast, when transferring from your iPhone, iPad and iPod to Mac or from your Mac to your iPhone, iPad and iPod.
Video Tutorial: How to Copy Playlists from Apple Device to iTunes in Mac El Capitan


