Playlists are the best way to play music in a particular occasion such as a party, a road trip or in the mornings going to office. But when the occasion has passed, you want to delete the junk on your iPhone, you want to delete the unwanted playlists on the iPhone. Moreover, when you sync music to your iPhone, iTunes will automatically transfer some playlists already present in it such as Classical music, most played and recently added. Are you tired of these playlists? Do you want to delete them? Here’s how you can do that. Normally, iPhone won’t let you delete the native playlists from iPhone and you will have to manually select the songs and Playlists in iTunes to delete the playlists and avoid them copying again on your iPhone.
You can follow these steps to delete the playlists and avoid copying them to your iPhone again.
- Part 1. How to delete Playlists on iPhone
- Part 2. How to delete Playlists on iPhone using dr.fone
- Part 3. How to avoid syncing unwanted Playlists from iTunes to iPhone?
Part 1. How to delete Playlists on iPhone
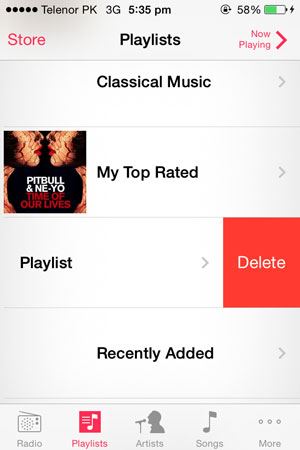
Open the Music App and Tap on the Playlists from the Buttons at bottom. Swipe from right to left and it will show the delete button. Tap on delete button to delete Playlists from iPhone. The next step is to avoid copying those playlists again to your iPhone.
This method will only help you with those playlists which you have made on your iPhone. It will not delete the native playlists transferred via iTunes. Moreover, this is a very tiresome process and it will take a whole lot of time, because deleting a simple playlist on iPhone doesn’t mean it will be permanently deleted. Instead of it, whenever, iPhone synchronizes with iTunes, these playlists will appear again in your iPhone Music Library.
That’s where we have the dr.fone, it will not only allow you to delete the Playlists permanently on your iPhone but once you sync your iPhone with iTunes, it will not copy those playlists again to your iPhone. It doesn’t stop here: you can rename a playlist, add songs and even export the newly made Playlist permanently to the iTunes. All in all, it is a complete and perfect music manager for your iPhone. And all you can do this even without using the iTunes on your computer.

Part 2. How to delete Playlists on iPhone using dr.fone
The best part about using dr.fone is that it is available for both the Windows and Mac and it can do a lot more than deleting a playlist on your iPhone. It is available in Trial version but if you want to use it for a wholesome benefits, we would recommend you to purchase the full version.
Download and install the latest version of dr.fone
Step 1: Download and install dr.fone on your computer. After then launch it and connect your iPhone to your computer via the USB cable.

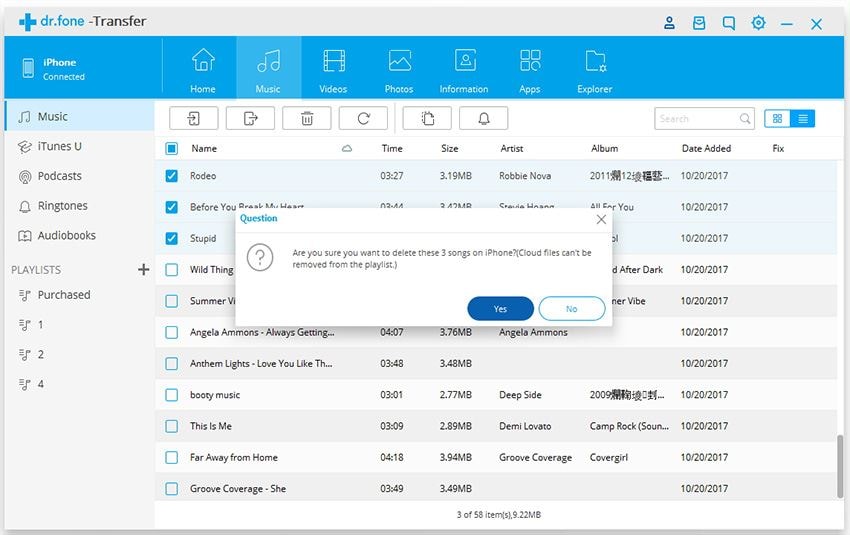
Step 2: Navigate to the Music management window. From there, you can see the “Playlists” displayed in the right side. Right Click on any Playlist and Select the Delete to delete a Playlist from iPhone. It will show you a dialogue, Click on Yes to delete the Playlist.

That’s it! You will be able to delete any unwanted playlists from your iPhone using this method. We will strongly recommend you to not use iTunes to sync music with your iPhone because it will not only create a tiresome problems but will also become irritated some time. However, managing music using dr.fone will not cause such problems and the music will not be affected on the other iDevices such as iPhone, iPod Touch or iPad. However, if you are still using the iTunes, here’s how you can avoid syncing certain Playlists on your iPhone by using iTunes.
Part 3. How to avoid syncing unwanted Playlists from iTunes to iPhone?
- 1.Connect your iPhone with PC and open iTunes.
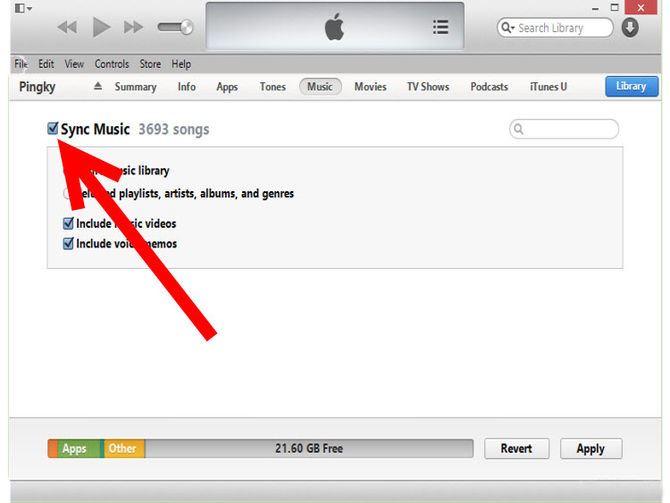
- 2.Select iPhone from the top Left menu and Hit the Music button.
- 3.Now, select the Selected Playlists, artists, albums and genres instead of “Entire Music Library”
- 4.Scroll down and select the playlists that you want to copy to your iPhone.
If you don’t have some songs in your Playlists, you will have to individually select those songs, albums, artists or genres. Although at start it will take some time, but it will become very easy for you to manage those songs in your library again.


