We all know that iPhone has the best camera among all smartphones and we use it a lot to take photos on different occasions. Sometimes photos are taken on the portrait mode (for example: taking photo of your dog or cat) while other times it can be a landscape (for example: taking selfie using front camera of your iPhone or photo of a scenery). We can’t always be sure that in which mode photo will look better, portrait or landscape mode, if you are in such a dilemma, don’t worry, simply take the photo in whatever any mode because you can always rotate your photos right from the photos application on your iPhone.
In the newest version of iOS 8, the rotation feature is embedded with the crop feature so you can also crop the photo while rotating it. If you don’t want to crop it, simple click on rotate button and press it until you like the direction of your photo. However, method of rotating photos on previous versions of iOS like iOS 7 is slightly different.
Here’s how you can rotate photos on your iPhone from the photos app. You can follow any guide depending upon your iOS version.
Part 1. How to rotate Photos on iOS 8?
Take a picture from camera or select an already taken picture from the photos library.
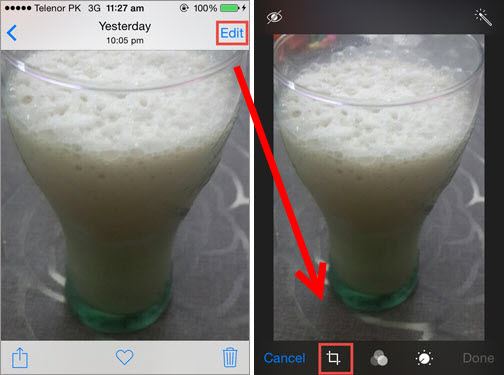
Step 1: Tap on the “Edit” button in the top right corner to edit the photo. Now, Tap on crop icon to crop and rotate the photo on your iPhone.

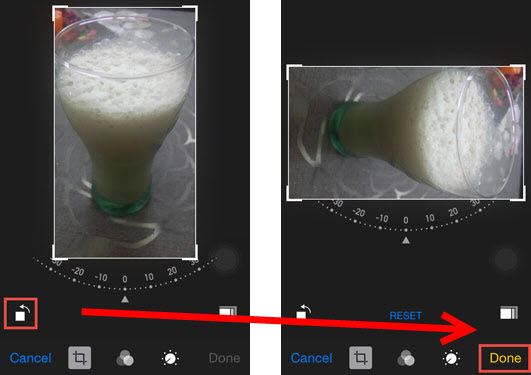
Step 2: In the left corner of your screen, you will find the rotate button, tap it again and again until you find the right direction for your photo. Once you have set the rotation, tap on “Done” button in the bottom right corner to save the photo. That’s it! You can rotate as many photos as you want on your iPhone using the steps mentioned above. Moreover, this method also works perfectly with the iPod Touch or iPad running iOS 8.

Part 2. How to Rotate Photos on iOS 7?
1. Select the photo that you want to rotate and tap on “Edit” button at top right corner.
2. Here you will find the rotate button in bottom left corner. Tap it over and over until you find the right direction for your photo.
3. After rotating the photo, tap on “Save” button in the top right corner to save the photo. This method works similarly on iPod Touch or iPad running iOS 7.


