Recording a video on iPhone 6S is an easy feat but sometimes you are in hurry and forget to change the direction of your iPhone 6S which results in upside down videos. In Addition to that, sometimes a videos is recorded in the portrait mode which should have been recorded in the landscape mode, the whole scene doesn’t fit properly and the end result video is just not so good. Have you ever faced such kind of problem? Don’t worry, thanks to dozens of iPhone video editor applications in the Appstore which will not only let you edit the videos in every aspect possible but you can also rotate them for whatever direction you want.
Natively, iPhone 6S doesn’t let you rotate the videos right from the photos application, however, you can use iMovie or any third party application to change the direction of the video. These applications works in such a perfect way that you can turn the video to any direction that you want. One such application to rotate the videos on iPhone 6S is Video rotate free, here’s how you can use this application to rotate videos on iPhone X/8/7/6S/6.
- Part 1. Step-by-step Guide to Rotate Videos on iPhone
- Part 2. How to Rotate Video for iPhone using Filmora Video Editor
Part 1. Step-by-step Guide to Rotate Videos on iPhone
Download the Video Rotate free or Video Rate Paid on your iPhone 6S. The free application will let you rotate the video of up to 5 seconds while the paid application which will cost you $0.99 only will let you rotate any kind of videos. After installing the application, open it and select the video that you want to rotate.
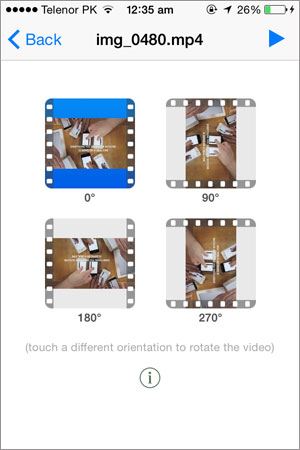
Step 1. Select the angle to which you want to rotate the videos, you can select form four options from zero degree to 270 degree.
Step 2. After, selecting the video it will ask you for the rotation mode, you can select from “Slow” or “Fast” mode. Slow mode will encode the video very slow and the resultant video will be compatible with all kinds of video players. Fast mode does rotating task very quickly and the final video can only be played either on iOS or Quick Time.

Depending upon the selection of your mode, rotating the video will take some time and the final video will be saved to the Camera roll on your iPhone 6S.
Now, if the video is long, it will take some time, you can also transfer it to the PC and rotate it using the Filmora Video Editor. Filmora Video Editor is the ultimate editor just like the Sony Vegas pro which will let you edit the videos in any possible way from adding effects to music, you will also be able to crop, trim and rotate the videos very easily. Here’s the complete guide on how to use Filmora Video Editor to rotate the videos.
Part 2. How to Rotate Video for iPhone using Filmora Video Editor
Among many video editing tools, Filmora Video Editor is an awesome choice. This will surely be a good fit at times of rotating your videos. The software has a wide range of compatibilities. This means that you can use the software both on Mac and Windows.

- Filmora Video Editor is specially designed for beginners and professionals.
- Plenty of video editing features are available, such as trim, crop, rotate, etc.
- You can edit video, audio and photos with multiple video editing tools.
- To make video special, you can apply free effects like PIP, titles, filters, etc.
- You can save video to specified formats, export to phones, upload to web, or burn to DVD.
Steps on How to Rotate Videos with Filmora Video Editor:
Step 1. Install and launch Flimora Video Editor
The first action that you’ll have to do is to launch the program on your PC. And select "Full Feature Mode" to enter the video editing mode.

Step 2. Import video to the program
After that, hit the "Import Media Files Here" for importing your required video that will need to be rotated. The video importing feature is quite handy due to having the drag and drop feature in the software.

Step 3. Rotate the videos
After dragging and dropping the video from media library to the timeline, double click the video clip on timeline, You’ll get to see this tab just above the timeline. A pop-up window will appear soon. This window has a lot of options for rotating your imported video. Once the editing is complete, simply hit the “OK” button situated on the window.

Step 4. Save and export video
The final part is involved with exporting the rotated video. To do so, you’ll have to click the “Export” tab. Once you’ve set your preferred configurations, hit the “Export” button. This will export the video according to your format and device. You can also upload the video directly from the program to YouTube, Facebook and Vimeo.


