- Part 1. How to Use iTunes to Transfer Purchased Music from iPhone to Mac
- Part 2. Transfer Music from iPhone to MacOS 10.12 Sierra with dr.fone for Mac
If you have bought music from the App Store or other things like videos, books etc with your iPhone, you can transfer them to your iTunes library without downloading them again or buying them again. The process can take a little bit of time depending on the number of music and size of the music file you are transferring. In any case, to transfer music from your iPhone to MacOS 10.12 Sierra, follow the steps below.
Part 1. How to Use iTunes to Transfer Purchased Music from iPhone to Mac
You can transfer your purchased music from your iPhone to your iTunes library without using iCloud. The process is simple and will transfer all your purchased music from your iPhone to your iTunes library.
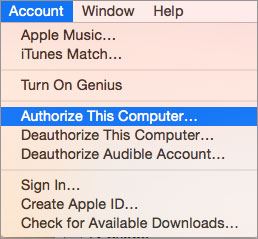
Step 1: To start, connect your iPhone to your Mac and open the iTunes application. From the top menu, click “Account” and select authorize this computer. You will be asked to log in using your Apple ID.
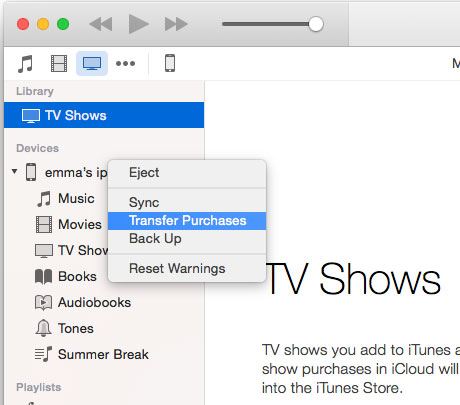
Step 2: Go back to the top menu and click on “File”, scroll to “Devices” and select “Transfer purchases from iPhone”. You can also directly go to the top menu and click on “File”, scroll to “Devices” and select “Transfer purchases from iPhone”.
The purchased items will now be transferred from your iPhone to your iTunes library. This process is not only for music, you can transfer apps, videos and books etc to your iTunes library using this method. The purchases do not only apply to the things you bought, it also includes things you downloaded for free. So, as long as it is in your iPhone, you can transfer it to your iTunes library.
Part 2. Transfer Music from iPhone to MacOS 10.12 Sierra with dr.fone for Mac
dr.fone is the best media management alternative for Mac and your iOS device. The app lets you transfer music from any iPhone, iPad and iPod to your own MacOS 10.12 Sierra. You can even transfer playlists, iPhone videos and pictures to your Mac too.
Step 1: Download and install dr.fone for macOS 10.12 Sierra. After then, launch it and connect your iPhone with your Mac via the USB cable.
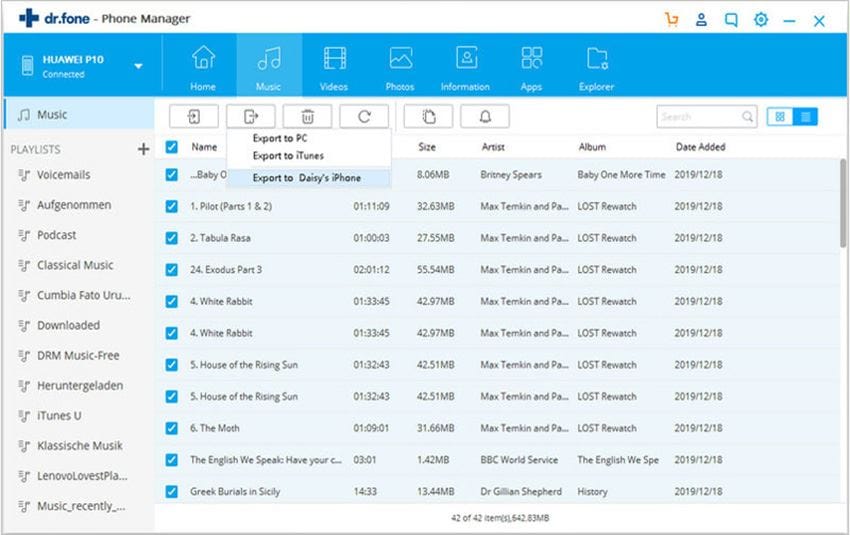
Step 2: Click the "Music" tab at the top of dr.fone window to check out all the songs on your iPhone. Select the ones you need, then click “Export” >> “Export to iTunes” to save them to iTunes or in a folder on your Mac. On the left hand side of the window, there will be a list of your playlists. Right click on the playlist you want to copy from the list and select the "Export" option. It will immediately start copying the playlist to your iTunes library or your Mac.
More about dr.fone
- • Unlimited sharing: With iTunes you have limits to the things you share from your devices but with dr.fone, there is no limit to what you share. You can transfer music, videos, playlists, album artwork etc to your computer and to other devices.
- • Transfer any media file to your device: dr.fone allows you to transfer media files from your iTunes and computer to your iPhone in no time. The transfer is also very fast compared to iTunes.
- • Convert the media file: You can convert a music or video with dr.fone before transferring it to your device. This feature makes it possible to transfer compatible formats to your device.
- • Easy to use: The dr.fone has a very easy and simple interface. Transferring music and other media files has never been easier before than with dr.fone. With just a few clicks, you can transfer your music to and from your devices in no time.


