Earlier this year, Apple announced the most amazing iOS yet iOS9 with more than 100 hundred new features. Some of these features were labelled as keynotes while other remained the hidden features and you can find them while using iOS 9 on your iPhone. The prominent features include the improved notes application, improvement to To-do list app, Split view for iPhone, News App for iOS, better Siri and last but not the least, new search improvements in the iOS 9. However, the public release of iOS 9 is still expected at the end of September while the beta versions are being released every once in a while.
If you have already installed the beta version of iOS 9, you should know that this version is nowhere near the final version of iOS 9. Moreover, it is provided to developers to check out the bugs and problems in the iOS 9. So, it is highly likeable that you will face different glitches and problems on your iPhone running iOS 9. Moreover, as the beta version are in the testing phase, so some apps from the App store might not be compatible with them. If you are facing any of such problems, you can always switch back to the original iOS 8.4 which is running on most of the Apple devices now. Uninstalling the iOS 9 is not an easy being a beta version, you can always downgrade to the iOS 8.4 until the final version of iOS 9 is released. You can read our step by step guide on how you can downgrade from iOS 9:
- Part 1. How to Uninstall iOS 9
- Part 2. How to Backup Songs/Playlists/Photos/Videos from iPhone/iPad/iPod to iTunes or Computer
Part 1: How to Uninstall iOS 9?
Before you continue, please make sure to make a backup of your iPhone/iPad/iPod via iTunes. Later you can restore your device from the backup file to avoid losing your content.
Note: songs, playlists, videos downloaded from the internet, and photos synced from itunes, shared from friends, and downloaded from the internet are not in the iTunes backup file package. If you don't want to lose these files, you're supposed to backup them to your computer before doing the iOS uninstall.
Steps to uninstall iOS 9
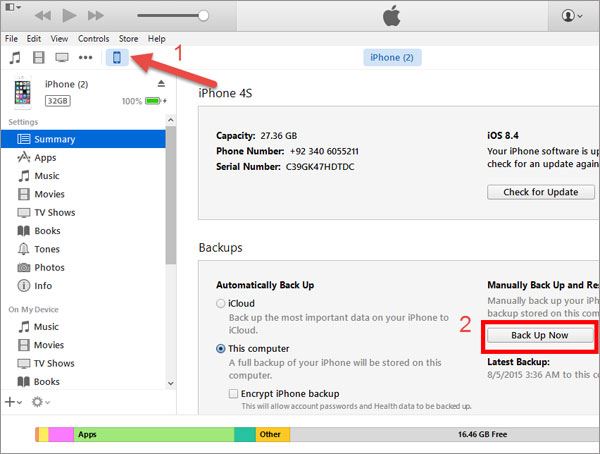
Step 1: Connect iPhone with PC and launch the iTunes, on the main screen, Click on the small iPhone button and you will see every detail about your iPhone. Click on the “Backup Now” to make a quick backup of your iPhone. Once the backup is made, connect your iPhone with PC and put it in the recovery mode.

Step 2: Press and hold the Home button and power button together until it restarts your iPhone and you see the Apple logo. Now, release the Power while keep holding the Home button. After certain time, a pop-up will be shown in iTunes saying, “iPhone in recovery mode”. Click on restore button to restore to iOS 8.4.
If you had enabled the Find my iPhone, you will need to enter the iCloud credentials in order to start your iPhone. Enter the details and you are good to go.

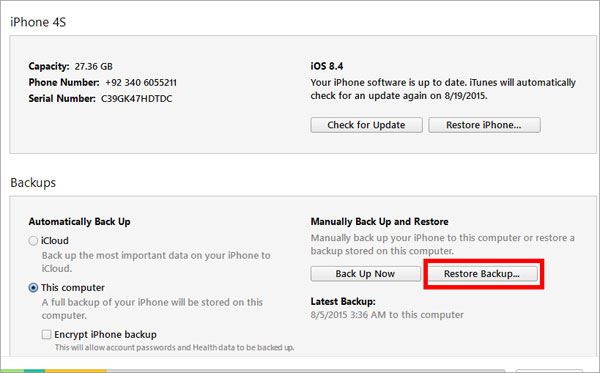
If you want to restore the previous backup of your iPhone, from iTunes, click on the “Restore iPhone” right next to the backup now.

Part 2. Backup Songs/Playlists/Photos/Videos from iPhone/iPad/iPod to iTunes or Computer
dr.fone is the most tool for you to backup your songs, playlists, videos and photos. Here are its main features:
dr.fone - Save Songs, Videos and Photos Stuck on iPhone/iPad/iPod
- 1 click to copy all music from iPhone/iPad/iPod to iTunes; Library on Mac/Windows PC
- Compare songs in iDevice with iTunes, filtering duplicate while transferring music
- Copy playlists with rating, play counts, and tunes to iTunes, avoiding the empty song awkard issue
- Be able to transfer users selected songs, videos, playlists and photos back to iTunes or computer
- Export all songs, playlists, videos and photos to a folder in computer anytime at any where
Step 1: Download dr.fone and connect your device with your computer
Click the Download button to get the installation package. Follow the guide in the pop-up window to install it. Connect your device with your computer via a USB digital cable. When your device is detected, it will be displayed in dr.fone main window with its basic information.

Step 2: Copy media files to computer (optional)
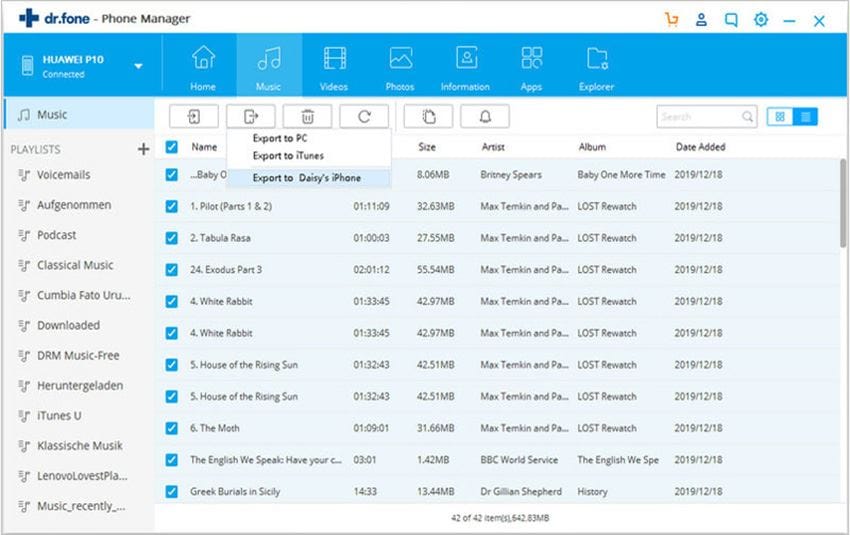
If you want to transfer the music/videos/photos in your device to iTunes, find the "Music"/"Videos"/"Photos" and select the media files you want to transfer, then click "Export" >> "Export To iTunes". "Export To Mac" to directly copy your music to a folder on your local computer.
Note: from the window you can see there is a "Add" button. Sure, it's the place where you can put media files in computer to your iPhone, iPad and iPod. No data on your device will be erased. It's safe and easy! (for this reason, i can't love the software more, because i have 2 computer which contains my loved music)
GOOD NEWS: dr.fone is updated to support the latest iOS 11, iPhone X, iPhone 8 (Plus), iPhone 7, iPhone 7 Plus, and computer operating system: Mac OS X 10.11 El Capitan and Windows 10.


