Although iOS 10 was released more than 200 hidden features for iPhone and iPad but it also brought some glitches with itself. One of the widely talked glitch in iOS 10 is that users are not surf the internet after iOS 10 on different devices. Some users have problems with the connecting to the Wi-Fi while others are reporting that the Wi-Fi has become dead slow for them. These kind of issues may be due to your internet connection or iOS 10, so, we have compiled a list of 7 different ways which can be used to fix such kind of issues on any iPhone, iPod Touch or iPad running iOS 10.
- 1st Solution: Restart your iOS Device and Wi-Fi Router
- 2nd Solution: Re-Connect with your Wi-Fi Network
- 3rd Solution: Reset Network Settings
- 4th Solution: Switch to Airplane Mode
- 5th Solution: Switch Wi-Fi Networking
- 6th Solution: Switch Wi-Fi Assist
- 7th Solution: Change DNS to Google DNS
1st Solution: Restart Your iPhone/iPad
First of all, make sure that you are connected to the internet and your router is working fine. If it is working on other devices, you are facing an issue while connecting to the Wi-Fi, we would recommend you to restart your iPhone, iPad and your Wi-Fi router. Sometimes, the router assigned the IP address according to the device which may create problem for some users and they will not be able to connect to the internet. Restarting the iPhone and Wi-Fi Router will eliminate such problems as you will be able to connect to the internet again.
2nd Solution: Re-Connect with your Wi-Fi Network
If the first solution didn’t work for you, you can forget the network from your iPhone and can connect to the same network using the same password. Here’s how you can do that.
Step 1. Go to Home screen on your iPhone and click on “Settings”, tap on the Wi-Fi as shown in the screenshot below.
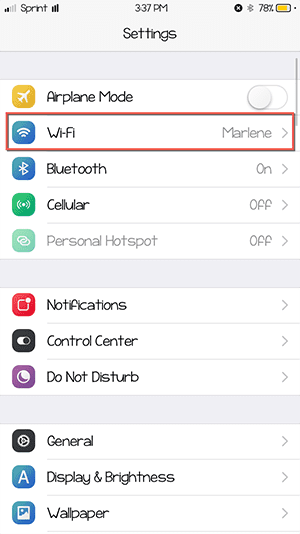
Step 2. On the next screen, click on the little button next to the connected Wi-Fi Network.
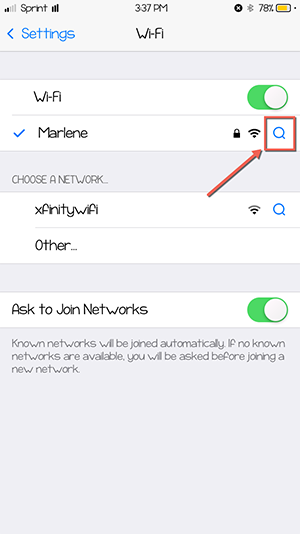
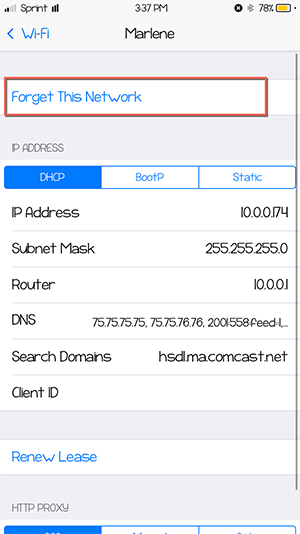
Step 3. Finally, hit the “Forget this Network” button on the screen and it will forget the saved details of this network. You can re-enter the password to connect to the same network again.
dr.fone - all-in-one tool to transfer data between phones and computer

Why Choose dr.fone:
- idr.fone integrates all the features you need for managing music, video, photos, contacts and even text messages among iPhone, iPad, iPod, iTunes, Android devives and computer.
- Transfer music, videos, playlist and more from iPhone to iTunes Library/PC/Mac/Android devices.
- Fix "iPhone, iPad, iPod won't connect to computer" issues.
3th Solution: Reset Network Settings
This method is so far one of the toughest and best solution to solve this problem as it will automatically reset all type of network settings on your iPhone or iPad. Before doing that make sure that it will delete all of the saved Wi-Fi Passwords, users’ names, passwords and login details from your iPhone or iPad. It will also remove the details of the Bluetooth devices.
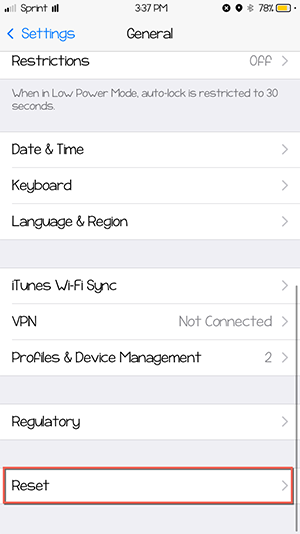
Step 1. Launch “Settings” on your iPhone and tap on the “General”.
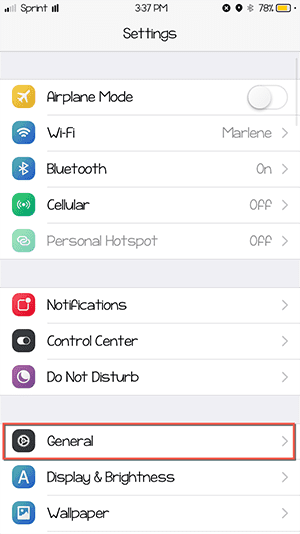
Step 2. Go to the bottom of the screen and there you will find “Reset”, tap on it.
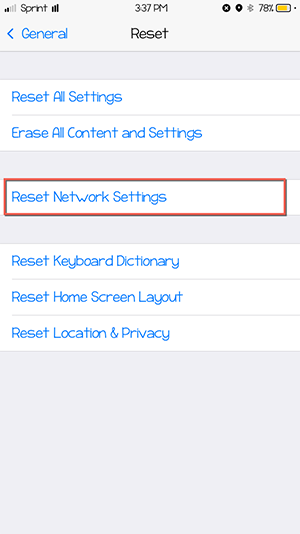
Step 3. Finally, hit the “Reset Network Settings”, you will also have to enter the passcode of your device and hit the confirmation button again.
4th Solution: Switch to Airplane Mode
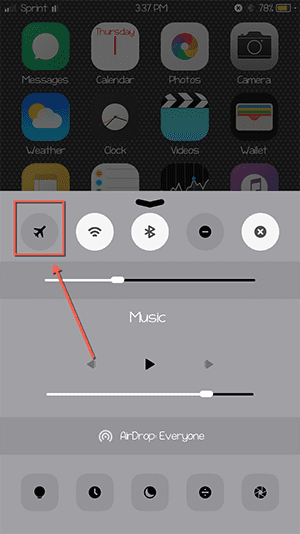
This method is for all those users who do not want to lose all the saved Wi-Fi password from their devices. All you have to do is enable the “Airplane” mode for 10 seconds which will restrict all type of communications from your iPhone or iPad. Open the Control Center on your iOS Device and hit the “Airplane” button. After 10 seconds, open the CC again and hit the “Airplane” button again.
5th Solution: Switch Wi-Fi Networking
Like many other system settings, Wi-Fi on your iPhone or iPad also uses the location of your iPhone or iPad. However, sometimes a bug may cause a problem to detect the location which may lead to error while connecting to the Wi-Fi, you can simply switch OFF and then again on the “Wi-Fi Networking” to reset such settings. Here’s how it works:
Step 1. Open “Settings” On your iOS device, scroll down and tap on “Privacy”.
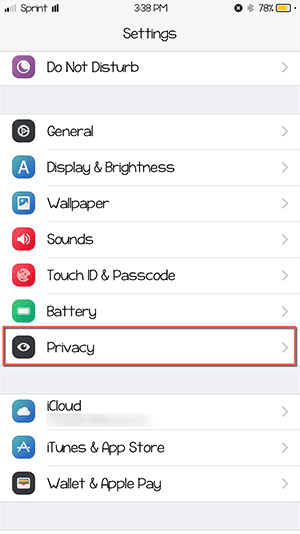
Step 2. On the next screen, tap on the first option “Location Services”
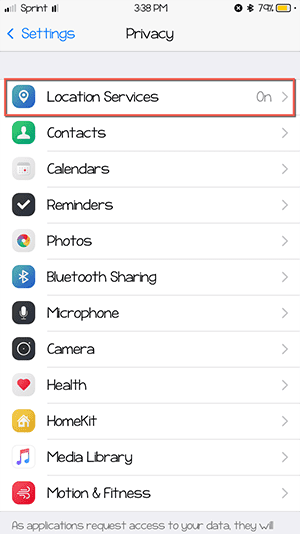
Step 3. Now, scroll to the bottom of the screen and tap on the “System Services” as shown in the screenshot below.
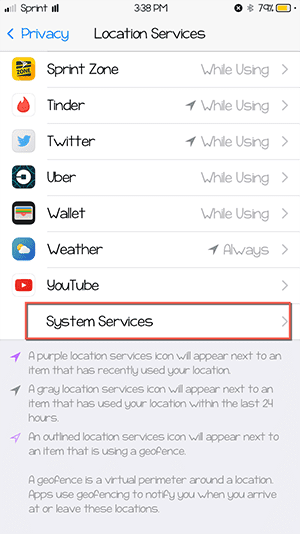
Step 4. Finally, Toggle the “Wi-Fi Networking” button to ON and off again.
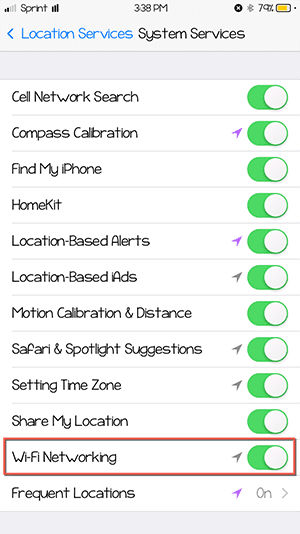
This method has worked for some users, so you should try it on your device.
6th Solution: Switch Wi-Fi Assist
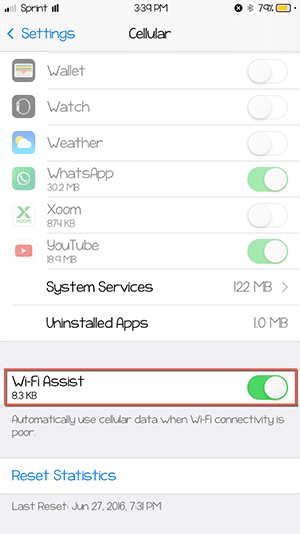
In the latest version of iOS 10, there is a Wi-Fi Assist function which works with the Cellular data on your iPhone or iPad. So, whenever you will have the poor internet connectivity on your iOS Device, cellular data will be automatically used using this feature. Here’s how to find and toggle this switch.
Step 1. Go to Home screen and open “Settings”, now tap on “Cellular”.
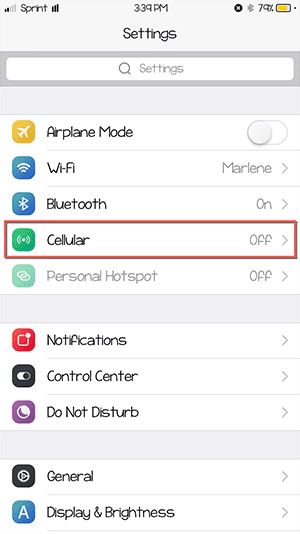
Step 2. At the bottom of this screen, you will find the “Wi-Assist” switch.
7th Solution: Change DNS to Google DNS
Sometimes, Wi-Fi connectivity issue is not caused by the latest iOS 10, however, it is due to a problem with your Wi-Fi network. In order to resolve such kind of issues, you can change the DNS address to the “Google’s Address”. Here’s how to change DNS on iPhone or iPad.
Step 1. Open “Settings” and tap on “Wi-Fi” on the first screen.
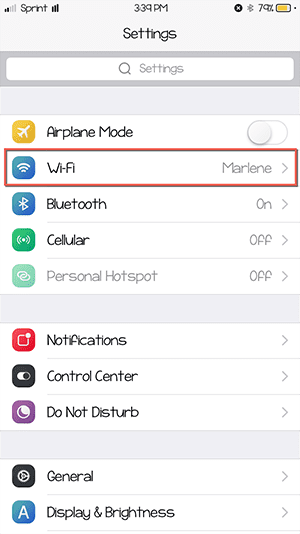
Step 2. Hit the small button next to the connected Wi-Fi network as shown in the screenshot below.
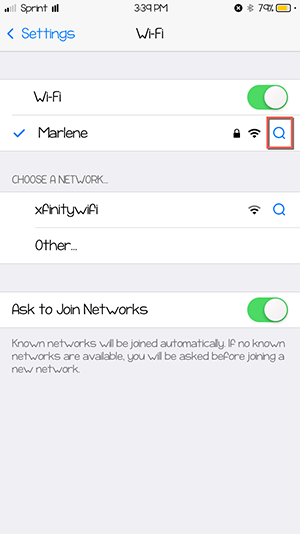
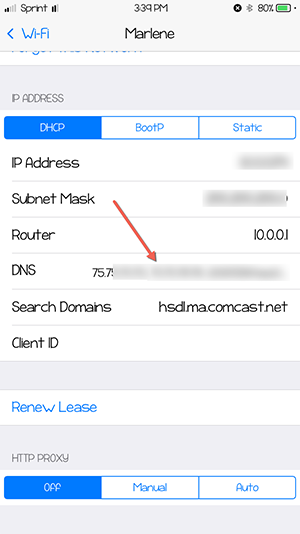
Step 3. Finally, tap on DNS and remove it using backspace on your keyword. Now, enter “8.8.8.8” as new DNS address.
That’s it! One of these tips should work for you to fix this problem.


