There are several programs that can be used to perform the Android NAND backup. It is one of most critical forms of storage that the Android OS uses. It is for the same reason that the user wants to make a proper backup of this storage. It can also be regarded as the storage that is linked to each and every aspect of the Android OS. In simple words it means that backing up this storage means that the entire Android OS has been saved from theft or damage. During the process the image of the drive is taken and everything along with it is captured. This tutorial deals about the best and the most advanced techniques related to the idea.
Advantages of the Android NAND Backup:
● NAND backup ensures that the user gets the best and the most advanced form of backup. There is no need to run individual software for every backup.
● This form of backup is also known as NANDroid backup. It is actually related to the NAND flash memory.
● It is a de facto standard that can be used to get the work done i.e. to image the entire Android device with ease and satisfaction.
● The android OS can be back up using this technique and therefore the custom ROM image is there to get the work done. It also means that the previous ROM can be activated if desired or can be returned to.
● From games to music and from ringtones to widgets this type of backup means that literally everything onto the Android system is back up with ease.
● The load of malware or the loss of personal data can be perfectly avoided if this terminology is used. It means that the user needs not to worry about the data loss at all as it is recoverable.
● On the other hand it is a perfect backup that a user can think of. It means that the device can be restored to exactly the same state as it was before with the help of this idea.
How Does it Work?
There are several ways as well as means to ensure that the backup is created with ease and satisfaction. It also means that the work being done is in line with the user’s proficiency. The most awesome thing about the NAND backup is that is can be done as per the desire of the user. The ways and means that are associated to it are the ones which are of several kinds. The user can choose the one which seems to be easy.
The TWRP Way
WRP stands for “Team Win Recovery Projects” and it is one of the best ways to create the NAND backups. It is also used to create the complete image of the system rather than creating the individual file backup which takes too much time. Installation of the TWRP is a complete process. It is therefore advised to follow this link to download and install this great app. Here this process has not been mentioned as this tutorial is about the NAND backup rather than the TWRP installation.
Step-by-Step Guide to Do Android NAND Backup
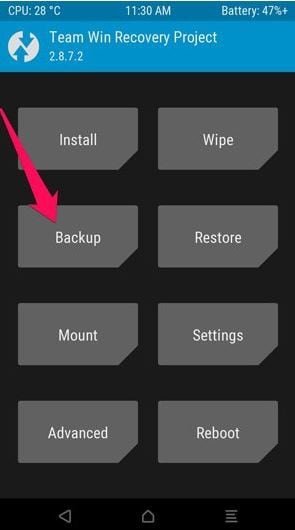
Step 1. Once the TWRP has been installed it is time to run the app. The interface as follows will be shown. The "Backup" button is to be pressed.

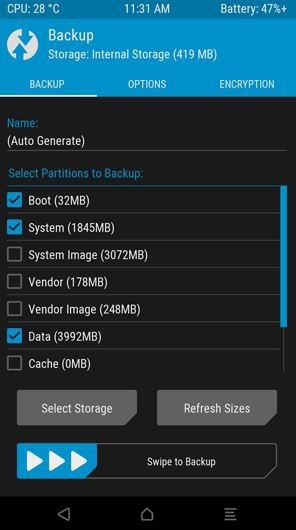
Step 2. The name bar on the next screen i.e. on the top is to be clicked and therefore the backup is given a name.

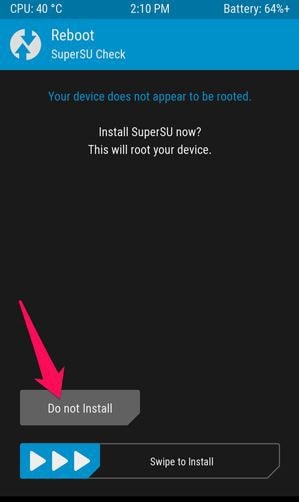
Step 3. Once the backup has been completed do not install the Super SU as it is to be done on your own rather than the TWRP doing it for you.

The NAND backup has been successfully created with the help of the three simple steps that are mentioned as above and therefore the process ends here in full.


