If there ever comes a time when you need to transfer data from your iOS 9 device to Windows PC, you need to know the best application to use for this purpose. The data could be pictures, music, videos, contacts, and so on. Even though there are many applications that can allow you to do this, some of them have limitations in copying and transferring the files. One of the most suitable applications for transferring data from iOS 9 (iOS 10 included) to Windows is MobileTrans for Windows (or MobileTrans for Mac ).

This application enables you to transfer photos, music, videos, contacts, apps, and other forms of data between iOS, Blackberry, Android and Windows devices with absolute ease. If you have data on your iOS 9 device that you would like to move to a Windows PC (windows 10 included), it will allow you to do that easily. You can use it to safely transfer data without messing up its original quality. Besides allowing you to transfer data between various devices, it also serves as a backup tool that you can use to backup phone data to a computer safely and securely. If you want to restore those backups to your phone, it also allows you to do it easily.
Why Choose This Phone Transfer:
This software program has a wide range of amazing features. The following are some of them.
1. You can use it to erase your old phone permanently if you do not want the data to remain there after transferring it to Windows PC.
2. You can use it to backup phone data to your computer and then restore that data back to your phone later on.
3. It allows you to transfer music from iTunes to iPod, Android phone, Symbian phone, and iPhone.
4. It supports retrieval of data from iCloud backup.
Steps to Transfer Data from iOS 9 to Windows PC
To be able to transfer data from your iOS 9 (iOS 10) device to Windows PC using this application, the following is what you will need to do.
Step 1. Install and launch phone transfer
First install and launch the phone transfer, and then look for the “Back up Your Phone” option and then click on it.

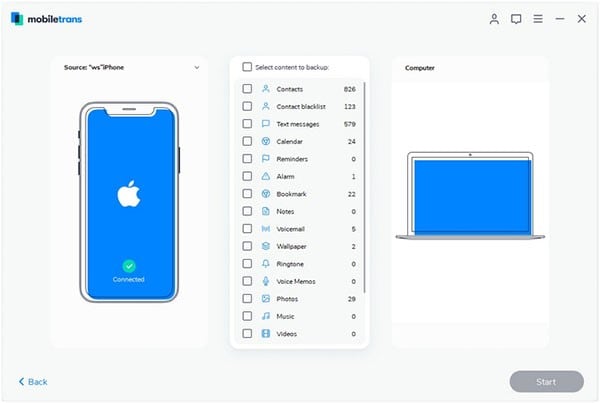
Step 2: Connect iOS 9 devices to PC
And then you will need to connect iOS 9 device to your Window PC with a USB cable. In the window that will open, choose the data that you want to transfer to your Windows PC. The data could be movies, photos, music, videos, contacts, and so on. You can choose to transfer everything, or you can choose specific types of data to transfer.
Step 3: Start to back up iOS 9 to Windows PC
Once you have selected the data that you would like to transfer, click on “Start Copy”.

After that, you will need to wait for iSkysoft Phone Transfer to transfer the data you have selected to your computer. Make sure that you do not disconnect the two devices when the data is being transferred because that will interfere with the process.


