- Part 1. How to Install Android on Mac
- Part 2. How to Run Android Games on Mac with Chrome
- Part 3. How to Use Android Music, Photos and Videos on Mac
Part 1. How to Install Android on Mac
The Android operating system is since 2013 the most popular operating system in the world. It is understandable therefore that even the most hardcore iOS fans from the Apple world will want to know what the fuse is all about. The truth is that installing Android on Macbook is possible and there are many ways it can be done. One way to do this is to install the system on the Mac using a virtualization software. For most people, this way of installing an Android system represents a cost-effective method of trying out the system before possibly deciding to buy a hardware Android device while others may just stick to using the system on their Macs. Anyway, the following is a step by step guide on how to install Android on Mac.
Here are the steps:
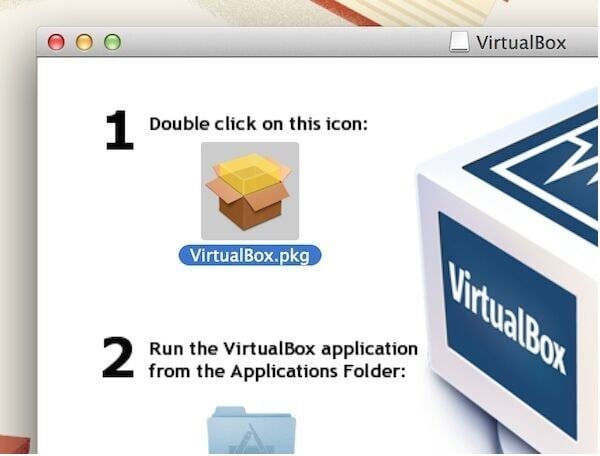
Step 1. Virtualbox is a free virtualization software from Sun micro-systems that is available for Mac, Windows and Linux and you can use it to install any operating system of your choice that it supports. For our purposes here, we will use it to install Android on macbook or Mac as the case may be. The first step is to download and install it on your Mac.
Step 2. Navigate to download a modified version of the Android operating system that can be run on intel based chips (hence the x86).
Step 3. After installing Virtualbox, launch it and click on New, then fill in the details, giving the new virtual machine a name, then click next.
Step 4. You will be prompted to choose a RAM size and after that you will create a harddisk drive for the virtual machine. You do not need to worry because the software uses default settings that match your system, just keep clicking next.
Step 5. After the virtual machine has been created, click on the green Start button on Virtualbox to start the machine, it will now request the file location of the Android iso file you downloaded, select it and confirm, then your Android installation will start.
Step 6. When the installation finishes, you will now have a fully functional Android operating system that you can start and stop at will from your Mac desktop.
Part 2. How to Run Android Games on Mac with Chrome
In 2015, Google released an App runtime for Chrome (ARC) which is an extension for the Google Chrome browser that allows native Android apps to be run on any Operating system that has a Chrome browser. It has therefore become possible to run Android apps in a chrome browser that is running on a Mac or on Windows or on Linux. Currently there are certain limitations and not all apps will work this way, but as time goes on, developers will update and modify their apps to become more Chrome friendly. Following is a step by step guide to running Android games on your Mac using a Chrome browser.
Here are the steps:
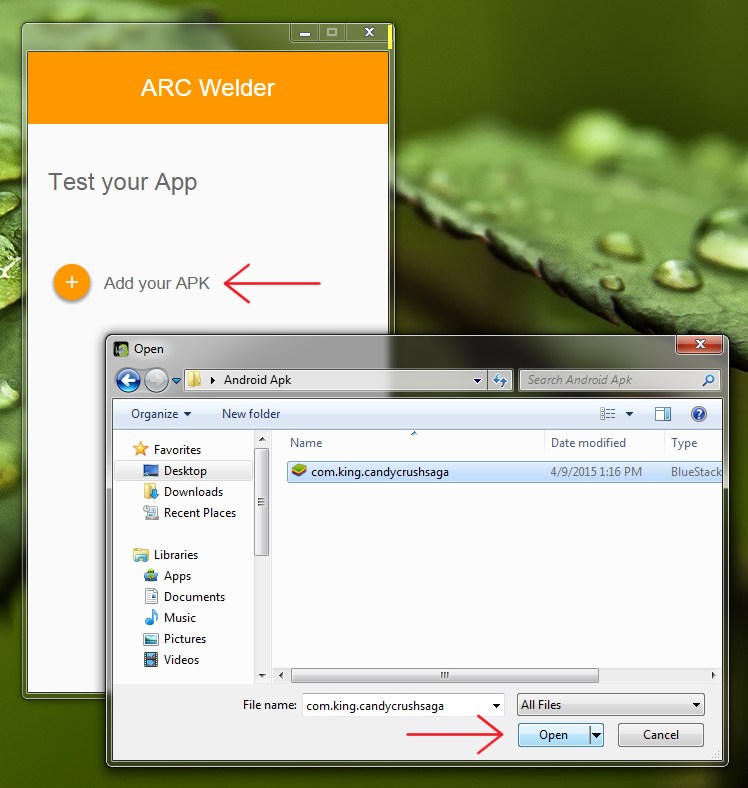
Step 1. Download and install ARC Welder. This is the Chrome app that will allow you to run Android apps inside your chrome browser.
Step 2. Download the APK of any app that you would like to try out. There are tons of sites with free Android APKs and it is often more helpful to add apk to the app’s name when searching.
Step 3. Now launch your ARC-Welder app. For the first run, it will ask you to select a working directory, simply choose one or create a new one.
Step 4. Click on “Add your APK” to load the app. You will be presented with more options which you can just skip, leaving the default settings on.
Step 5. After you have clicked “Launch App”, there is no guarantee that the app will work, but many apps are currently working this way and more apps are being updated to work. But if yours works, then have fun with it.
There is also a developer’s version of the app runtime but that one is for geeks, you can download the chrome extension.
Part 3. How to Use Android Music, Photos and Videos on Mac

If you want to use your data and media files from your Android device on your Mac, or you just want to view your pictures and videos from your Android phone on your Mac desktop, then MobileTrans for Mac (it also has MobileTrans for Windows version) is what you need. With MobileTrans for Mac, managing your files between the Android smart-phone and your Mac desktop becomes a breeze. You can even use the program to transfer contacts, call logs, messages, calendar, music and videos e.t.c from one phone to another phone and not just to your Mac.
iSkysoft Phone Transfer will make securely backing up your phone data very easy. And it is compatible with over 3,500 different types of devices including iOS, BlackBerry, Android, iPad, Samsung devices e.t.c. Here are some features of the iSkysoft Phone Transfer and their benefits.
Features & Benefits
•1 Click Data Transfer. With just one click, you can transfer your data from your phone to either your Mac desktop or to a multitude of other devices. iSkysoft Phone Transfer simplifies this task that normally has been a difficult one.
•1 Click Backup. With one click you can back up your phone data securely. For sure, many smart-phones come with a backup feature, but a backup to a memory card is not really secure unless the backup is physically on another device. iSkysoft Phone Transfer makes this secure form of backup possible, and it does it with just one click.
•Transfer iTunes. You can also use it to transfer your iTunes data like music and videos to your Android device or other types of phones in a quick and simple way.
•iCloud & OneDrive Restore. You can use iSkysoft Phone Transfer to restore your iCloud or OneDrive data like pictures, music, contacts, messages and videos back on either your Android, iPhone, Windows Phone, BlackBerry or any other medium.
Step by Step Guide to Use Your Videos & Music from Android on Macbook

Step 1. First of all, you will have to download and install iSkysoft Phone Transfer on your Mac or Macbook.
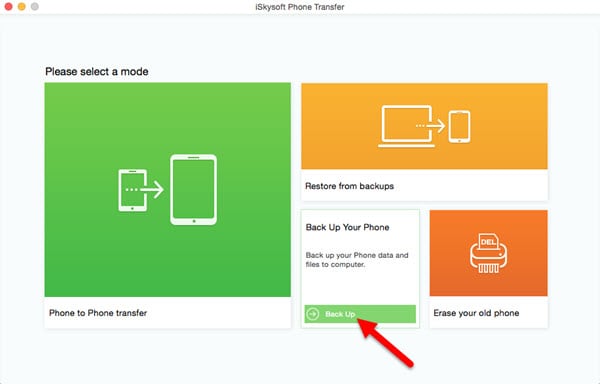
Step 2. Launch the program, then click on the tab labeled "Back Up Your Phone", this will then bring you to the backup window.
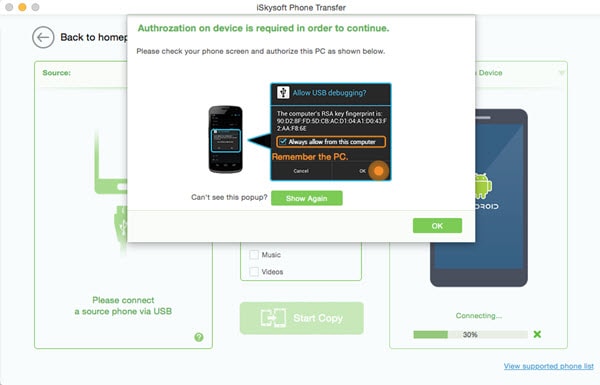
Step 3. You can now use a USB cable to connect your phone or tablet to Mac and authorize your phone to Mac. The data details of your device will be shown on the program interface and you will also have the option of selecting or de-selecting what you want to copy or do not want.
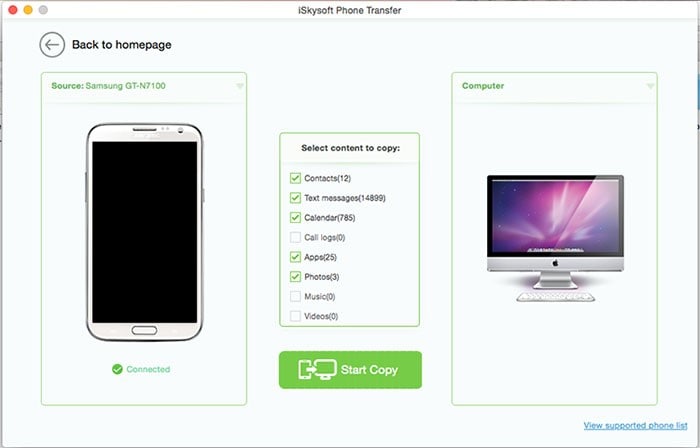
Step 4. After selecting the items you want or de-selecting the ones you do not want, you will then click on “Start Copy” to initiate the data transfer. You will now be shown a progress report with the individual files that have been copied, including their success status.
When the program finishes, your phone or tablet’s data will now be securely copied to your Mac and you can also use them in whichever fun or entertaining ways you please, the choice is yours.


