You know that it is very important to create a full backup of your device. Everything on your device; all your contacts, Backup, SMS, calendar entries and even emails need to be kept safe in a backup file just in case you lose the data somehow. Anyone who own an Android device knows just how easy it can be to lose some or all of the data on your device. Sometimes the data loss can occur through no fault of your own. This is why it is absolutely vital that you learn at least a few ways you can backup Android device. Lucky for you this article will offer you a complete guide on how you can back up all of the data on your device to your PC or other storage location.
Part 1: The Best Way to Backup Android in 1 Click
In this fast paced world, you don't have time to backup every type of data on your Android device individually. You therefore, need a solution to easily and very quickly backup all the data on your device. By far the best tool to help you back up your device is MobileTrans for Mac (or MobileTrans for Windows). This program is designed to help you back up all types of data at a go, without having to back up each type individually.
Key Features of MobileTrans:
- It is easy to use, fast and highly reliable.
- You can use the program to create a full backup of your device that is inclusive of all types of data including SMS, Calendar, emails, call logs, videos, music and many others.
- It can also be used to restore the backup you have created as well as to restore data from a number of other backup files including an iCloud backup file, iTunes backup file, Blackberry Backup and even a OneDrive Backup file.
- MobileTrans for Mac can also be used to transfer data between devices. It is also compatible with almost all Android devices and all Android OS.
- It can also be used to completely erase the data on your device, a valuable feature that can help when you want to sell your device.
Step-by-Step Guide to Backup Android
Step 1. Begin by downloading and installing the program on to your Mac. Launch the program on your Mac and you should see the following primary window.

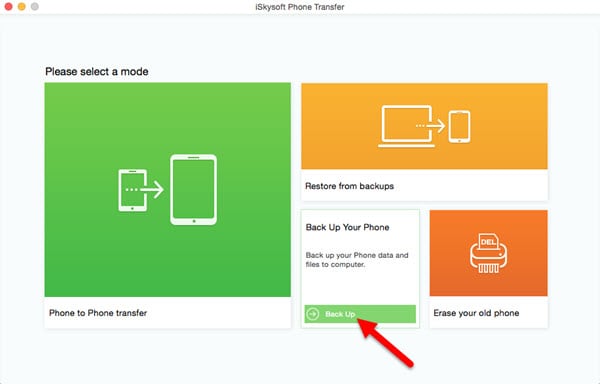
Step 2. From the options provided select "Backup your Phone" to open the backup window.
Step 3. Connect the Android tablet or phone to the Mac using USB cables. You will see all the data on your Android listed in the middle panel of the resultant window.
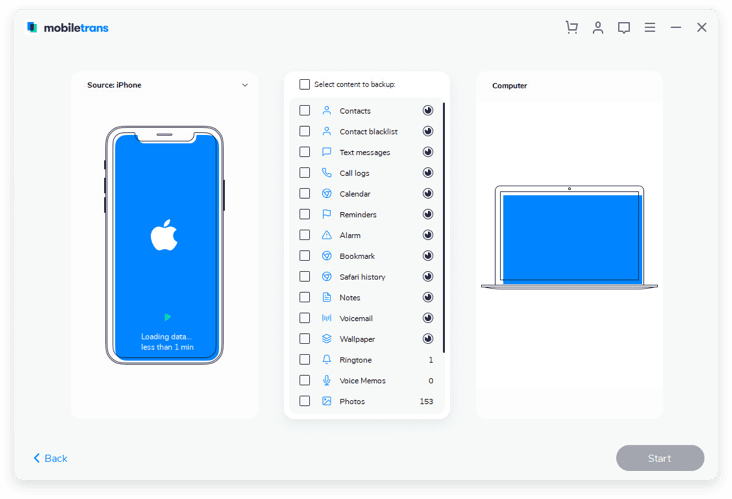
Step 4. Now all you have to do is simply select the data you would like to backup and the click "Start Copy". The program will begin backing up all the data on your device. Be sure to keep the device connected through the whole process.
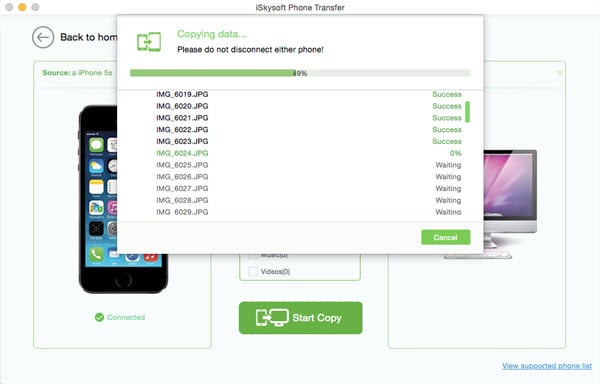
Within just a few minutes, the data you selected will be backed up on your Mac and readily available to be restored when you need to. If you want to restore data, they can use "Restore from backup" mode to restore them.
Part 2: How to Backup Android Using Google
You can also use Google to back up your Android phone. But you should know that you can only backup some data on your device to Google. You can backup Contacts, Calendar, App Data, Wi-Fi passwords and some settings. You cannot however backup your photos, SMS, videos and other similar data to Google.
Step-by-Step Guide to Backup Android Using Google
Step 1. Launch the settings app on your Android device and then tap on "Backup & Reset".
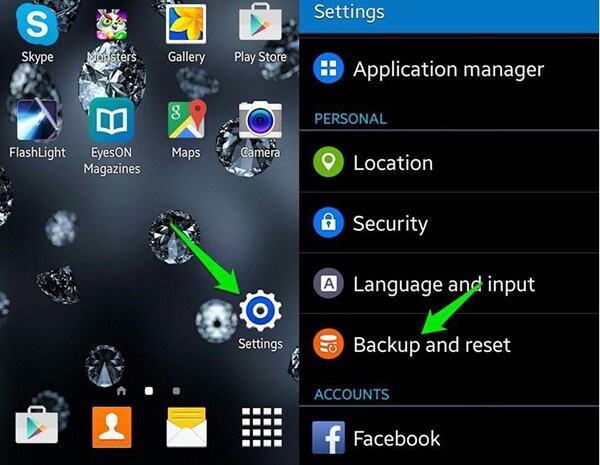
Step 2. Then check both "Back up my data" and "automatic restore". Next just tap on "Backup Account" and add the Google Account you want to back up the Android device to or create a new one if you don't already have one.
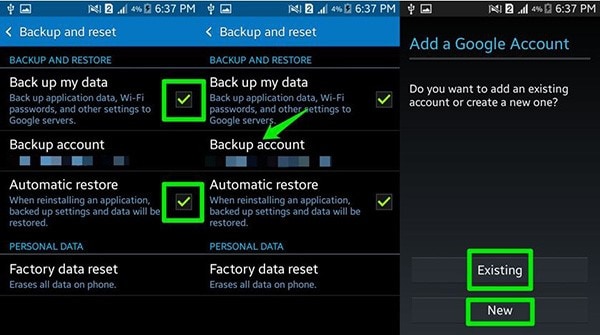
Step 3. Now just go back to the settings menu and then scroll down to find "Google" which is located under the "Account" heading. Tap on the Google Account and check all data you want to sync.
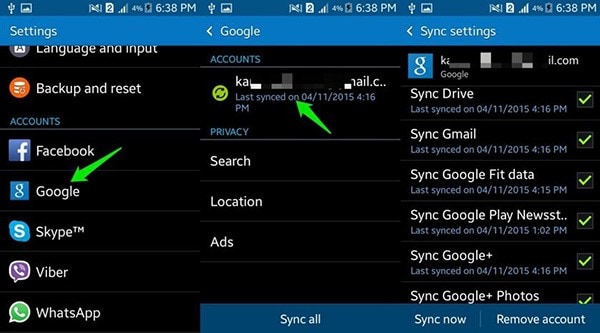
All your selected data will now be synced to Google servers and they can be restored to your device or any other Android device just by logging in to your Google account.
Part 3: How to Backup Android to SD Card Directly
An external storage device such as an SD card is a great way to keep the data on your device safe. Your SD card is also a great option especially because it is easily transferable to another device and hence very easy to restore the data on it. The following are just a few of the reasons why you may want to backup data on your device to your SD card.
- If your Android device had not been performing up to par lately, you may decide to Factory reset your device. A factory reset will almost always result in total data loss so you may want to have a backup of your data on your SD card where it will be easily accessible when you need to restore.
- If you want to root your device and enjoy the benefits that can only come from having a device that has custom ROM installed, you may want to back up your Android device's data to the SD card just in case the process doesn't go quite as planned.
- The same applies to an Android firmware update. There are times when a firmware update can cause data loss. So, before updating your device’s firmware it is a good idea to back up your device. You can back up the device to the SD for easier access.
As you can already probably tell, the major advantage of backing up your data on an SD card is accessibility. Restoring the data will be just a matter of copying the files back to the device's internal memory. The only problem with this method of back up is that it is can be quite time consuming. This is because you will need to copy each of the individual folders on your Android device to the SD card. For instance, if you wanted to back up the photos on your device to SD card, you need to open the My Files app on your phone, locate the folder containing the photos (usually the DCIM) folder and then from the Menu option choose to Move the folder to the SD card.
For all the data on your phone including apps, you would have to go through this process, making it a very labour intensive and time consuming activity. The only type of data you can easily backup on your Android device to SD card easily and quickly is contacts. The following is a step by step guide on how to do it.
Step-by-Step Guide to Backup Android to SD Card Directly
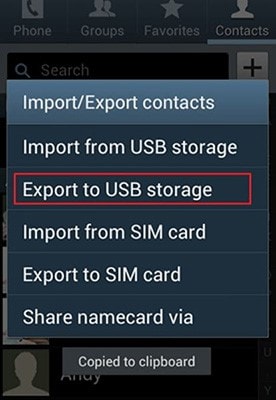
Step 1. Launch the contacts app on your device and then click on the contacts tab to show the contacts saved on your Android phone. Tap on the menu option and then select Import/Export. Choose "Export to USB storage" or "export to SD card".
Step 2. All of the contacts on your Android phone will be saved as a vcf file that will be available on your SD card and that can be restored at any time. There are some apps that can be moved to SD card storage. You can check if a particular app cab be saved on your SD card by tapping on Settings > Application Manager and then selecting that particular app. The "Move to SD card" tab will be activated and you can just tap on it to save the app to your SD card.
As you can see, this is not an efficient way to back up your device. It is time consuming and very complicated. SD cards are also not 100% safe since they can get corrupted rendering the information stored on them invalid. It therefore should be at best a temporary measure and not your go-to solution.


