There are many reasons for which the user needs to make sure that the subjected process is followed. The Android factory reset backup is an idea that has the solutions to all the common issues which the users face in relation to the Android OS. It includes slow speed, lack of functionality and full storage. It is also to be noted that the user needs to make sure that the process that has been mentioned in this tutorial is followed. These are not only easy but will also make sure that the user gets the best outcome. For all the users who are looking for the ways to get the subjected thing done are requested to read the tutorial till the end.
Part 1: How to Do Backup and Reset on Android
There are several phones as well the tablets that use the Android to operate. The process to backup and reset the Android phone may therefore differ slightly but the fact of the matter is that it is same at the core. The process generally involves the users resetting the device and getting the same prompts. However where the difference lies is only the interface. It is also advised to follow the process as under that is related to one of the kind, make and model of the Android.
Step-by-Step Guide to Do Backup and Reset on Android
Step 1. First of all the path that is to be followed in this regard is Settings > General > Backup and reset to start the process.
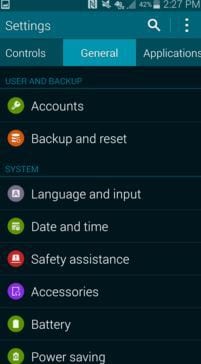
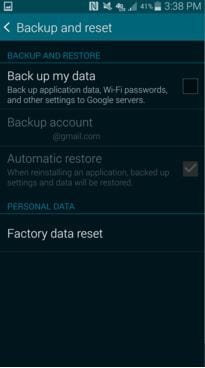
Step 2. The option of "Backup my data" is to be selected so that all of it goes to the Google servers. Once this process has been finished it is advised to make sure that the "Factory data reset" tab is pressed to proceed with the process.
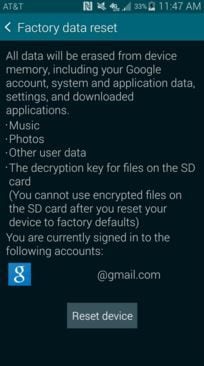
Step 3. The device will ask whether or not the reset is required. The user there needs to press the "Reset Device" option. The device will restart and will be wiped once the restart has been completed. This also completes the process in full.
Advantages of Android Backup and Reset:
Much have been written and spoken about the topic in this regard. It is therefore not at all a new topic to speak or write about. It is also to be noted that the user needs to make sure that the following advantages are kept in mind before the device is reset.
- If the device is to be sold then it is the best way to ensure that noting remains onto it and a clear machine is given to the other.
- Wiping the Android also makes sure that the user gets all the personal info saved. Once the backup has been made it is advised to reset the device to avoid any hassle and issue.
- This factor also makes sure that the device becomes new. In case of virus or malware attack it is highly recommended to get this thing done with ease.
- It is also one of the methods that are recommended after a year or so. It is because the devices are known for their slow nature if adequate measures are not taken in this regard.
Part 2: How to Backup an Android Phone in One Click
There are numerous programs which claim that in 1 click the Android device is back up. However the fact is that most of these programs are not up to the mark when it comes to the functionality mentioned. It is only the MobileTrans for Mac (or MobileTrans for Windows) that has all the processes embedded in such a manner that the best is always presented. There are numerous features of the program that are to be considered. However following are some of them presented in great detail.
Key Features of MobileTrans:
- From the Android the music, photos, videos and contacts can be transferred to iOS and BlackBerry.

- Music, videos, photos and contents from iOS and BlackBerry can be transferred to Android with ease.
- The content onto the Android can easily be transferred to the PC with this awesome program.
- The contacts from one drive can be restored to Android, iOS, and BlackBerry phone.
Step-by-Step Guide to Backup an Android Phone in One Click
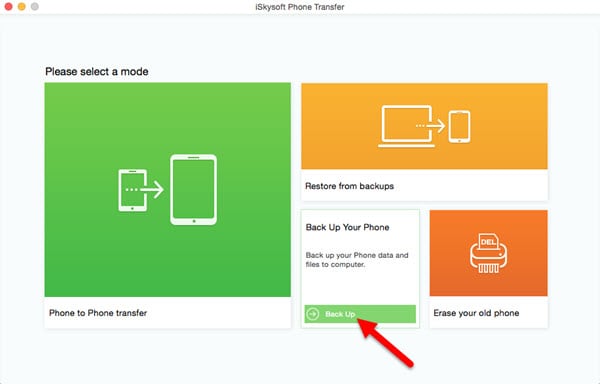
Step 1. Download and install MobileTrans for Mac to your Mac and then run the program. The "Back Up Your Phone" option is then to be selected to proceed in this regard.
Step 2. The Android device is then to be connected to the phone to proceed with the process. From the middle interface the data that is to be copied is to be selected.
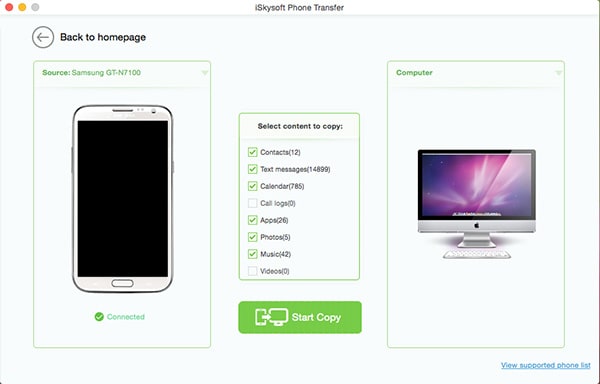
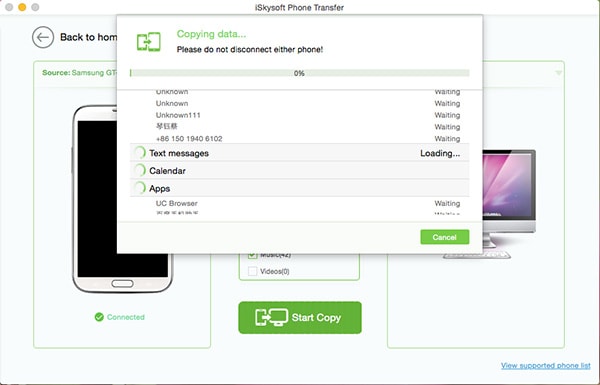
Step 3. Click "Start Copy". The progress bar will then show how much transfer has been made to Mac. The user will be notified once it has been completed. It also completes the process in full.
