Having an Apple device can be an amazing experience, especially if you have both an iPad and an iPhone. When they first get a new iPad, the first thing many iPhone users do is sync data to the new tablet, such as photos, contacts, movies clips, etc. This is because it is easier and more convenient to send messages or use FaceTime to send messages from the iPad. This guide is going to show you how to email contacts from iPhone to iPad and transfer iPhone contacts to email.
Part 1: How to Email iPhone Contacts to iPad
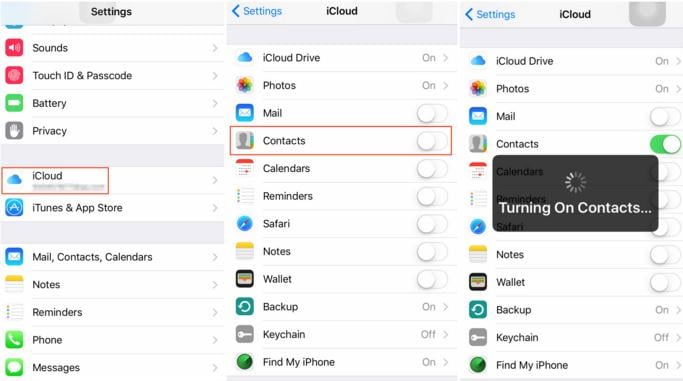
Apple’s iCloud allows you to sync contacts, calendars and other data between your iPad and your iPhone without the use of a Mac Book or a windows based computer. You need an Apple ID and access to a 3G or Wi-Fi connection. Once you have set up iCloud on both your iPhone and iPad, you can easily email contacts from iPhone to iPad.
Step 1: Go to “settings” tap “General” then click on “About”.
Step 2: Tap the “Settings” icon then select “iCloud.” Enter your Apple ID and password into the appropriate boxes then press “Sign In”.
Step 3: Switch on “Contacts” by sliding the bar to the “On” position. Select “Merge” to combine your iPhone’s contacts with the iCloud database.
Step 4: Repeat all the above steps on your iPad. This will ensure that all your contacts and emails are available on both devices.
Part 2: How to Transfer Contacts from iPhone to Email
If you have an email account such as Gmail that you use to send mail on a regular basis, then you can also use it as a back up for your iPhone’s contact list. Syncing your iPhone contacts with a Web mail service will also let you access important emails from both your iPhone and online via a web browser.
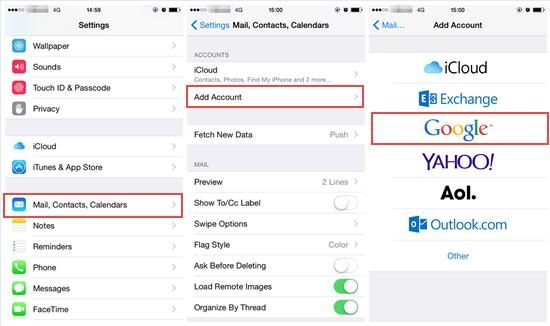
Step 1: On your iPhone go to “Settings” then scroll down to “Contacts, Mail, Calendars.” Tap on “Add Account” to get a visual list of the different email clients that you can sync with your phone. Tap the Gmail tab.
Step 2: Fill the fields with your accurate Gmail account information. You will have to type in your name, email address, password and a descriptive name for the account you are linking to. The tap on the “Next” button at the corner of the screen.
Step 3: Complete your email account set up by filling out the “Outgoing Mail Server” box. This should include your username (you can simply use your email address for this); your password and “Host Name.” for the host name, simply type in “m.google.com” then tap “Next”.
Step 4: Back in the “Contacts, Settings and Mail” menu, select the newly configured email account from the list, then slide the “Contacts” switch to the On position to allow contacts to sync between your account and your phone. When prompted, tell the phone to keep contacts in the iPhone, and then tap on “Done” to complete the process of backup iPhone contacts to Email.
Losing your iPhone can be disastrous, as is being left with an unusable device after a botched iOS update. But with this process, you will always have your contacts backed up on your email account from which you can easily salvage them.


