You do not have to apologize if you are using a Mac and at the same time a fan of Android. The easiest alternative to putting it is that – be comfortable and choose what makes you comfortable. You do not have to use something because someone else is using and you have to use the same. Everyone has their reasons and requirements to use a Mac and a smartphone running on Android.
If you are using Mac and wish to make Samsung file transfer to Mac (probably the latest model), then you would require an additional software that will help build the connection between the two systems. The best thing about additional software is that it gives you complete control over the action of transferring the data to a new device. You can easily establish communication with the device from your Mac and even access files, especially you get the report of Galaxy Note7 battery failures and fires, you should backup all your important data on your Samsung phone before you send it back. You can then choose selectively that you wish to move to your Macintosh. Let us a closer look at the application in detail.
- Part 1: How to Transfer Samsung File to Mac
- Part 2: How to Transfer File Between Samsung and Mac Using Droid NAS
- Part 3: Transfer File Between Samsung and Mac Using Android File Transfer for Mac
Part 1: How to Transfer Samsung File to Mac
MobileTrans for Mac (or MobileTrans for Windows) is a transferring software package for Mac, providing the easiest and the hassle-free manner to move content from a Samsung (Samsung Galaxy Note7 supported) device. You can also use the same program to move the data directly to another device using Mac as the medium. The program gives complete control over the data that you wish to copy to the Mac or new device.
Key Features of iSkysoft Phone Transfer:
- It can transfer call logs, text messages, videos, images, apps, app data, and much more.
- Transfer data without any quality loss and create backup of the device without any loss.
- It can recognize over 3,500 networks and handsets.
- It can restore data from backup files.
Step-by-Step Guide to Transfer Samsung File to Mac
Step 1. Visit the official website to download the program for Mac. Install the program and launch the same. The primary interface of the software opens, where you will notice different options. From the choices presented, pick "Backup your phone" feature.
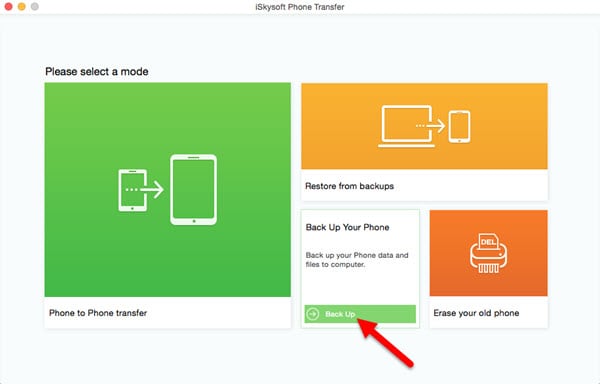
Step 2. Establish a connection between the Mac and the Samsung device that you are using with USB cable, probably provided by the manufacturer. The original cable ensures stability and prevents data loss. After connection, you will see the details displayed on the screen.
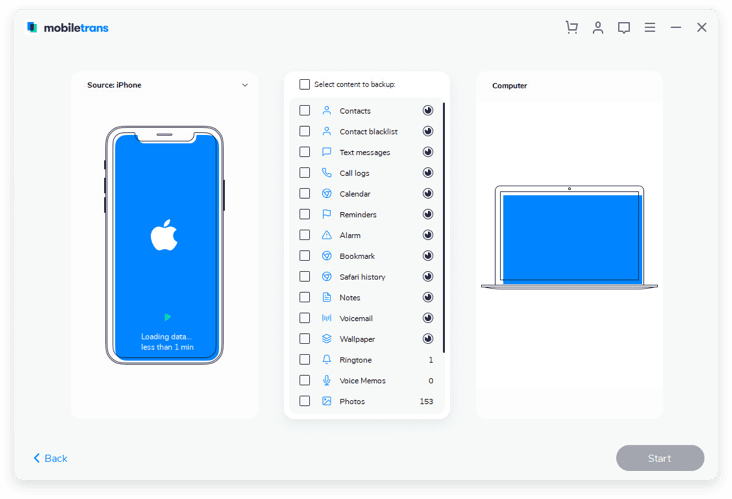
Step 3. In the following screen, you can pick the data categories that you wish to clone to your Mac. After selection, you just have to hit the "Start Copy" button.
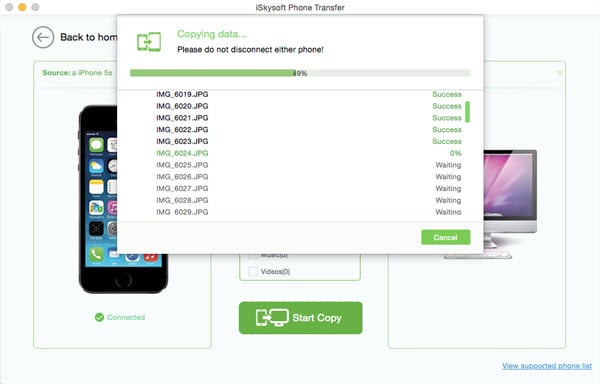
Step 4. Now, wait for the application to complete the transferring process. Once done, you can browse the location where you will find the contents copied from your device to the Mac.
Tips: You have already created a backup of your Samsung device on your Mac. Using the same software, you get the chance to restore a device! Yes, by choosing "Restore from Backups" option from the primary window, you have the opportunity to perform a full restoration with ease.
Part 2: How to Transfer File Between Samsung and Mac Using Droid NAS
Droid NAS establishes communication between an Android device and Mac, which allows a user to move files between the two devices seamlessly. It is similar to that of Google's Android File Transfer. Nonetheless, it performs the action over a wireless connectivity and in a straightforward manner. The application is accessible for free from the Google Play Store. All you need to do is install the application on your Samsung device. Make sure that you have enough battery life, as the app consumes battery rapidly. It is advisable to plug the handset to the power plug before beginning the transferring process.
Steps to Transfer File Between Samsung and Mac Using Droid NAS
Step 1. After installation of the app, run it by clicking the icon. You will see three options – Home, Office, and Café. Each of the options has different folders, which as a default are for sharing, and Home option is an assumption that it will share everything on the device to the Mac. Choose the best option and press the "Start Server" button.
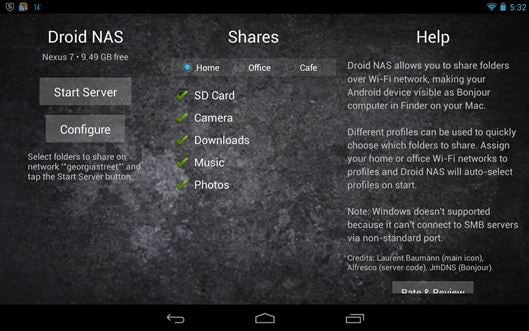
Step 2. Open you Mac, and navigate to Finder. You will see the device listed under the Shared category. Click on the device name and you will see the standard folders.
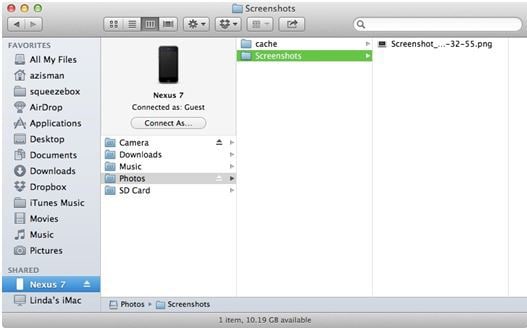
Step 3. You can choose the folders that you wish to copy to Mac or vice versa. For example, in the following screenshot, you will notice the music files listed in Nexus device, which I will be copying to my Mac directly.
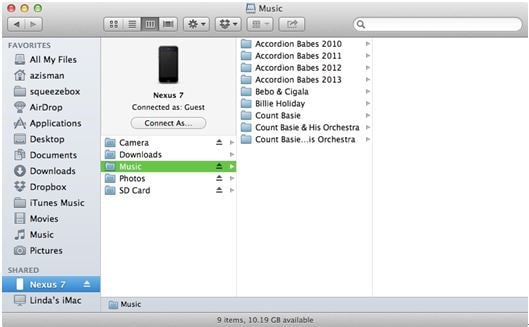
Step 4. If you are using an SD card on your device, you can gain access to the same by selecting "SD Card" as the option.
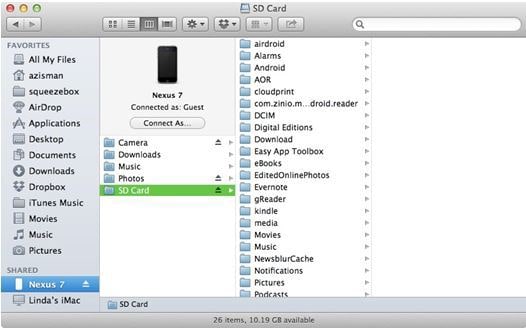
Step 5. After completing the transfer of files or folders from your Samsung device to the Mac, remember to click "Stop Server" button in the Droid NAS app on your mobile phone.
Part 3: How to Transfer File Between Samsung and Mac Using Android File Transfer for Mac
Apart from the procedures mentioned above, users also have the official method to move files from their Samsung device (Galaxy Note7) to Mac. With the help of the Google's Android File Transfer, you can easily create communication between the two different operating systems. Nevertheless, keep in memory that the free version of the software has limitations. It is a simple package without ads and with a limitation of 4GB transfer.
Steps to Transfer File Between Samsung and Mac Using Android File Transfer
Step 1. Download the Android File Transfer for Mac from the official website of Google. Click the download now button to begin the download of the free version. After finishing the download, drag the executable file to the "Applications" folder in Mac.
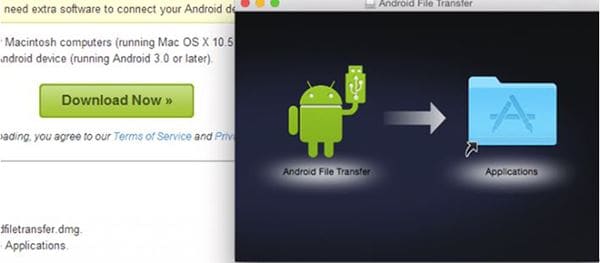
Step 2. Now, connect your Samsung device to the Mac using the manufacturer provided cable. You can also use a third-party manufacturer cable, but they may not be consistent in transferring the data, which could corrupt the system of the mobile handset. Furthermore, ensure that the device's screen is not locked. The software will detect the handset automatically and display the same in the computer window of the Mac. You can click on the device name to see the folders. Like you operate a computer, you can drag and drop files or folders from the smartphone to your Mac. You can even perform the reverse action of copying folders or files from Mac to the Samsung phone. The File Transfer app also gives you the ability to rename, edit, or delete files from the device.
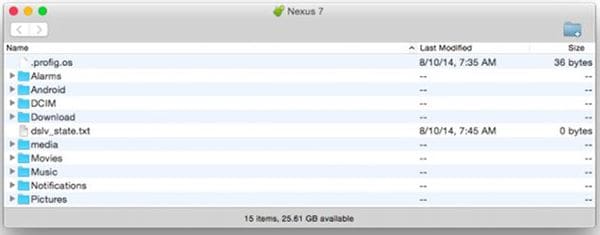
Fix Android File Transfer not working on Mac
You might be looking for solutions because you are facing certain issues with file transfer to Mac from your Android through a USB cable. Do not worry! You are not the only person who is facing the problem. You might probably have downloaded the Android File Transfer application to work the way around with Mac. So, if you have a few issues related to it, then following points may be of crucial help why you are unable to establish a connection between the two gadgets.
1. The first thing you need to do is enable file transfer protocol on your Android. You can perform this by heading to the Settings app, select Storage, tap the three dots appearing on the upper right corner, choose computer connection, and tick mark "Media Device (MTP)" option.
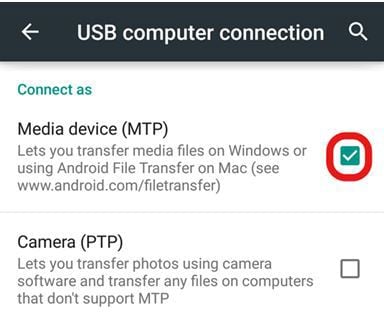
Unplug the USB cable, and repeat the process to see whether you can begin file transfer. For many, changing the option helped in moving files between their Android device and Mac.
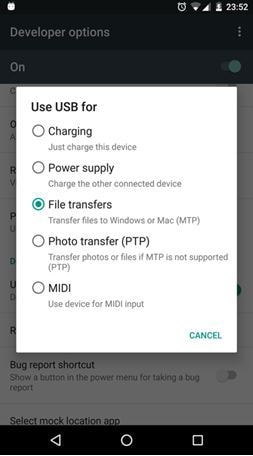
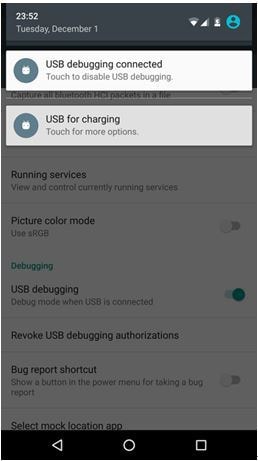
2. If you are unable to see the above options, then you have to enter the developer mode. To enable the developer mode, first head to the Settings app. Scroll the menu and tap "About Phone" option. Now, tap "Build Number" repeatedly for at least seven times or until you see a message pop-up, which states that you have enabled the developer mode. Now, head to the Settings app once again, and choose Developer Options. Under this, tick mark Enable USB Debugging. Now, lock the screen and connect it to the Mac. Unlock the screen, and swipe the notifications area to select USB Charging. Tapping the selection opens a menu of choices, where you have to choose File transfers. The action is enabling the device to accept file transfers through USB communication. Note that this is helpful for users using Android 6.0.
3. Check for the USB cables. Not all the cables are capable of handling file transfer protocols. The cables provided by the manufacturer along with the device is the most suitable mate for data transfer between Android and Mac. If you are using a third-party cable, then it is time to find the original wire. If you do not have, then get yourself one to ensure a stable and reliable connection that assists in file transferring without any hurdles.
