If you are planning to switch from your existing Android device to iPhone, or probably made the switch, the most concerning aspect is transferring the entire data - photos, contacts, calendars, music, videos, and so on. Moreover, you have to ensure that there is no loss of data during the transferring process. If you are looking for transferring contacts from your Android to iOS device, then you are at the right place. The information provided here would be helpful for users who are migrating from their present Android device to iOS. Since migration is a tedious process, we provide you with simple to operate applications that are capable of transferring data such as contacts, calendars, notes, and other documents without any data loss at faster speeds. Let's begin to learn on how to transfer contacts from Android to iOS 10.
Part 1 : The Simplest Way to Transfer Contacts from Android to iOS 10
Users always look out for the easiest way to transfer contacts from their Android to iOS device. Several applications are available that provide the transaction. However, it is essential to look for a program that comes as a package and helps in transferring the data without loss. At the same time, it is also vital that the program carries out the operation in a secure way. If you are in search for such a program, it ends at MobileTrans for Mac (or MobileTrans for Windows). The phone transfer application from iSkysoft is a one-click solution for file transferring management. With the support provided by the software, it is easy to move data such as contacts, text messages, photos, calendar, videos, apps, app data, music files, and much more between iPhone and Android devices. Additional features of the program are as below.
Key Features of MobileTrans:
- It is a cross-platform package that makes it handy for transferring content across different devices and platforms without risking the content and quality.
- Apart from moving the content, users also have the opportunity to create a backup of the device. Additionally, they can also use the same application and a backup to restore a device to the selected content.
- It is capable of overwriting content, thus allowing a permanent deletion of the data present within the device. Due to this, users have the opportunity to avoid information leak related to banking and other sensitive materials.
- As it recognizes and supports over 3,500 devices and networks, one can easily move content from a number of devices and on different networks at a faster speed without any loss.
Step-by-Step Guide to Transfer Contacts from Android to iOS
Step 1. You can download the free version of the software package by visiting the official website. Install it by following the guidelines, and launch it once complete. From the main interface of the application, choose "Phone to Phone transfer” tab.

Step 2. You then have to proceed with the establishment of the connection of your Android device and the iOS device to which you wish to transfer the contacts. Use the USB cables provided by the manufacturer to connect them to the Mac.
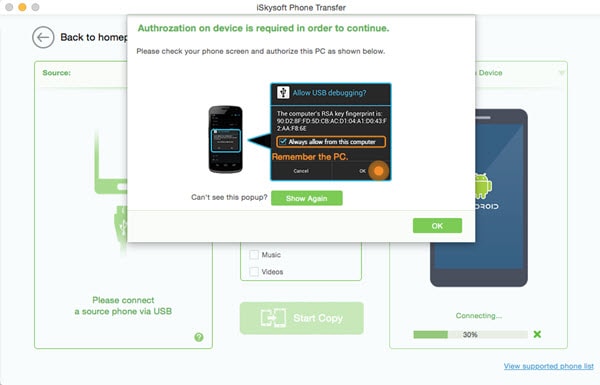
Step 3. Once connected, the application will automatically identify the devices and displays them in the source and destination windows as shown in the picture below. MobileTrans does not know which device is source and destination. Therefore, you have the option of "Flip" with which you can change the source and destination devices.
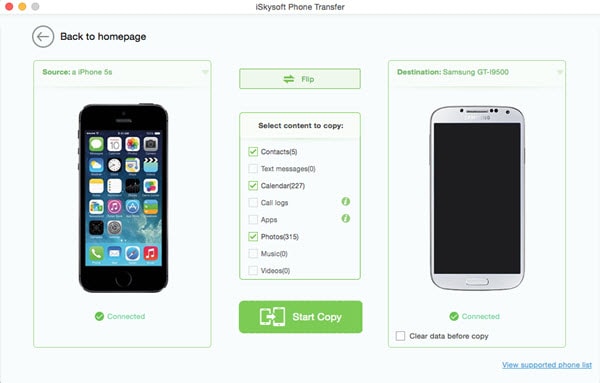
Step 4. From "Select content to copy" window, choose the categories that you wish to move from your Android device to iOS device. As your planning to transfer the contacts, select contacts. After selection, press the "Start Copy" button. It will begin the transaction process that you can monitor in the transfer progress window.
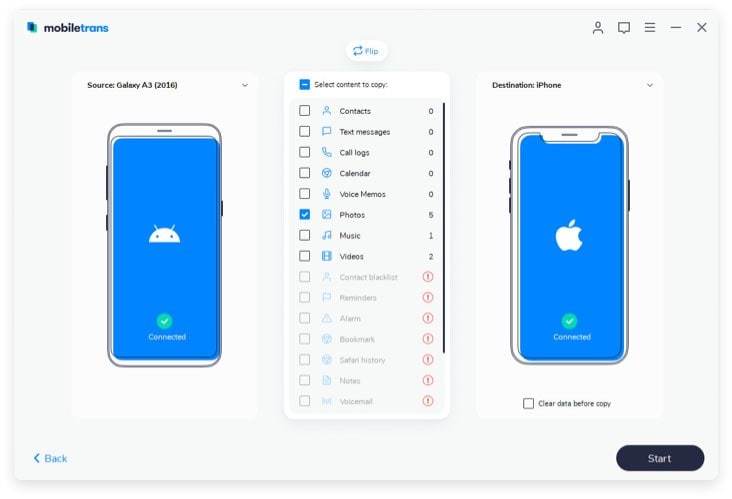
After completion of the process, you can disconnect both the devices from the USB cable.
Part 2 : How to Transfer Contacts from Android to iOS 10 Using Google Account
Step-by-Step Guide to Transfer Contacts from Android to iOS 10 Using Google Account
Step 1. Open Settings on your Android device. Tap "Accounts & Sync" feature, and then choose Google account. If you do not have a Google account, then you need to create one, which you can do by pressing the "Add Account" button.
Step 2. After creating the account, you will be able to head to the next screen, where you can select everything or choose "Sync Contacts" feature. Allow the synchronization to complete. The time taken depends on the size of the address book.
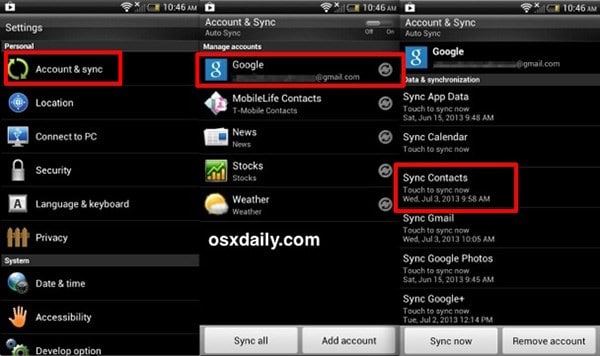
Now that you have synchronized the contacts from your Android device to Google's server, you can sync the same from Google server to iPhone.
Step 3. On your iPhone, open Settings feature and then head to "Mail, Contacts, Calendars" feature and select "Add Account" option. Choose "Other" and under contacts tap "Add CardDav Account" feature. Enter the following details into the fields and then tap "Next".
- Server: google.com
- User Name: your Gmail address
- Password: your Gmail password
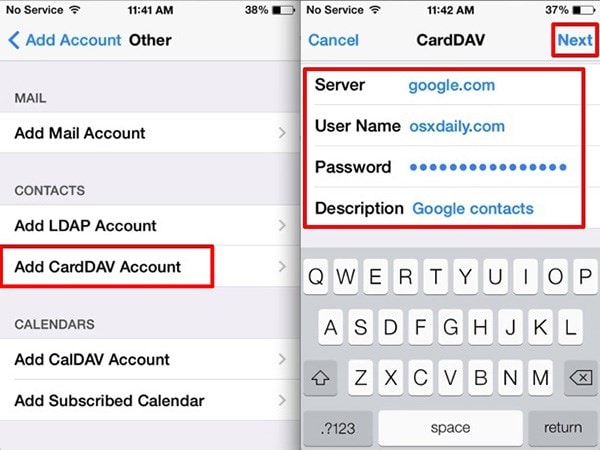
Step 4. Once you enter the details, the synchronization process begins immediately. Once the process starts, you can exit out from the settings app on your iPhone and open the "Contacts" app to see the synchronization progress. The time taken is dependent on the size of the address book.
The system is identical to all the versions of iOS. If you still run into any synchronization problems on your iPhone, then go back to the settings feature and check whether the account settings are using SSL configuration with port 443. The settings usually happen by default with auto detection. Now that both Android and iPhone have the same Google contacts service, any changes in either of the devices will synchronize over to the other. The process will make it easy for users who are using both the devices and have a larger address book with a number of details inputted into a single contact.
Part 3: How to Transfer Contacts from Android to iOS 10 with Move to iOS
Bringing contacts, photos, and accounts from your existing Android phone to a new iPhone or iPad is no longer a tedious task. With the help of Apple's Move to iOS app, you can now easily transfer contacts over a direct Wi-Fi connection.
Before beginning the process, it is important that you set up your new iPhone device. You can start by selecting the language, the home country or region, connecting to the local Wi-Fi network, and choose the cellular network. After entering the respective details, the iPhone will take a few seconds to activate. You can also choose whether to enable the location services. Now that you have set up your iPhone follow the steps below to begin the transfer process of getting contacts from Android phone.
Step-by-Step Guide to Transfer Contacts from Android to iOS 10 with Move to iOS
Step 1. As you have already set up your device, head to the Settings app and look for "Apps & Data" feature. Choose "Move Data from Android" feature.
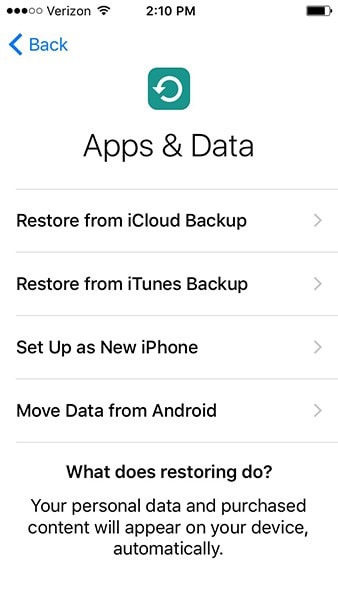
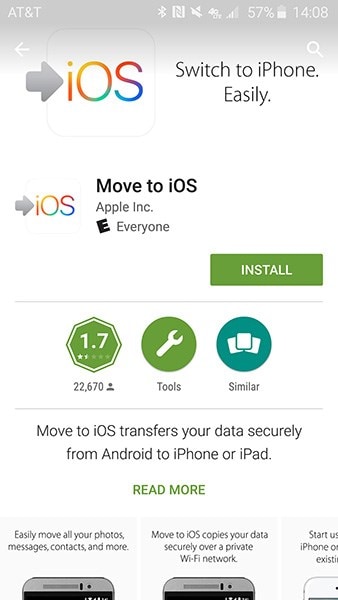
Step 2. On Your Android Device, go to Google Play Store and search for "Move to iOS" application.
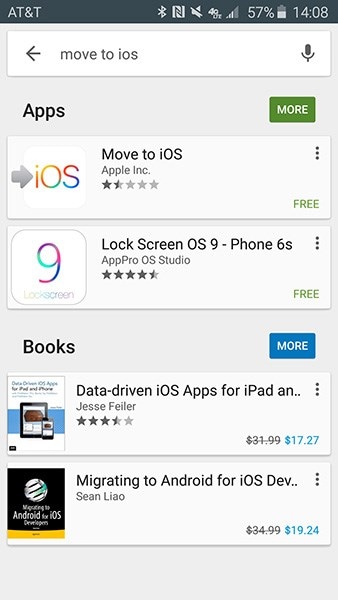
Step 3. Open the listing and press "Install" to begin installing the application on your Android device.
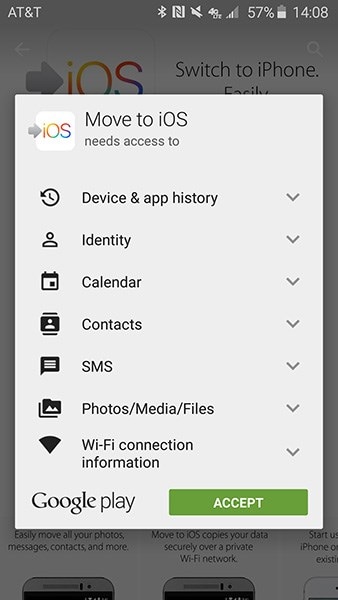
Step 4. Accept the permission request when prompted to complete the installation. After installation, open the application on the device.
Step 5. On Your Android Device, go to Google Play Store and search for "Move to iOS" application.

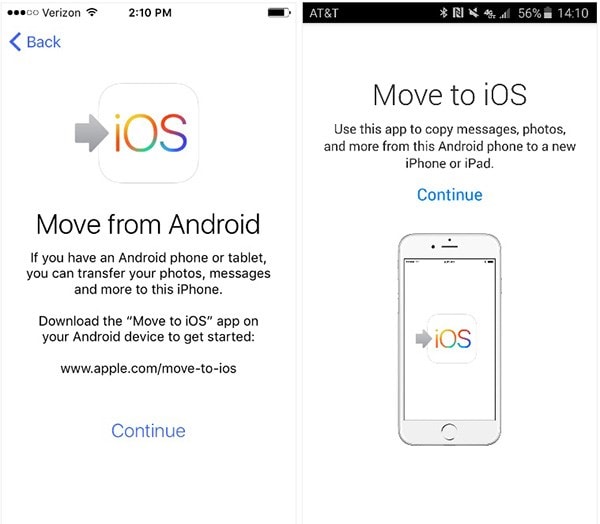
Step 6. On both the devices, press "Continue" as shown in the picture below.
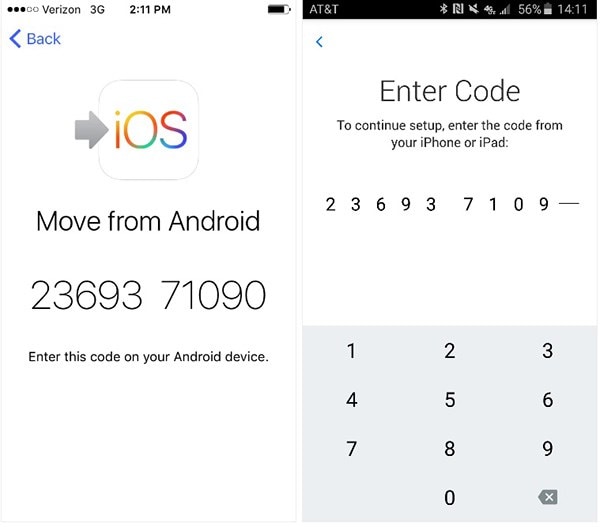
Step 7. On your Android device, input that 12-digit code displayed by the application on the iOS device.
Step 8. The application connects both the Android and iPhone over a P2P Wi-Fi connection. The application will then ask you whether you are willing to transfer your Google account information, chrome bookmarks, text messages, contacts, and other media files stored in the camera roll. You can select the categories that you wish to import to the iPhone.
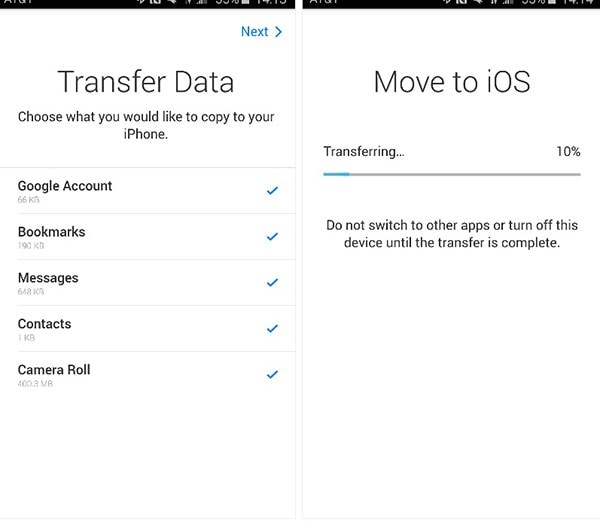
The application will then begin transferring the selected categories from the Android device over to the iPhone. An additional benefit of the app is its ability to place the appropriate content in the correct applications. After completion of the transfer, the device disconnects the P2P connection automatically and prompts a message to take the old device to the nearest Apple Store to recycle it for free. After finishing the transfer, you can continue setting up your new iPhone. You can begin by creating a new Apple ID or logging into your existing account. Time taken to complete the transaction depends on the size of the address book present on the Android device.
Part 4: How to Transfer Contacts from Android to iOS 10 Using Copy My Data
You can transfer contacts from your Android phone to iOS through many routes. However, it is important that the application offers the easiest way to move the data. Copy My Data functions with little fuss and helps a user to move desired content from their existing Android to iOS devices in a few simple steps. Before proceeding with the guide, it is important that you have both the devices setup and working, and they are on the same Wi-Fi network. It is also important to download the app for both Android and iOS. Installation is quite simple and takes a few seconds for both the platforms.
Step-by-Step Guide to Transfer Contacts from Android to iOS 10 Using Copy My Data
Step 1. On your Android device, head to Google Play Store and search for "Copy My Data" application. You can install the same by pressing the "Install" button. On your iOS device, head to the App Store and search for "Copy My Data" application. Install it onto your iPhone.
Step 2. On your Android device, open the application and tap "Next" on the introduction screen. On your iPhone, launch the application. You will notice a message stating that the application would like to gain access to the contacts, calendar, reminders, and photos. It is important that you provide access to the application so that it is easy for it to transmit and receive data from other devices.
Step 3. After providing the access/permission to the application, you can tap "Next" on the introduction screen of the application.
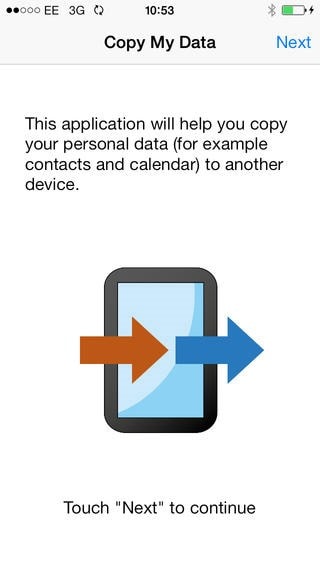
Step 4. On your iPhone device select "To or from Another Device over Wi-Fi" and press "Next". If both the devices or on the same Wi-Fi network, the application will display the Android device. If you do not see the device, then ensure that the connection is stable and that the Android phone is present and connected to the same network as that of the iPhone. Once you notice your Android device, tap it to establish a connection.
Step 5. To begin transferring the content from Android to iPhone, you need to press "Copy Data from Selected Device" feature. This feature will give you the permission to access content present on the Android device and move it onto your iPhone.
Step 6. After establishing a connection between the two devices, the application will prompt a pin code on the Android device. You need to enter the same number on the iPhone application, which allows the app to display the content that it can transfer between the two devices over the Wi-Fi connection.
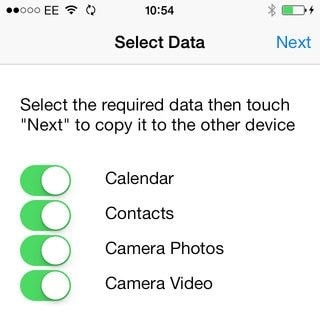
Step 7. On your Android device, the application will allow you to control the data that you wish to transfer to the connected iPhone. You can begin marking the check boxes for the categories that you want to move to the new iPhone. After selecting the required content, you have to press "Next" button to begin the transaction process. Transferring the contacts from Android to the connected iPhone device is dependent on the size of the address book.
Conclusion: As explained above, you have an opportunity to select any one of the procedure to transfer contacts from Android to iOS. Using any of the application is a user choice. Nonetheless, for users who wish to have a backup of the content of both the devices or transfer larger files have the opportunity to use MobileTrans from iSkysoft to ensure that they move the desired content from Android to iPhone, and vice versa securely with no loss of data. For those who wish to move only the contacts have the option to select the direct matter using the Google account, Move to iOS, or Copy My Data apps.


