It is not always that Gimp will be flawless when removing background from a photo or undertaking general editing. There are many problems common with the program. One of the problems is having the active layers invisible. This can result in having the layer being blocked by others or its visibility is turned off. Adding a layer mask to the image is another problem as well as inability to view the saved image in a separate program.
- Part 1. How Can I Remove Background in Gimp?
- Part 2. Instantly Remove Background Tool - PhotoScissors
Part 1. How Can I Remove Background in Gimp?
Do you know how to remove background using Gimp? If not, this section is all dedicated to informing you on that and it will be easy editing your photos whose background you don't want to see. At first, it might appear to be challenging but you will see things in an easier and faster way once you have been used to Gimp. Gimp has many features that include a customizable interface, digital retouching, photo enhancement and hardware support. It's easy to use and comes for free so you will not incur any expenses. Nevertheless, it has lesser buttons compared to other programs while some features are missing. That will compromise its effectiveness.
- Step 1 - Have Gimp installed to your computer and launch it to add the image. Open the image in the program to get started.
- Step 2 - Lookout for the "Add Alpha Channel" icon to click if it's not there. If it's already added, the section will be grayed out. This step is very important because without the channel, it will be impossible to remove the background.
- Step 3 - Then, select "Fuzzy Select Tool" and then proceed to activate the "Feather Edges" option. That will ensure the edited object has a smooth texture.
- Step 4 - Adjust the radius before selecting the image background you are removing. When satisfied that the area selected is a true representation of what you want to remove, press the "Delete" key on the keyboard and your image background will be erased.

Part 2. Instantly Remove Background Tool - PhotoScissors
There is a lot that you have been missing in case PhotoScissors has not been one of the programs you use for editing photos. It is one of those proven to be excellent in removing backgrounds as it works at very high speeds and delivers instant results. Your edited images will not lose an inch of their quality and you can get both paid and free versions of the program. You should be wise enough to make the right choice on what suits your needs satisfaction. PhotoScissors will always be an ideal choice for editing your photos with bias on removing backgrounds.
Some of its standout features are:- Added offset boundary option and added shadow option.
- Enhanced stability and usability.
- Added crop & resize option.
Step-by-step Guide on How to Remove Background from Images with PhotoScissors
Step 1. Import Image
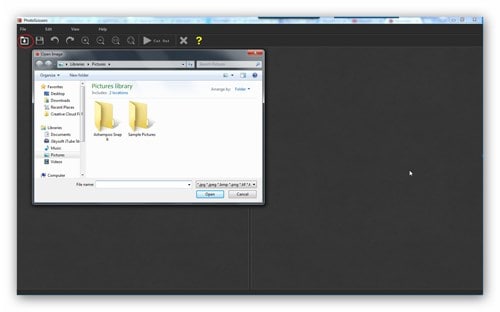
You can do nothing without PhotoScissors getting installed to your computer. Make sure this is undertaken as the first thing and the program has to be functioning properly. After you have made sure that everything works well, add the photo you are to edit into the program. A simple drag and drop will work the trick or use the long process of the menu bar which works as well.
Step 2. Outline Your Image
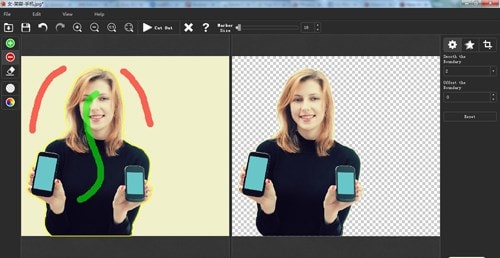
Once the image has been added, mark it out to know the sections that will be erased and those that will be retained. This is all about the background and foreground.
Step 3. Apply Changes
Lastly, you should save the changes made to the photo after being applied automatically. If you overlook this step, you will have done useless work.


