With no restrictions, everyone has the right to record what their heart embraces, whether it’s an online or offline conversation or meeting. Sometimes we intend to rewind and go back in time to access information from our past conversations or meetings, and it seems impossible. But don’t stress: give thanks to the advanced world we live in, where we have access to thousands of mobile gadgets, millions of apps, and platforms. You should know there’s nothing impossible. Now, you can easily record and access all meeting conversations online without stressing. All you need to do is immerse yourself in the knowledge of zoom video recording. Zoom video recording is done to educate absent and present minds for attendance and accountability, reference purposes, open communication, and more in a zoom meeting all from your PC, iOS, or Android mobile devices, just by granting the app permission to access other features on your device. Here we bring you the easiest Ways to record zoom meetings, let’s take a look at them!
- Part 1. How to record zoom meetings on MacBook or Windows 10 PC?
- Part 2. Record online meeting with Filmora (PC/Mac) Filmora X.
- Part 3: How to record zoom meetings on iPhone or Android?
How to record zoom meetings on MacBook or Windows 10 PC?
1. Local recording: If you’re participating in a zoom meeting, you can locally record meeting videos, and multiple audio files on your PC by local recording. To put every recording process on a linear rail of convenience, firstly, you need to do a zoom local recording set up. To enable this option, you need to:
Step 1 - Sign in to the Zoom web portal as an administrator, with the privilege to edit account settings on your PC.
Step 2 - Down to the navigation menu, click on Account Management, then, the Account Settings. After this, in the recording tab, scroll to the Local Recording option, and verify the enabled setting.
Step 3 - Should in case the setting is disabled, Simply click the toggle button to enable it. If a verification dialog appears, then click turn on to verify the change.
Also, if you wish to make the setting a default, just click the lock icon to confirm the setting.
After the above setup, you can now proceed to achieve your goals. To record multiple audio files on zoom using local recording from each participant of the zoom meeting, just:
Step 1 - Open the zoom client, click the settings drop-down and select the Recording tab.
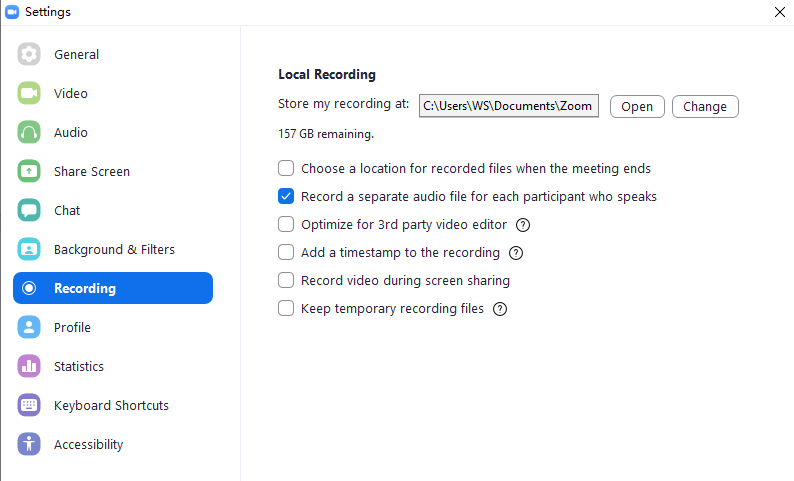
Step 2 - After this, enable Record a separate audio file for each participant among the options on the right side of the screen to start recording.
Step 3 - When the meeting is over and the audio is processed & saved, open the recording folder and click on the audio record folder to access each participant’s audio file.
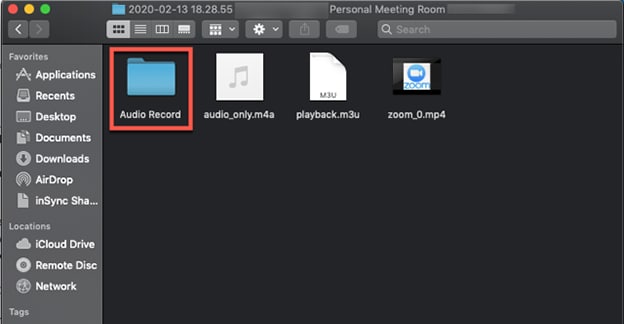
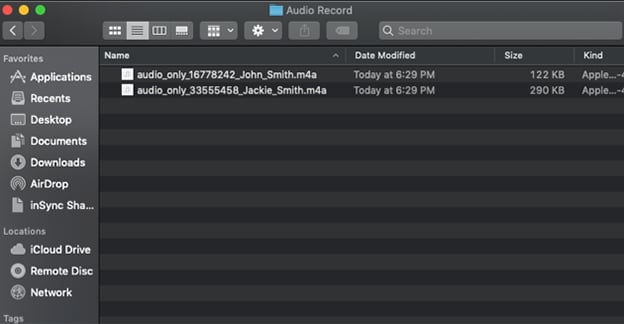
2. Cloud recording: No walls of limitation around you. Just as you can access the local recording—no side-picking here: you can also use cloud recording, which is iOS, Android, and PC compatible, to record on zoom. Just like the account set up for zoom local recording, it’s the same for zoom cloud recording—the only difference here is selecting the cloud recording over the local recording option. To record a meeting using cloud recording on your MacBook or Windows 10 PC, all you need to do is:
Step 1 - Start a meeting as a host, then click the record button.
Step 2 - Select Record to the Cloud to start recording. Once you are done with the meeting, click pause/stop recording to end the recording.
Step 3 - Before you can view and manage your cloud recordings, you’ll be notified with a two-link email by zoom to certify the processed recording.
Record online meeting with Filmora X
If you’ve decided to use the simplified advanced features of Filmora X to record, just follow the listed steps and have a successful recording.

Features about Filmora X
- Simple video creator without limits: The motion tracking, color matching, video keyframe can make the editing easier.
- Powerful tools to unleash your creativity: You can pan and zoom your video, stabilize and enhance your video on Filmora X.
- Stylize your video with amazing effects on Filmstock: Filmstock is an one-Stop resource center, including footage, music, images, and effects for the best video editing.
- Share your creativity with the world: Share your work on YouTube and Vimeo.
Security Verified. 5,481,347 people have downloaded it.
Step 1 - Install and launch the Filmora X on your PC. Then, click the record menu and select the Record PC screen option to use the Filmora X screen recorder to start recording.
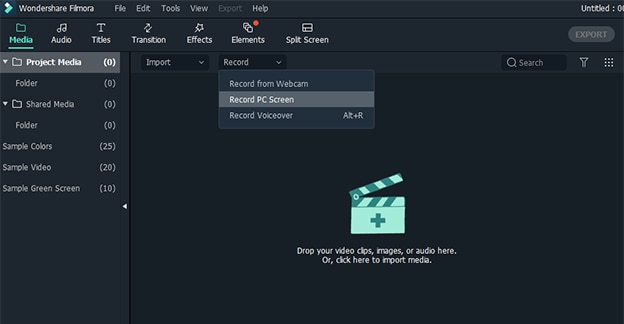
Step 2 - You can choose a custom view using the rectangle icon on the top left side of Filmora’s recorder window. To select the mic you’ll be using to record the meeting, click on the Microphone icon, enable or disable your PC’s speaker when recording by clicking the speaker icon. Also, to select the storage location for the recording, choose quality, set the duration of the recording, and decide if the mouse will appear or not on your screen during the recording, all you need to do is click on the setting icon at the lower right corner of the recording window and access.
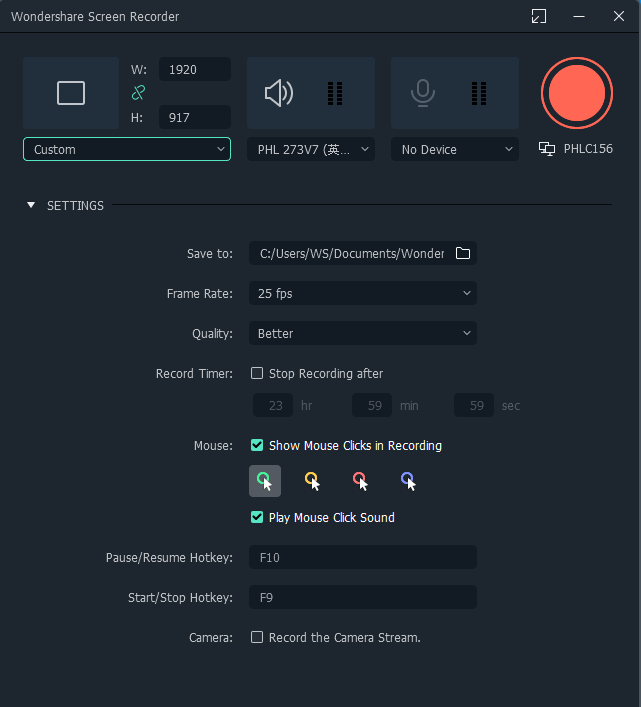
Step 3 - To begin the recording process, click on the REC button which starts on a three-second countdown. Once you’re done, press F9 on the keyboard to stop recording.
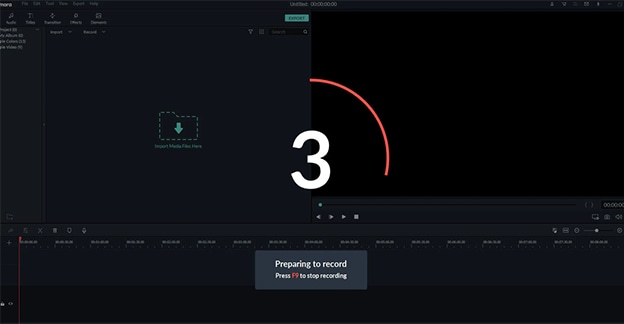
NOTE: The recorded file will automatically open in Filmora’s video editor so you can edit it before sharing it.
How to edit zoom recording video?
Using the intuitive editing features of the Filmora X, you have to import and upload files to the Filmora’s video editor before editing. But since the recording automatically opens in Filmora’s video editor, all that needs to be done here is start the editing processes.
- If you need to cut off irrelevant clips, add more clips all together in one sequence, use the red playback button in the lower half of the editing window and make any change. Excluding that, you can also add images to your recorded video, beautify them by just clicking the painter’s palette tool, then right-click to access additional editing features.
- Adding an audio file to the recorded video is simple just as dragging and dropping the audio file on the editing strip below. You can also make your recorded video more polished in professional quality by clicking transition in the top menu bar of Filmora’s editing window, accessing the available transitions. Filmora has made everything easy and accessible: you can add varieties of title and text designs by clicking the title in the main menu bar, utilize the Green Screen effect by clicking the icon next to the painter’s palette. You can also click on the microphone icon underneath the video/image box if you choose to narrate the recorded zoom meeting in the best audio recording quality.
- After Editing is completed, you’re left with three exporting options. Whether you choose to export the edited video to your device, upload it to YouTube, or Vimeo, just click on export on the top menu bar on your screen.
How to record zoom meetings on iPhone or Android?
Since zoom local recording doesn’t support iOS or Android devices, people do the most by asking the question: can you record zoom meetings on iOS, or Android smartphones? Whether you’re an iPhone or Android user, you can record zoom meetings on your smartphones just like the PC users using zoom cloud recording, although you have to be the meeting host before starting zoom video recording. To record with your iPhone device, just:
Step 1 - Tap More on the screen of your iPhone while hosting, then tap record to the cloud.
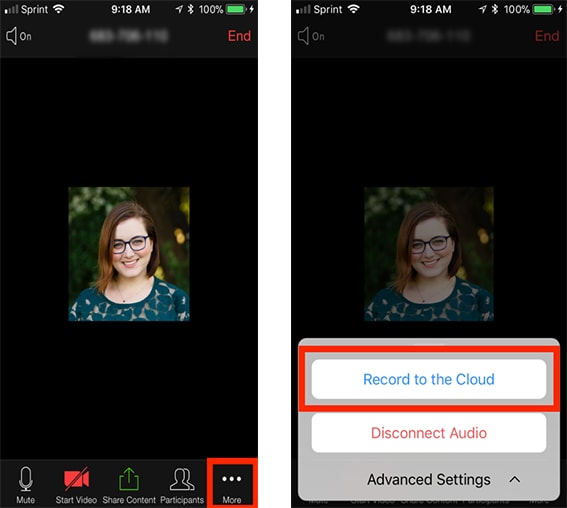
Step 2 - After engaging, you’ll see a recording at the top of your screen.
Step 3 - Once you’re done recording the zoom meeting, Tap more once again to stop the recording. Once you’ve done this, the recording will process and appear under my recording on the web.
If you’re an Android user, you can also record zoom meetings with cloud recording. All you need to do is follow the steps for the cloud recording on iPhone. But the only difference here is after tapping more, you tap the record option unlike the iPhones where it’s a record to the cloud option.
Frequently Asked Questions
1. How to record zoom meeting without permission / if you are not the host.
You know if you’re not hosting a zoom meeting, you can’t record. And If you wish to record, you’ll be needing a granted permission from the host of the zoom meeting. Although a lot of people find it difficult to record zoom meetings, once they’re not hosting the zoom meeting. But all thanks to Filmora X: an easy-to-use software that allows you to record zoom meetings without permission even in situations where you’re not the host, and other software which you can use to record a zoom meeting just as a participant.
2. How to share recorded zoom meetings?
Sharing your recorded zoom meeting isn’t a problem at all. If you’ve recorded using zoom cloud recording, to be on a safe drive, just: sign in at zoom.us/signin. After signing in, Click on My Recordings, then click Share under any recording and share your recording with anyone you choose to share it with.
Should in case you recorded on zoom using the local recording, put your mind at its state of peace, you have nothing to worry about. You can share your recording with ease: all you need is to upload your recorded file to Dropbox, Box, or Google Drive.


