Most video editing tool can help to edit video easily. They cut, trim, rotate, merge, crop and set color hues but when re-encoding for export process begins, the rendering takes a long time. Therefore, smarter tools such as Filmora Video Editors come in handy as it contains all smart features – you can cut videos without re-encoding.
The Best Tool to Cut Video without Reencoding - Filmora Video Editor
Filmora Video Editor for Windows (or Filmora Video Editor for Mac) carrys out all jobs for basic editing that include trim, rotate, aspect ratio, hue, color brightness, contrast, crop, speed, merge etc. The audio can be edited with tools including trim, fade-out, split, voice over, volume, pitch, and equalizer. Filmora video editor is highly recommended as this helps to cut videos without re-encoding and performs efficiently.
Key Features of Filmora Video Editor:
- This stylizes videos with more than 200 types of filters and overlays. It also includes 300 types of motion graphics for all occasions and features stunning special effects.
- The videos can be personalized with adding titles, transitions, and green screen. This has the amazing option of adding more than 120 basics to occasion-oriented titles & texts.
- The options of green screen and split screen are also there to be utilized.
- You can share & export videos with ease through Filmora video editor in any format. It can be saved in different formats on devices, including iPhone & iPads, burn on DVD or just share online on social media.
Tutorial on How to Cut Video without Reencoding with Filmora Video Editor
Step 1. Launch the program
First begin with downloading the Filmora video editor. Once it is done, run the file and perform the installation by following the instructions. Choose "Full Feature Mode" to start.
Step 2. Import video to the program
First drag and drop any video, photo, and audio file for edit. Use video editor to import files even from iPhone, iPad, Android, camcorder, cameras, screen, and any other device including social media.
Step 3. Trim video from the beginning or from the ending part
You need to drag and drop the video to timeline. Look for the pointer by moving the cursor at the beginning or at the end part of the video. Then use the pointer for trimming by moving it forward or backward from start to end of the video, the part you want to edit. Make sure to follow the instructions on the screen.
Step 4. Cut video from a middle section of a video
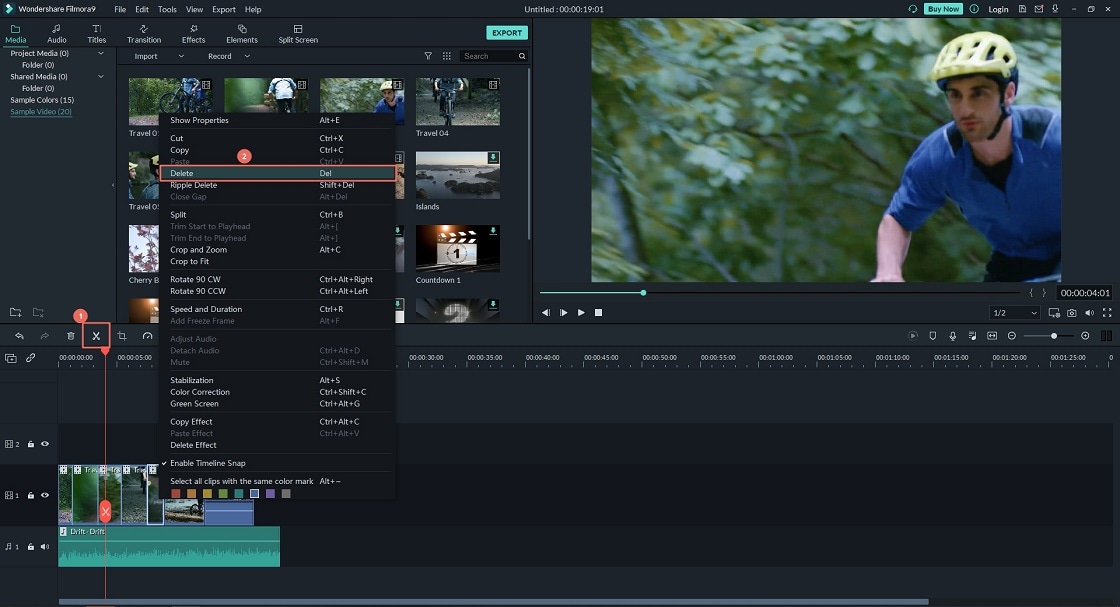
If you need to cut the middle part of the video independently, move the cursor to the beginning and end of the video you want to cut. Then use "scissors" icon to click and isolate it from the original video clip. A right click on the video will show a "Delete" option. Thereafter, save the middle portion of the video, you wish to use.
Step 5. Save or export video
Now when your video is cut, go to the preview window to view, by moving the cursor on the video and clicking it to "Play" on play-icon. Once you are satisfied, move ahead for export where you want the video to be sent. Before you export video, convert the file into a certain format where 12 video/audio formats are available in Filmora to choose from.


