Thanksgiving is the time to gather with families to thank for all the great people and things happened in our lives. There are some things which will be the same on Thanksgiving Day, such as the Turkey and beautiful videos of time that you spent with those people. For my family, watching home videos, birthday celebrations of a person, engagement or wedding videos of last year or most importantly videos of previous thanksgiving is a must. If it is the same with you, then before the Thanksgiving, you’re supposed to modify these videos to make these videos more spectacular or special.
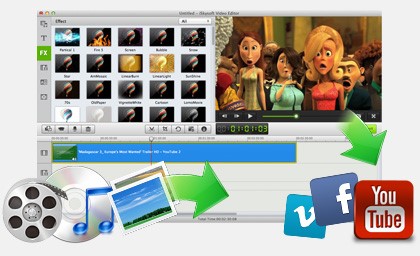
There are different video editors that will allow you to join different videos and add Thanksgiving effects to these videos to make them even more beautiful. But only few of them are easy to use for everyone. Filmora Video Editor is one such great software that will allow you to edit these videos in the best possible ways. That’s not just it, it is all-in-one media editor, you can also add beautiful photos alongside videos and the transitions will help the photos to make a perfect video. Here are the most important reasons that why you should use Filmora Video Editor to edit home videos for Thanksgiving.
* One of the primitive reasons of using Filmora Video Editor to edit home videos for Thanksgiving is the simplest and easy to understand user interface. The program is for every kind of video editor, so, no matter if you’re a newbie or a professional video editor, you can do professional level video editing using Filmora Video Editor
*The timeline of the Filmora Video editor has every basic video editing tool for cropping, trimming, rotating, splitting, video enhancing and even adding background music to the videos. All the tools are just above the timeline and can be used with one click. To make your videos even more beautiful, it has more than 280 beautiful motion elements and the special part is that some elements are specifically related with the Thanksgiving. For example; if you are editing a video related to thanksgiving, you can add turkey in it and set it in motion to make everyone laugh.
*The beautiful text styles will let you demonstrate the videos in the best possible way. Moreover, to enhance the beauty of your video, you can also add some amazing filters and overlays. Some of the filters are just like Instagram to make vintage videos while others black and white filters can be used for the videos of your childhood. All in All, Filmora Video Editor includes everything that you need to make a perfect Home video for Thanksgiving. Here’s the step-by-step guide on how you can use different tools to edit home Videos for Thanksgiving using Filmora Video Editor.
Edit Home Videos for Thanksgiving with Filmora Video Editor for Mac:

Step 1: Import media files
The first step includes importing the media files to the Filmora Video Editor, the best part is that you can import approximately all famous video and audio files to the Filmora Video Editor and that’s not it, all type of image formats are all supported in Filmora Video Editor. You can also record the videos using the Webcam on your laptop. Click on the “Import Media” button and select the media files that you want to use to edit Home videos for Thanksgiving.
Once the video files have been imported, simply drag them to the timeline to perform the editing functions. The most important thing while moving the media files to timeline is the sequence. Keep all the files in a perfect sequence to get the perfect output video.

Step 2. Basic Editing functions
Once the media files are in the Timeline, you can perform different functions on them. For some functions, you will have to move the navigating bar while others will be applied on the whole video. Here’s how you can perform basic editing functions.
- • Trimming: To remove the useless part of the video, move the cursor to a certain point and double-click on it. Now, select the “Trim to Play head” to remove the start or end of the video. If the cursor is behind the half, the start part of the video will be removed. However, if the cursor is beyond the half, the end part of the video is trimmed.
- • Splitting: Splitting also follows the same rule as that of trimming, move the cursor and select the split option to split a clip into two different clips.
- • Cropping: To Crop a video, Simply Click on the “Crop” button, and it will open another window, where you can select one of the preset crop modes. You can also select your own frame.
- • Rotating a Video: If some videos are recorded in the portrait mode using your mobile phone, rotate them to perfectly align with the rest of the video. Click on the “Show Inspector” button and then rotate the video to an appropriate direction.
- • Changing the Speed of a video: To make a slow motion or time-lapse video, click on “Show Inspector and adjust the bar to change the speed of your video.
- • Adjusting Colors of a Video: The colors of a video can also be adjusted in “Show Inspector”, there is a mode for auto-enhancing the colors of your video.
Step 3. Adding Background Music
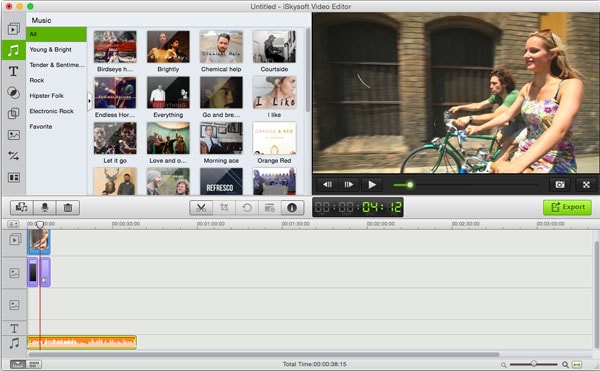
You can either select to add music from hundreds of sound effects in the Filmora Video Editor or can also add your own track. Move the Audio Track in the Timeline and adjust it with the video to properly sync it.
Step 4. Adding Motion Elements on Videos
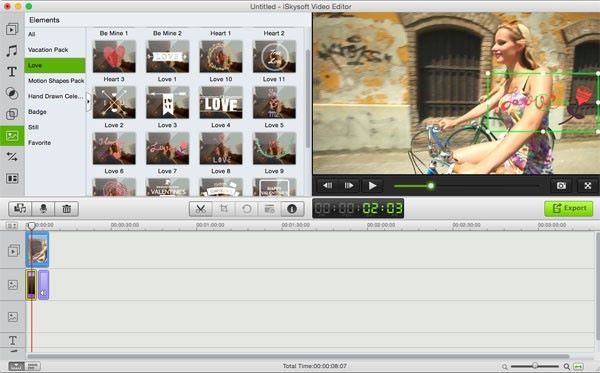
From the left panel of the Filmora Video Editor, Click on Elements, and it will show you all elements in different categories. Drag and drop and element to the timeline to apply on a video. Once an element is applied, you can also define its direction from the preview window.
Step 5. Apply Filters and Overlays
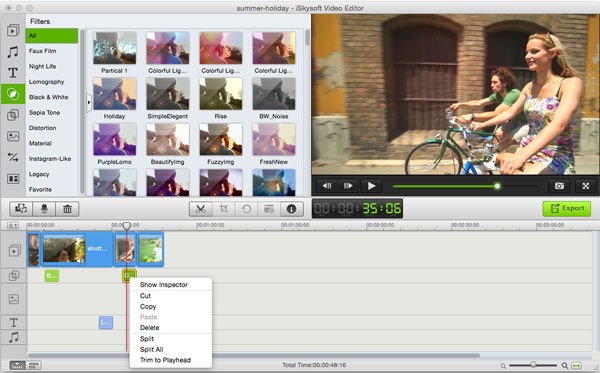
From Colorful to Black and White Filters, click on the filters or overlays and to add on the video, simply drag and drop the filters and overlays.
Step 6: Applying Special Effects
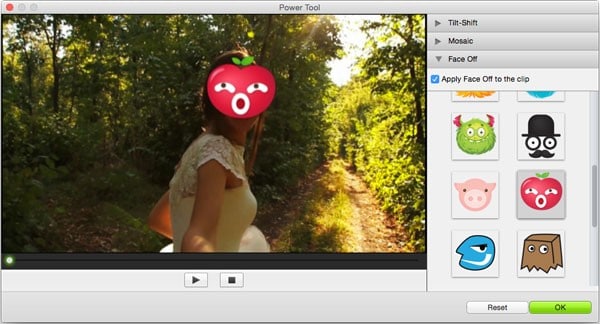
Special Effects are the most important part of the Filmora Video Editor, click on the “Power Tool” to reveal the special effects.
- • Tilt-Shift: it will focus on one parameter while blurring the rest of the frame.
- • Mosaic: It is used to blur a specific portion of the video while the rest of the frame remains the same.
- • Face-off: it is a cool effect to replace all the faces in the videos with the beautiful cartoons like characters and there are plenty of them to apply on a video.
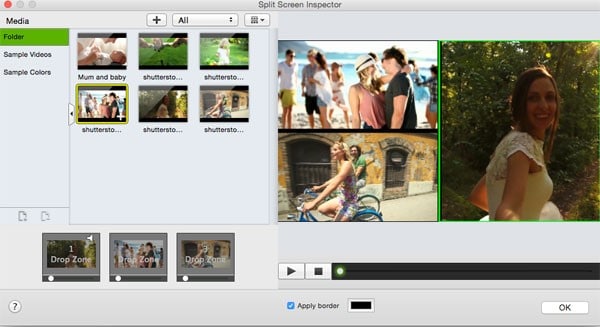
Step 7: Split Screen effects to join the memories of past with Present
This is the most important effect to make your home videos for thanksgiving even more beautiful. If you have a memory of the childhood and another video of recent past, you can combine them using the Split Screen effect. The best part is that you can combine more than two memories in one frame to make a splendid video. Click on the “Split Screen” button at the last of the left panel and select an effect. It will redirect you to another windows. Add two videos in different drop zones and Click on OK.
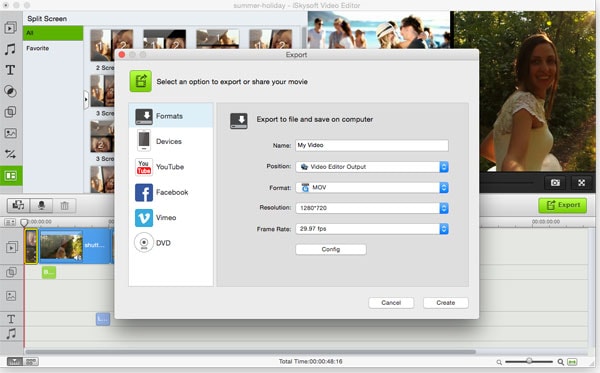
Step 8: Export Videos
After using beautiful text animations, filters, overlays, Thanksgiving motion elements or split screen effects, once the editing is finished, you can easily export the video to your computer. Click on the “Export” button. Now, Set the parameters to create a video or directly upload it to the YouTube, Facebook or Vimeo to share with your family or friends.


