A makeup tutorial is a lesson to guide viewers to apply a beauty product like concealer, eyeliner, or lipstick. YouTube viewers can learn different methods simply by watching these short makeup videos. Before buying a product, they can also watch a review of a specific product. YouTube channels are flooded with makeup tutorials by celebrities, brands; earning millions of views and generating a lot of revenue. The larger community of makeup and beauty monetize their channels on YouTube. Many YouTubers/influencers have come a long way in creating makeup videos with millions of subscribers. They have featured in world-famous magazines like Forbes, and many have been tagged as highest earning YouTubers.
Tati Westbrook is a famous beauty influencer with over 9.6 million subscribers on the world's largest video streaming network. Nikkie Tutorials is a famous YouTube channel by Nikkie de Jager, who started following her passion when she was just 14. Her channel is purely about makeup and transformations. She delivers a strong message on the power of makeup in every makeup tutorial video.
If we talk about fashion, it rewinds with time, and YouTuber channels provide tips and tricks to look better, grooming overall personality. If you want to start your career as a makeup artist on YouTube, we are here to help you. In this handy guide, we'll guide you on how you can create stunning makeup tutorials to engage your viewers. Let's begin with the top tips and tricks to film a makeup video.
- Part 1. How to make a makeup video with Filmora (step-by-step guide)
- Part 2. Seven Things You Should Know Before Filming a Makeup Video
- Part 3. Frequently Asked Questions
Part 1. How to make a makeup video with Filmora (step-by-step guide)
Filmora X is the best video beauty editor to add more to your simple makeup tutorial after the video shooting. Filmora offers lots of beautiful text font, color, animation to make your video look more professional. Before exploring different features, dig deep to create an engaging YouTube thumbnail using AI Portrait. Thumbnail makes the viewers either click or leave your video, so capture some still images to create a thumbnail for your video.
Prerequisite: Before starting, make sure that you have installed Filmora X on your computer.
Before adding cool effects to your video, the prerequisite is to shoot a perfect video without shadows and flickers. Here, we are unveiling some tips and tricks to help you to shoot an exemplary makeup video. #1. Sit in front of a window facing sunshine for a natural glow on your face. You can buy a ring light to get the continuous stream of light without distortion. #2. Make sure that the audio quality is good by upgrading camera mics or using reliable audio software.
Once you have completed the shooting of your YouTube makeup tutorial, follow these steps to add spellbinding effects and transitions to fine-tune your makeup video.
Step 1. Import the clips into Filmora
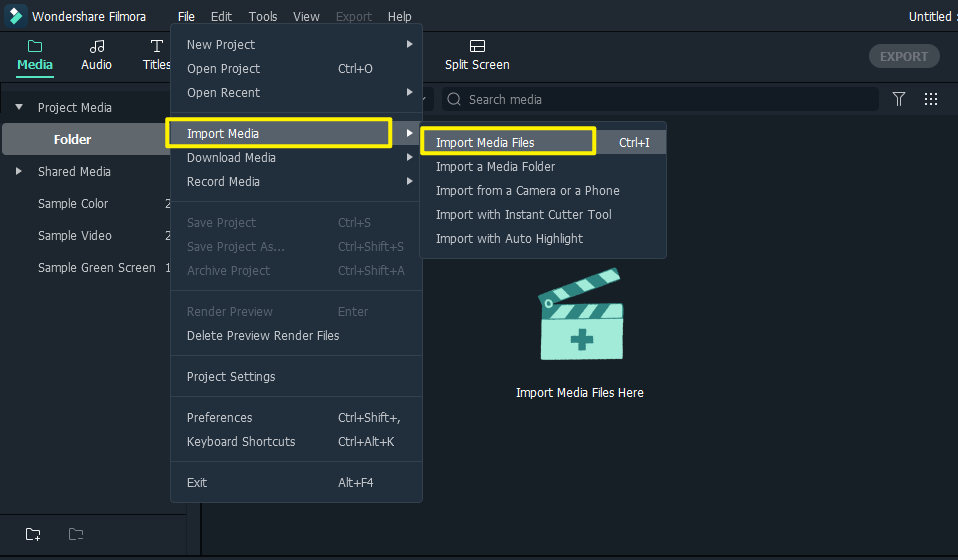
Open Filmora and import the makeup videos you've filmed through File Menu - Import Media. After that, you can drag the clips to the timeline and preview the effect of all your editings in the Preview Window at the upper-right corner.
Step 2. Add Transition to your video
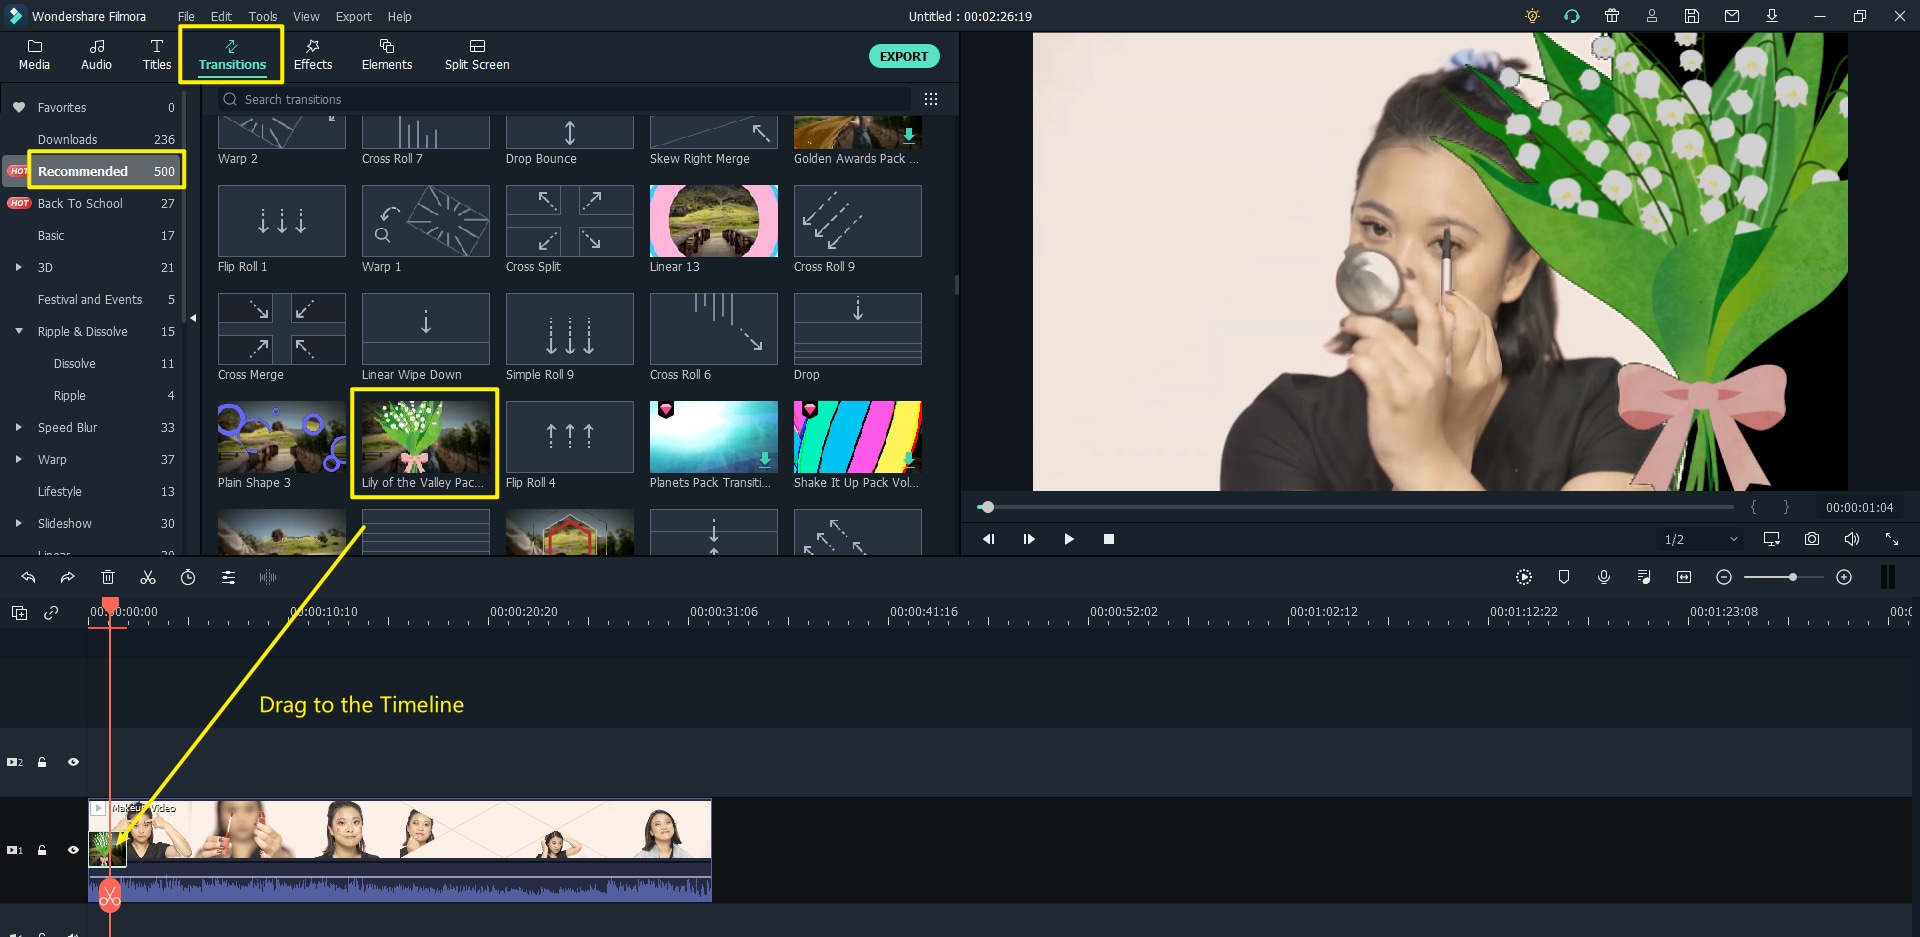
There're many different shots from different angle, you might need to add transistions to make the video run more smoothly and interesting. You can choose over 800 different kinds of transistions from the Transition Menu. Here I use a bouquet of flowers as the transition, and you can find many other transitions like this for your beauty videos.
Step 3. Add title or lowerthird to your video
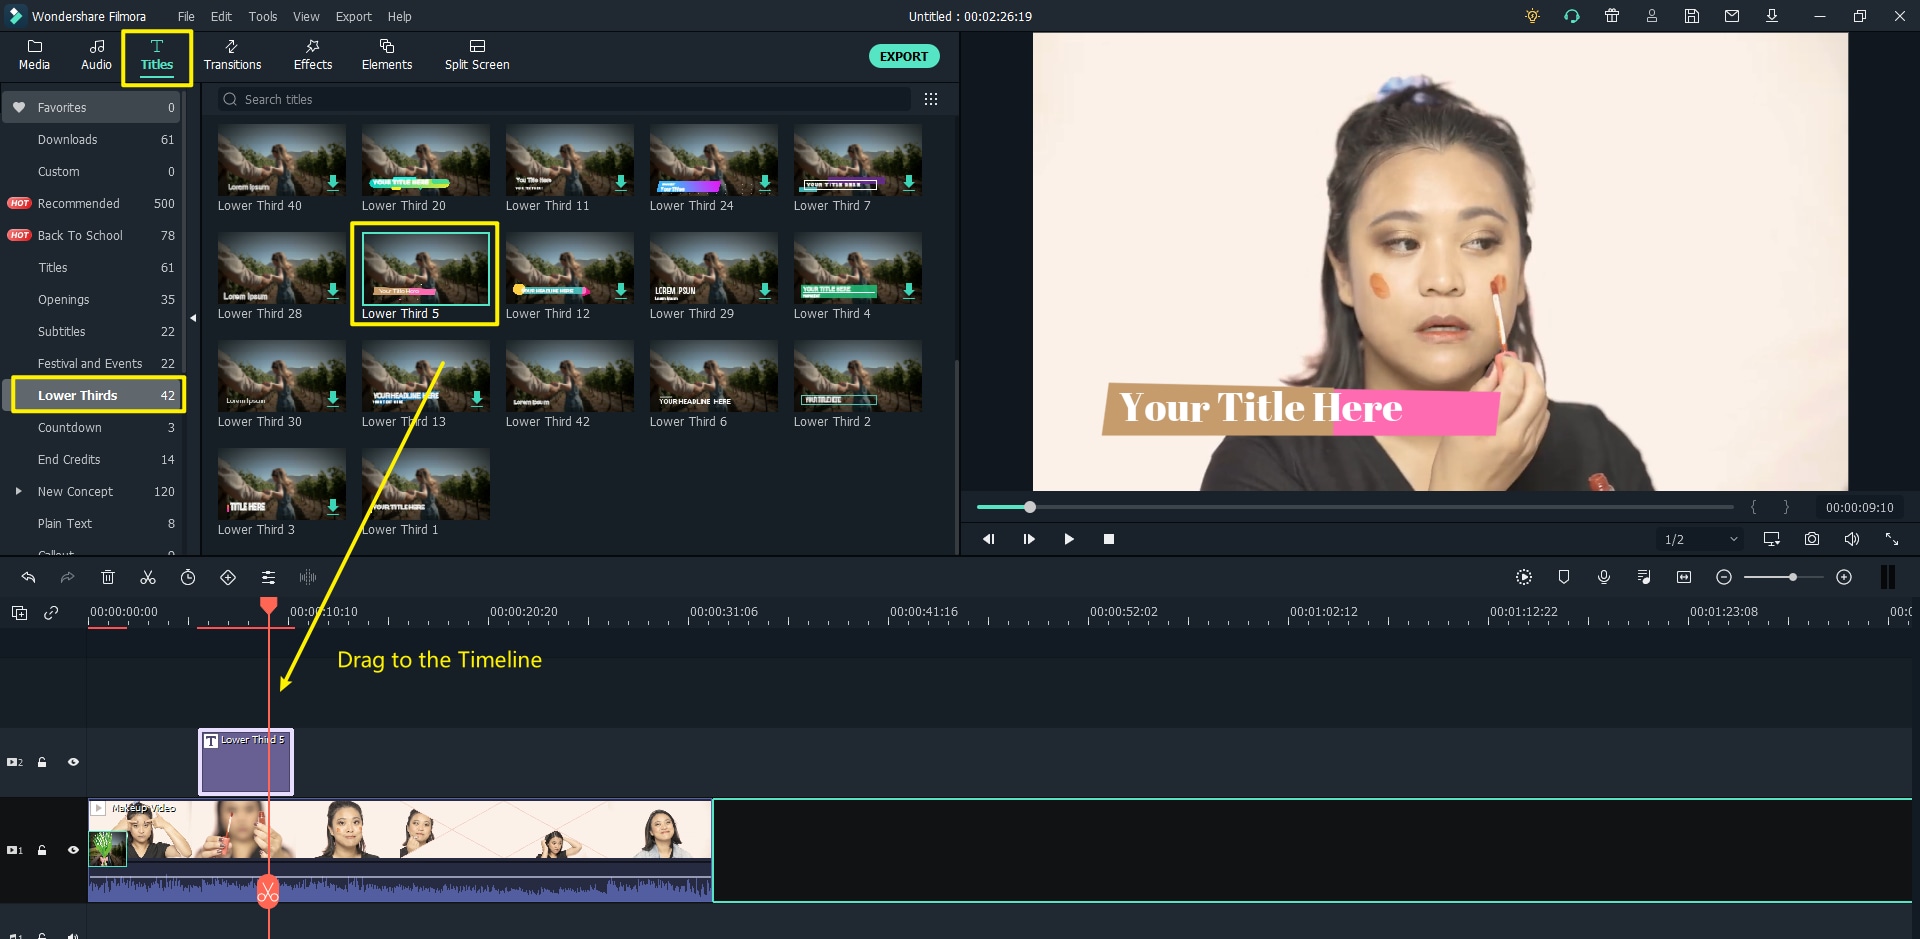
Filmora offers well-designed title and lowerthird options (with adjustable fonts, colors, and animation) for you to add stylized text to the videos. You can use these effects when introducing makeup products in your makeup tutorial. It will create more appeal to the viewers.
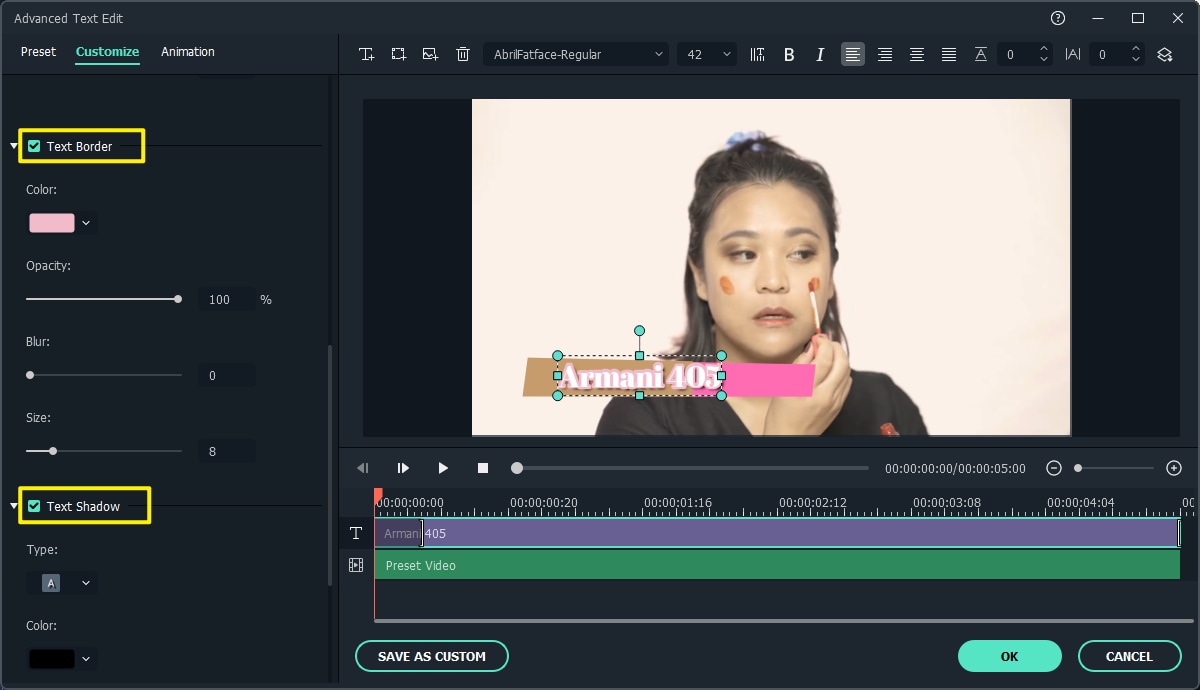
As shown in the below screenshots, you can easily customize your text in the Advanced Text Edit pop-up, from text-fill, text-border, to text-shadow, animation. There are endless possibility for you, you can design the unique text you want and use it in all of your makeup videos as a personalized icon.
Step 4. Use split-screen to create before vs after effect
Many beauty videos, including makeup video or fashion video, will create a before vs after effect. You can easily do this with filmora's split screen function. Here we will teach how to make a more interesting split screen effect wth four split screens! Check it out now.
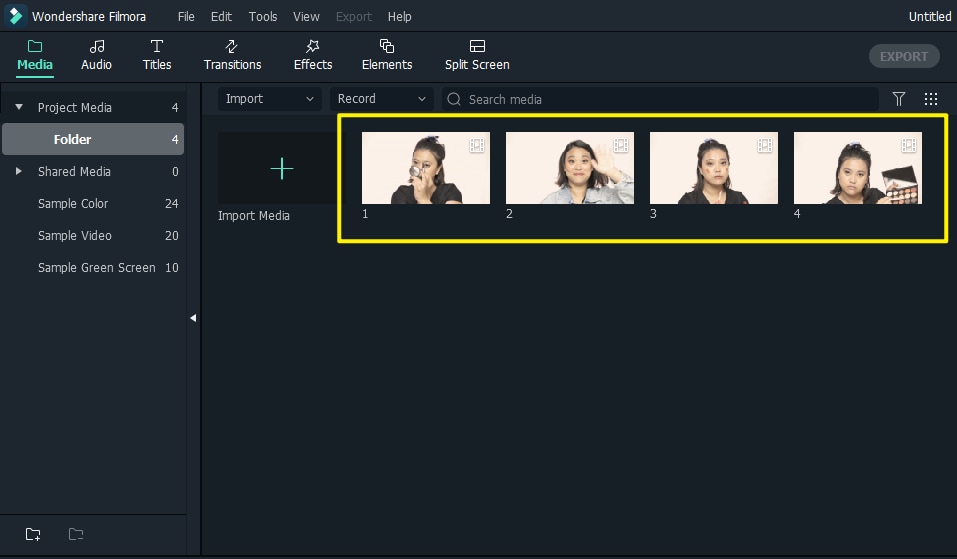
Firstly, you should import the 4 videos used in each split screen.
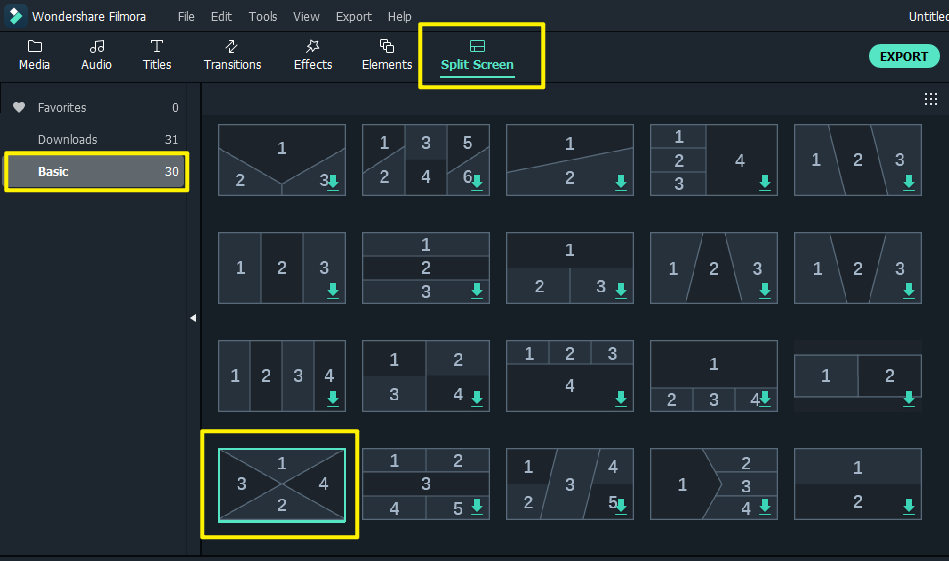
Secondly, find the Split Screen menu and drag the one you choose to the timeline.
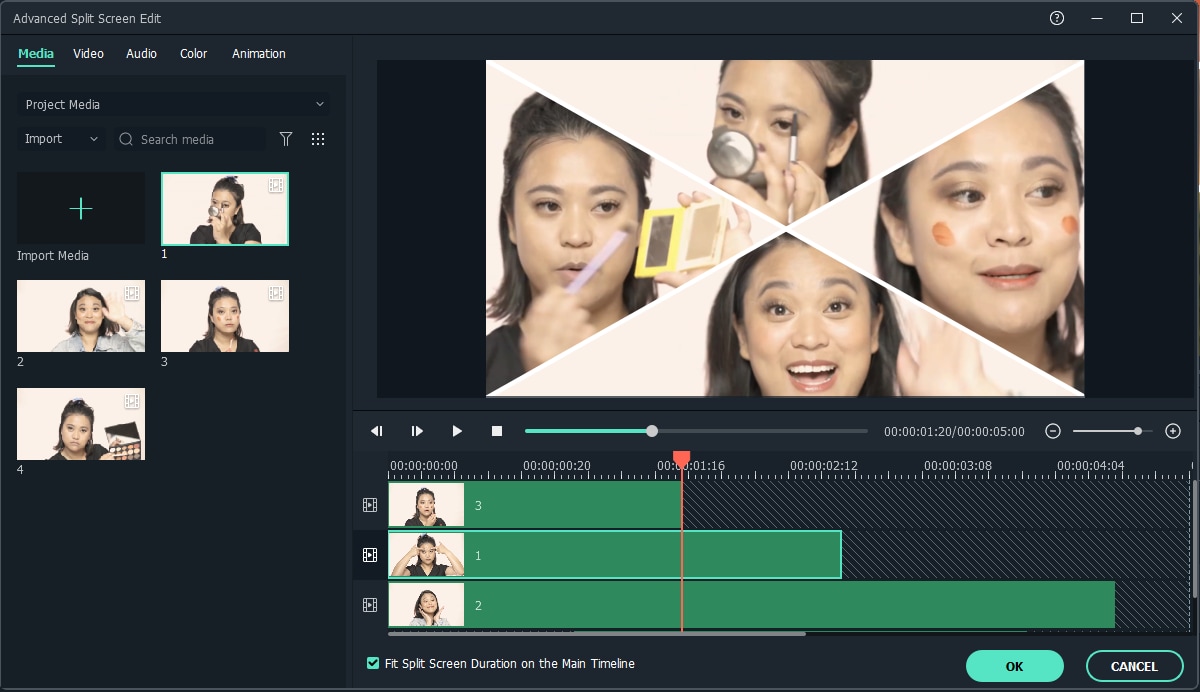
Double click the split-screen-effect on your timeline and move the 4 different videos to the 4 timelines shown in the pop-up. Here we put them in an order of time: from eyeshadow to eyebrow, then lipstick, and the last full-makeup one.
Step 5. Add cute or elegant elements to your video
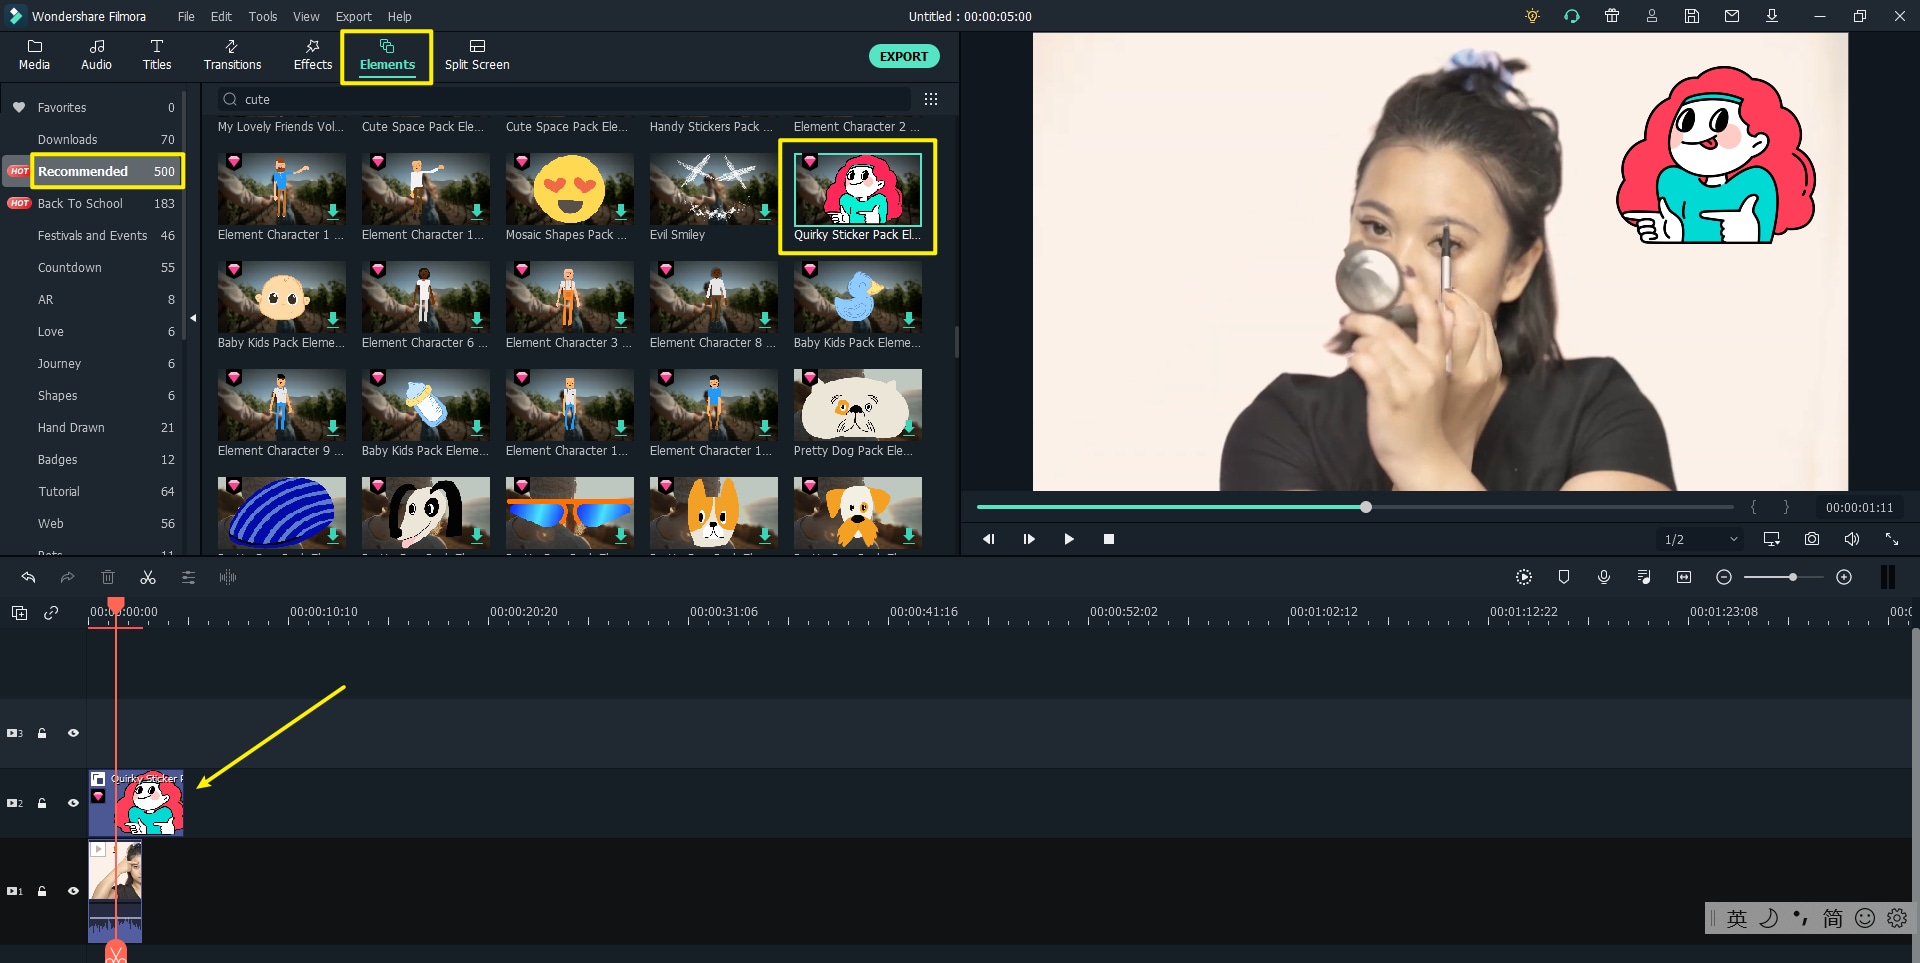
To add more flair to your video, you can add cute or funny emojis, elements to the video. Here we use the adorable little girl to add a tint of sweetness. Girls like that, aren't they?
Step 6. Discover amazing Beauty-themed effect packs in Filmstock
Maybe the best and easiest way to add all kinds of transitions/titles/lowerthirds/elements to your video is to find a complete suit of effect pack in Filmstock - an one-stop shop for royalty-free video effects, footage, audio and more. For example, you can search for beauty video in filmstock, and find exactly what you want - all effects in one pack belong to one theme (with well-designed and coincident color and style). They will definitely make you video more high-class and unique!
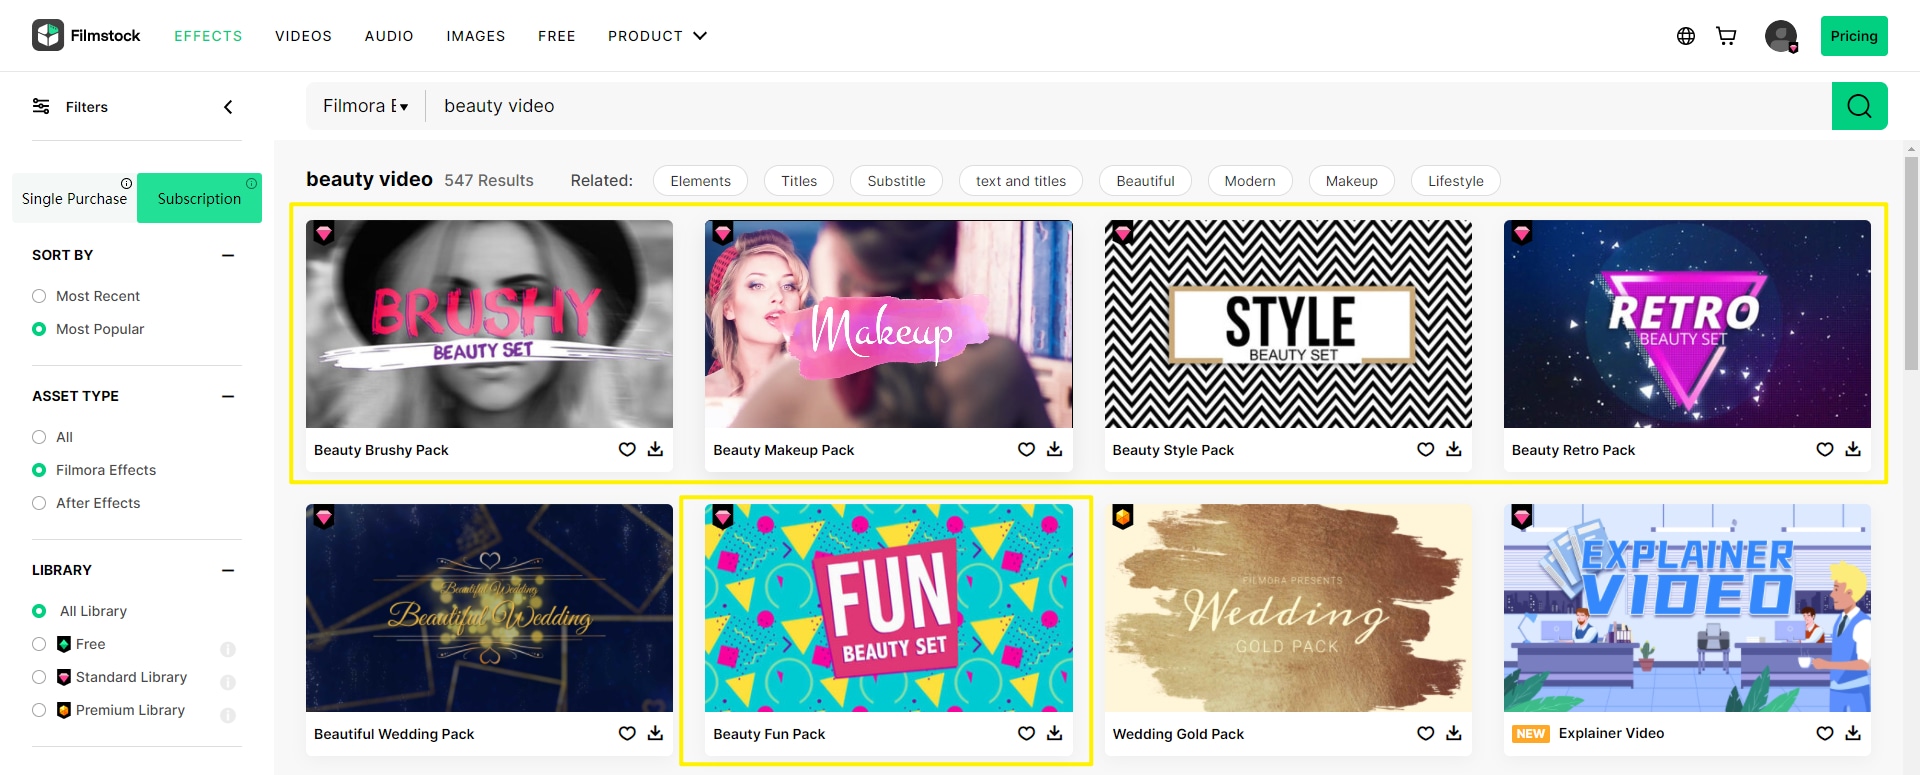
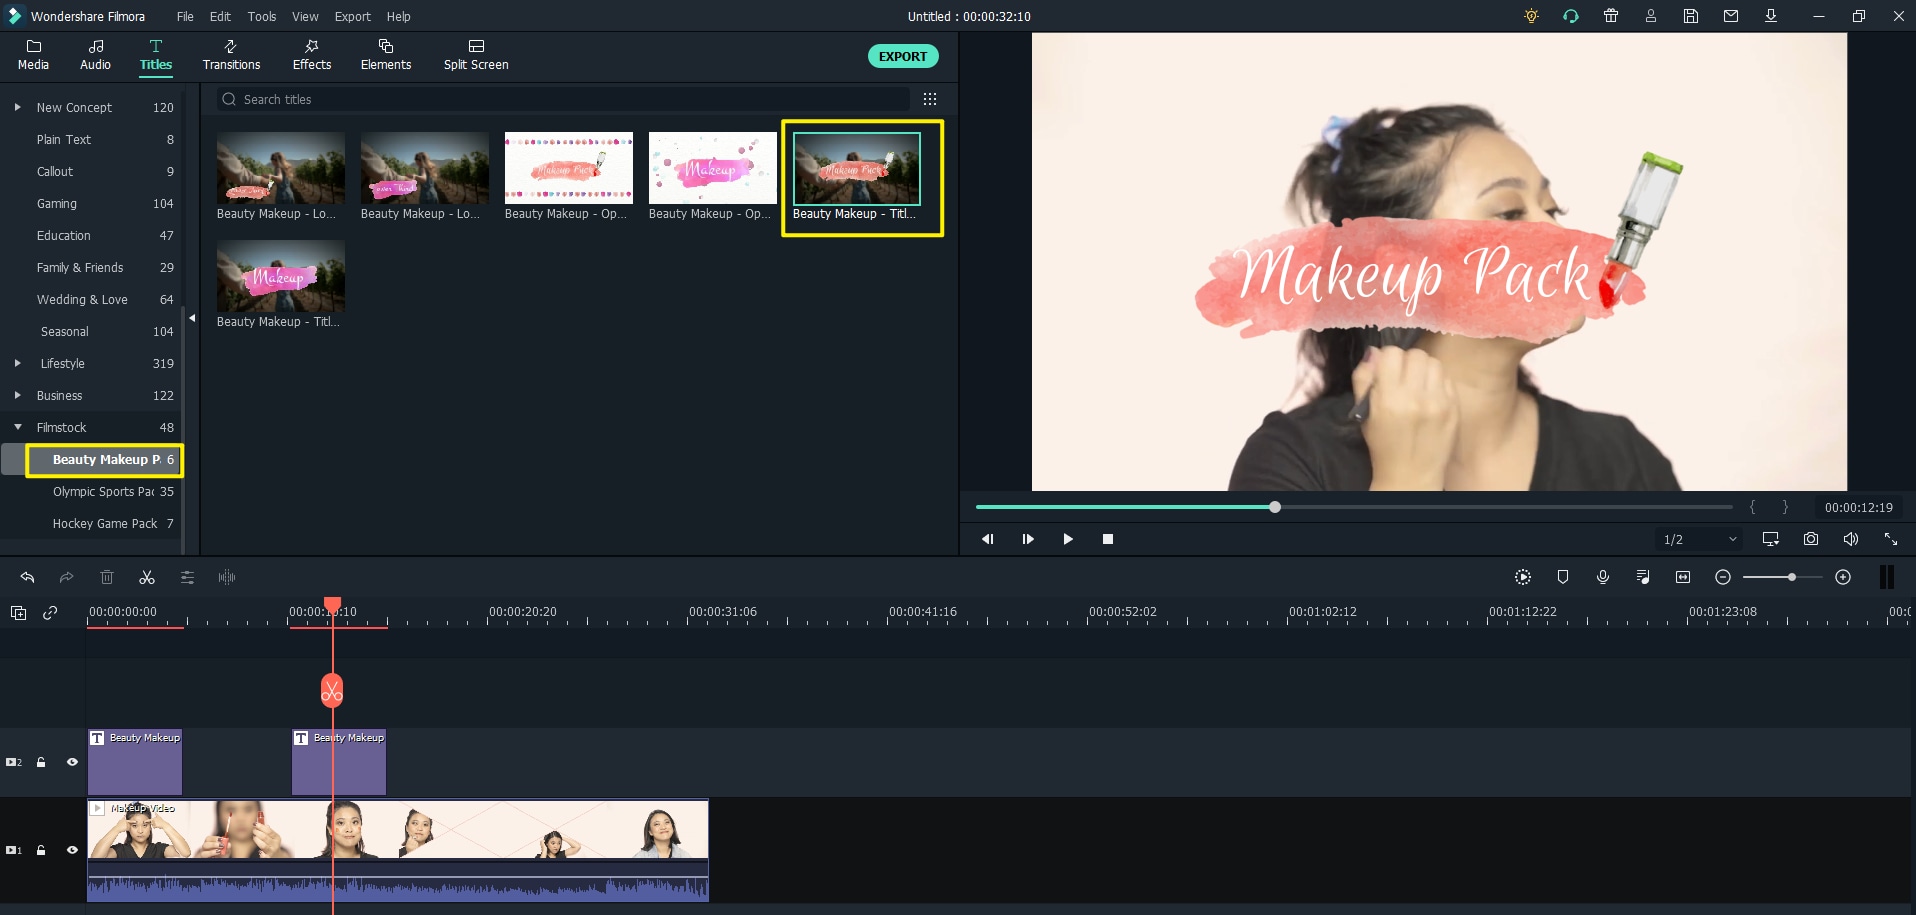
The filmstock "Beauty makeup pack" as shown here contains many makeup tool & beauty elements, such as the lipstick shape and the rosy color.
If you're interested in Filmora and glad to try it, why not watch the short interview video to learn more about us and our product! Welcome to join us and create with Filmora & creativity.

Key Features
- Best video editing software for beginner and semi-professional, youtubers, instagarammers.
- 500+ free special video effects to customize and create an awesome movie by yourself.
- 1000+ standalone effects downloading resources to make videos in all kinds of styles.
- Record voice in real-time: you can have you voices recorded in realtime and instantly add them to the video files.
Part 2. Seven Things You Should Know Before Filming a Makeup Video
If you have just started your makeup channel, our expert tips will help you create a quality makeup video. Before starting, go through our tips to add to your knowledge:
#1. Do Paperwork
All quality projects start from the paper sheet. Take a paper, and make a list of points you are going to highlight in your makeup tutorial. A well-structured script will boost your confidence when filming.
#2. Prepare all the Products
Before start filming your makeup video, lay all the products out. Don't forget to clean your makeup brushes, fix a mirror in a clean place to save your time and effort.
#3. Find a Full-Lit Place
Light directly influences the quality of your video. So sit in front of a window where the sun shines through and use that light to your advantage. Just keep in mind that the light is soft and natural, not too intense.
#4. Use LEDs and Reflectors
If you haven't the lighting set up in your place, we suggest you buy LEDs to create a lit environment. When using LEDs, never forget to have reflectors as they disperse the light evenly throughout the room. So you won't feel hot or be overwhelmed by the light brightness.
#5. Use Ring Lighting
Have you ever noticed the small white ring in the eyes of Youtuber when they are applying makeup? It's so because they are using ring lights when shooting their YouTube makeup video. Ring lights provide a soft, radial glow with a temperature of 5400K. They can also mimic natural daylight. Using rig lights, you need to worry about flickers as the ring provides a continuous stream of light.
#6. Use Audio Software
The general rule for voice is that it should be loud when you're recording your makeup video. Some cameras have mics, but the best approach is to upgrade to assure quality audio. We recommend using reliable audio software to amplify your voice. Moreover, you can attach a mic to one of your front-facing lights.
#7. Use video editing software
Simple video isn't good enough to grab the attention of your viewers. Before uploading your makeup tutorial, you should get some high-quality video editing software with some editing skills. We recommend you use Filmora X to add cool effects and eye-catching transitions to your makeup tutorials.
Part 3. Frequently Asked Questions
#1. How to set up for making a makeup video
Before editing your YouTube makeup video, you need to set up your camera for video shooting. The role of light is crucial to avoid shadows and flickers. To shoot a perfect video, you need a camera with a flip-out screen, ring light, camera-mounted shotgun mic, and a tripod. But if you cannot access all these tools, you can shoot your video using your smartphone's camera.
Once you have shot the video, you can use Filmora X for editing purposes. Filmora X will allow you to trim, merge, and crop, add background music, rotate videos, add motion elements, animated texts, overlays, and filters, etc. Moreover, you can directly upload the video to YouTube or burn it to DVD. Isn't it fun?
#2. How to film a makeup video?
When filming a makeup video, make sure to let your audience know what you are using and why you chose it. It would help your viewers to copy your steps with great ease. To highlight the products you are using, we suggest you use autofocus. Moreover, you can also shoot separate clips and merge them into your main tutorial video. Assume that your viewer knows nothing about putting on makeup, so try to add all details. Once you have shot your makeup video, never forget to capture some still photos to create an appealing YouTube thumbnail. You can apply stunning effects and transitions to your video using Filmora X video editing software.


