A reaction video is a clip recorded by an individual or a group of people to share their opinion on someone else’s video. It may be a movie, video song, dance video, trailer, game, or TV series. Reaction videos have been playing their part for a long while. People love reaction videos as they can relate to the feelings of a person. Reaction videos are popular on YouTube where many people are creating channels to react to popular content.
As a YouTuber, you need to understand the importance of reaction videos. When you upload a reaction video on your channel, you can make others relate to your feelings. Humans are always curious to know what others feel about particular stuff. If you're reacting to a funny video, people would also feel the realization of happiness.
With the synchronization of feelings, there is a brighter chance to win an overlapping audience on your YouTube channel. You might be wondering how to make a reaction video. It requires picture-in-picture software that can help your audience to contextualize the reaction. We are here to fix the issue. In this handy guide, we'll introduce Filmora video editor to create amazing reaction videos for YouTube. Let's begin!
Filmora Video Editor - the Best Video Editor for Creating Reaction Videos
Filmora is the best video editing software that balances powerful features to create stunning reaction videos with transparent backgrounds. If you want to create a reaction video, you need to use AI Portrait by Filmora without worrying about expensive material. In this guide, we'll unveil how you can make a stunning reaction video using the powerful features by Filmora video editor.

Key Features
- Best video editing software for beginner and semi-professional, that comes with powerful editing skills like trimming, splitting, rotating, editing, etc.
- Advanced video effects like keyframe, motion tracking, green screen, audio ducking also be found and applied to your video within few clicks.
- 500+ free special video effects to customize and create an awesome movie by yourself.
- 1000+ standalone effects downloading resources to make videos in all kinds of styles.
- Record voice in real-time: you can have you voices recorded in realtime and instantly add them to the video files.
Step-by-step guide on using Filmora to create an engaging reaction video
Instead of the rectangular box, reaction videos in which the person has a transparent background have more appeal. But it requires expensive materials such as a green screen, and stand to make a video with transparent background. You may find it difficult to afford all these materials to create a reaction video for your channel.
You don't need to worry about these materials. Filmora has solved it for you! Filmora X is an efficient reaction video maker that allows its users to create such transparent background videos without expensive material. It has introduced a new feature named "AI Portrait" that uses artificial intelligence to create cool effects. You can use this latest technology to separate the background and humans in a single click. So, let's dive deeper to create stunning reaction videos with Filmora's AI Portrait filters.
Before starting, make sure that you have installed Filmora on your PC. After completing the installation, record a reaction clip using a camera or smartphone.
While shooting the reaction clip, do use camera that captures high resolution; and use tripod to make your video more professional
Step 1: Start Filmora
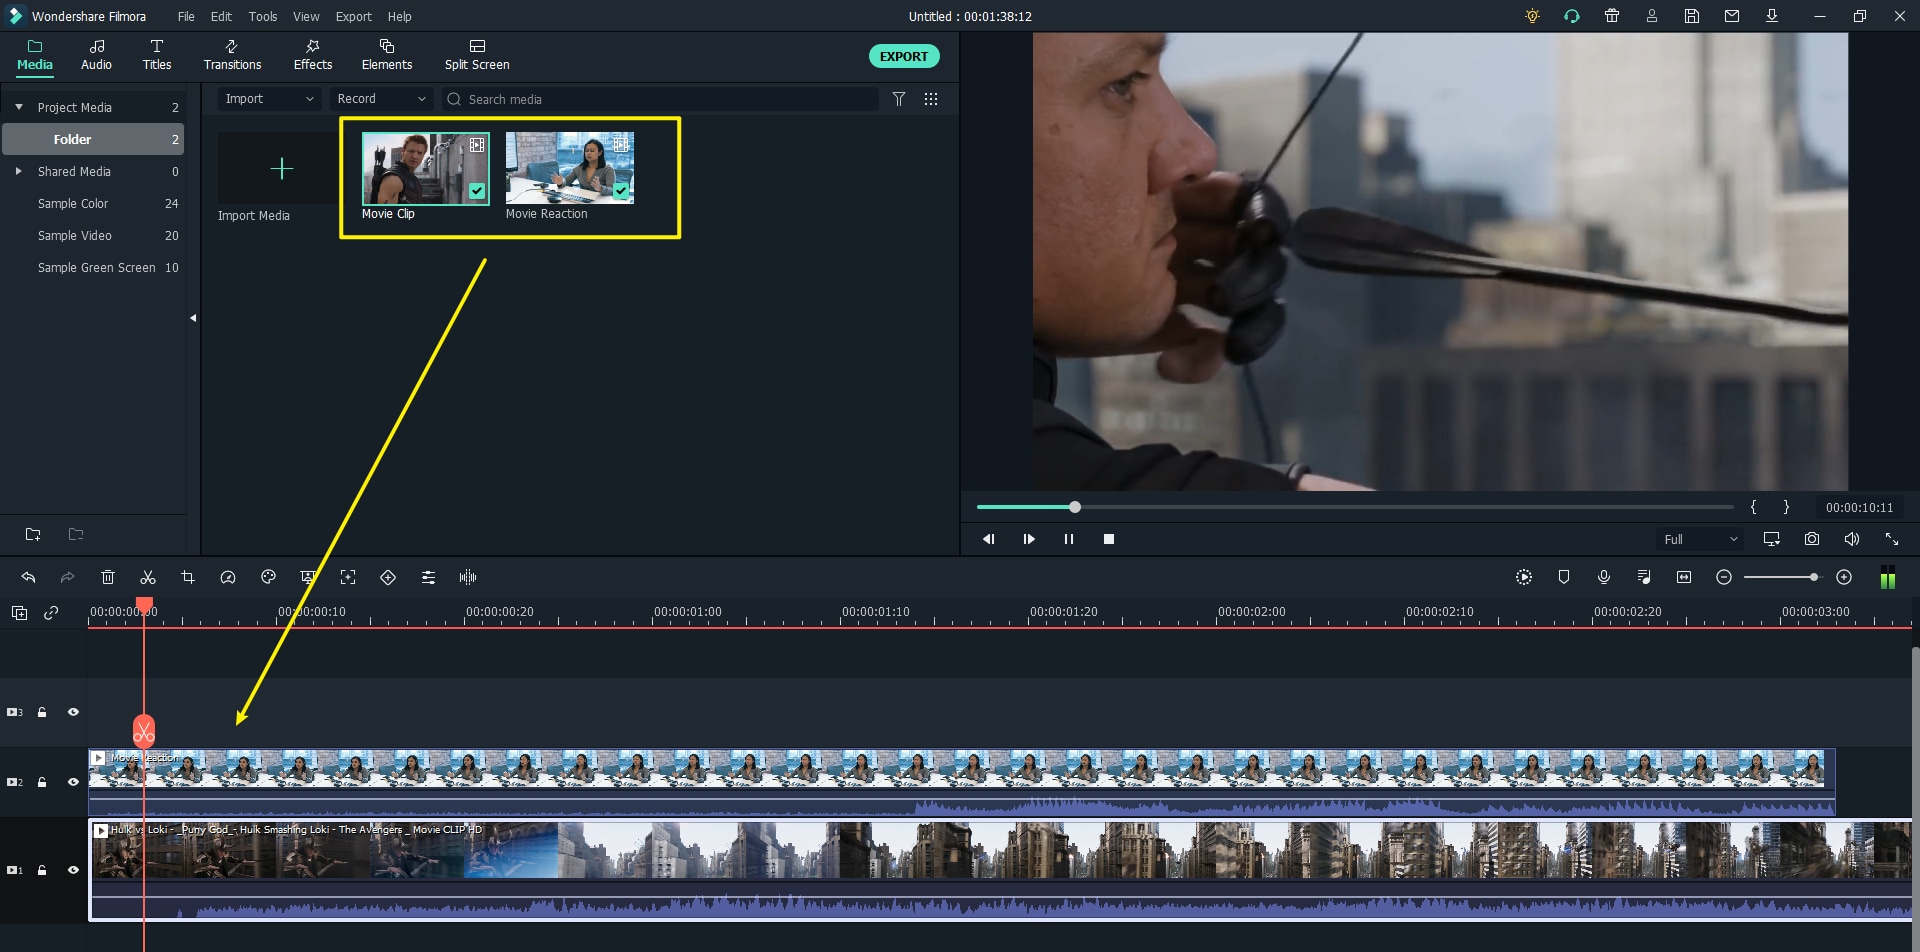
Once you have downloaded Filmora, start it on your computer. Then import your reaction clip and the video about which you want to create a reaction.

Step 2: Drag and drop videos to timeline
First, drag and drop your reaction video to the timeline, and then drag and drop the second video. Place your reaction clip on the top.
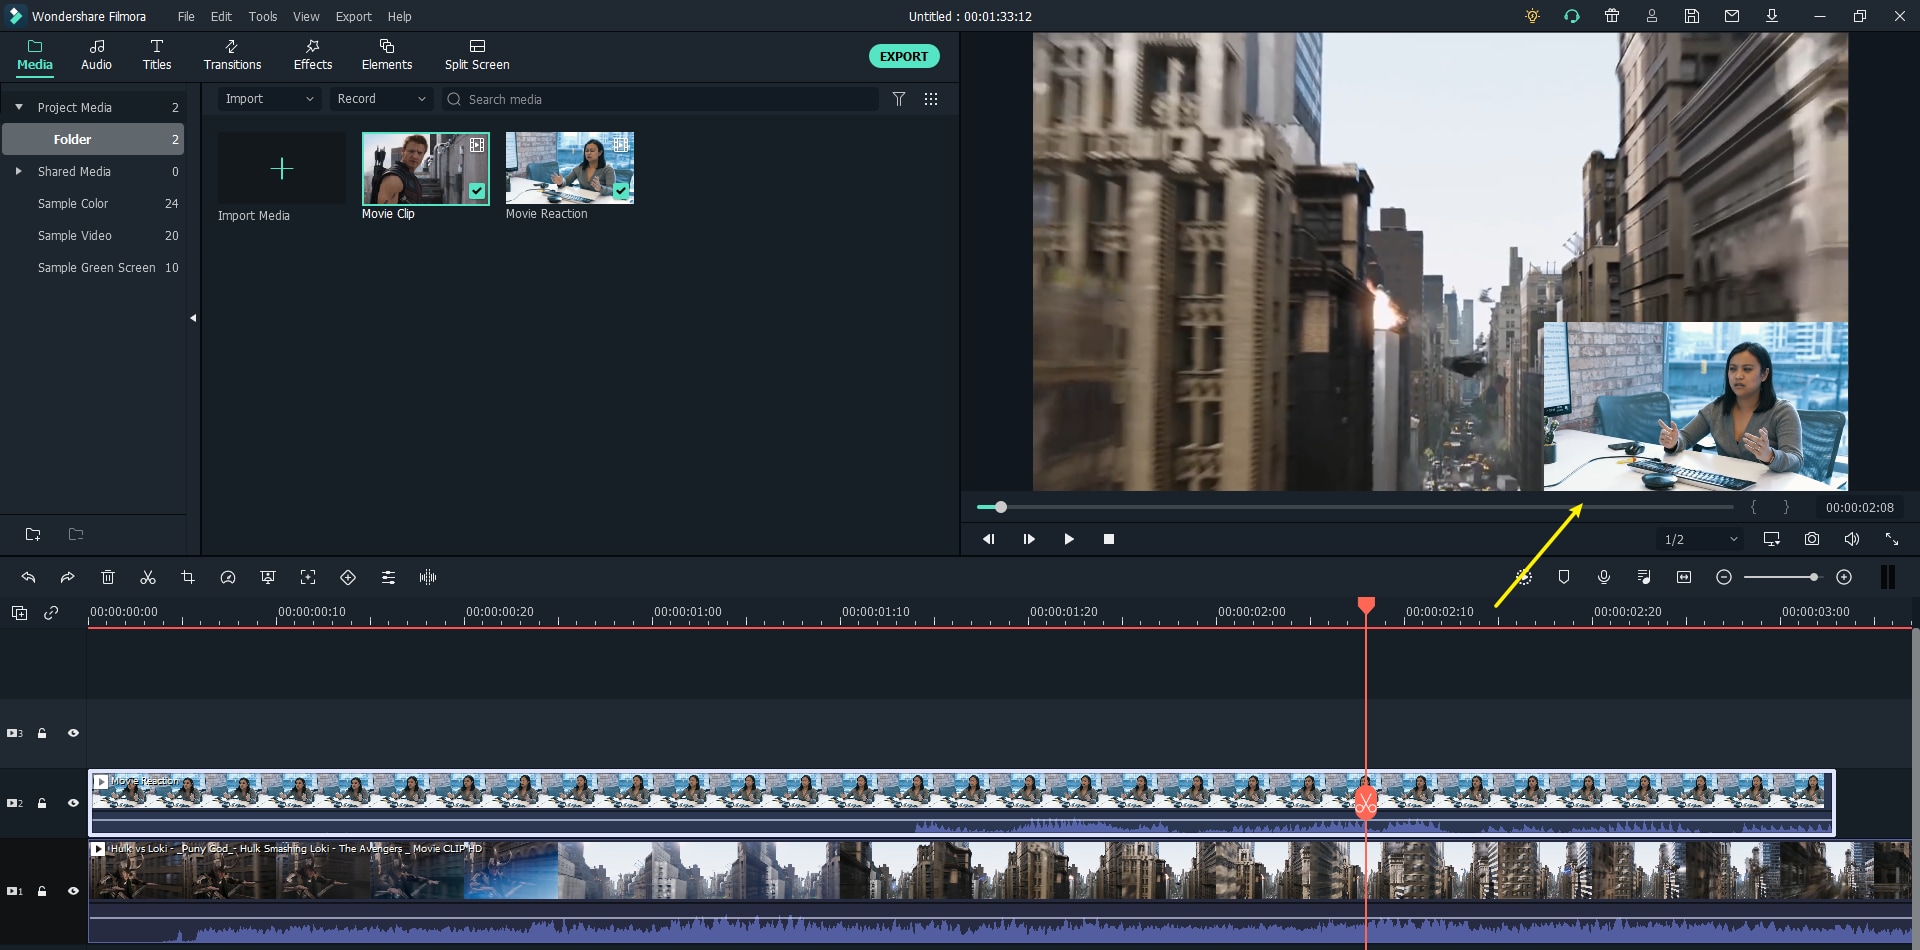
Step 3: Resize your reaction clip and move it to the right/left corner
Now, you can change the size of your reaction clip and put it at any corner as you like. Here I will move it to the right corner.
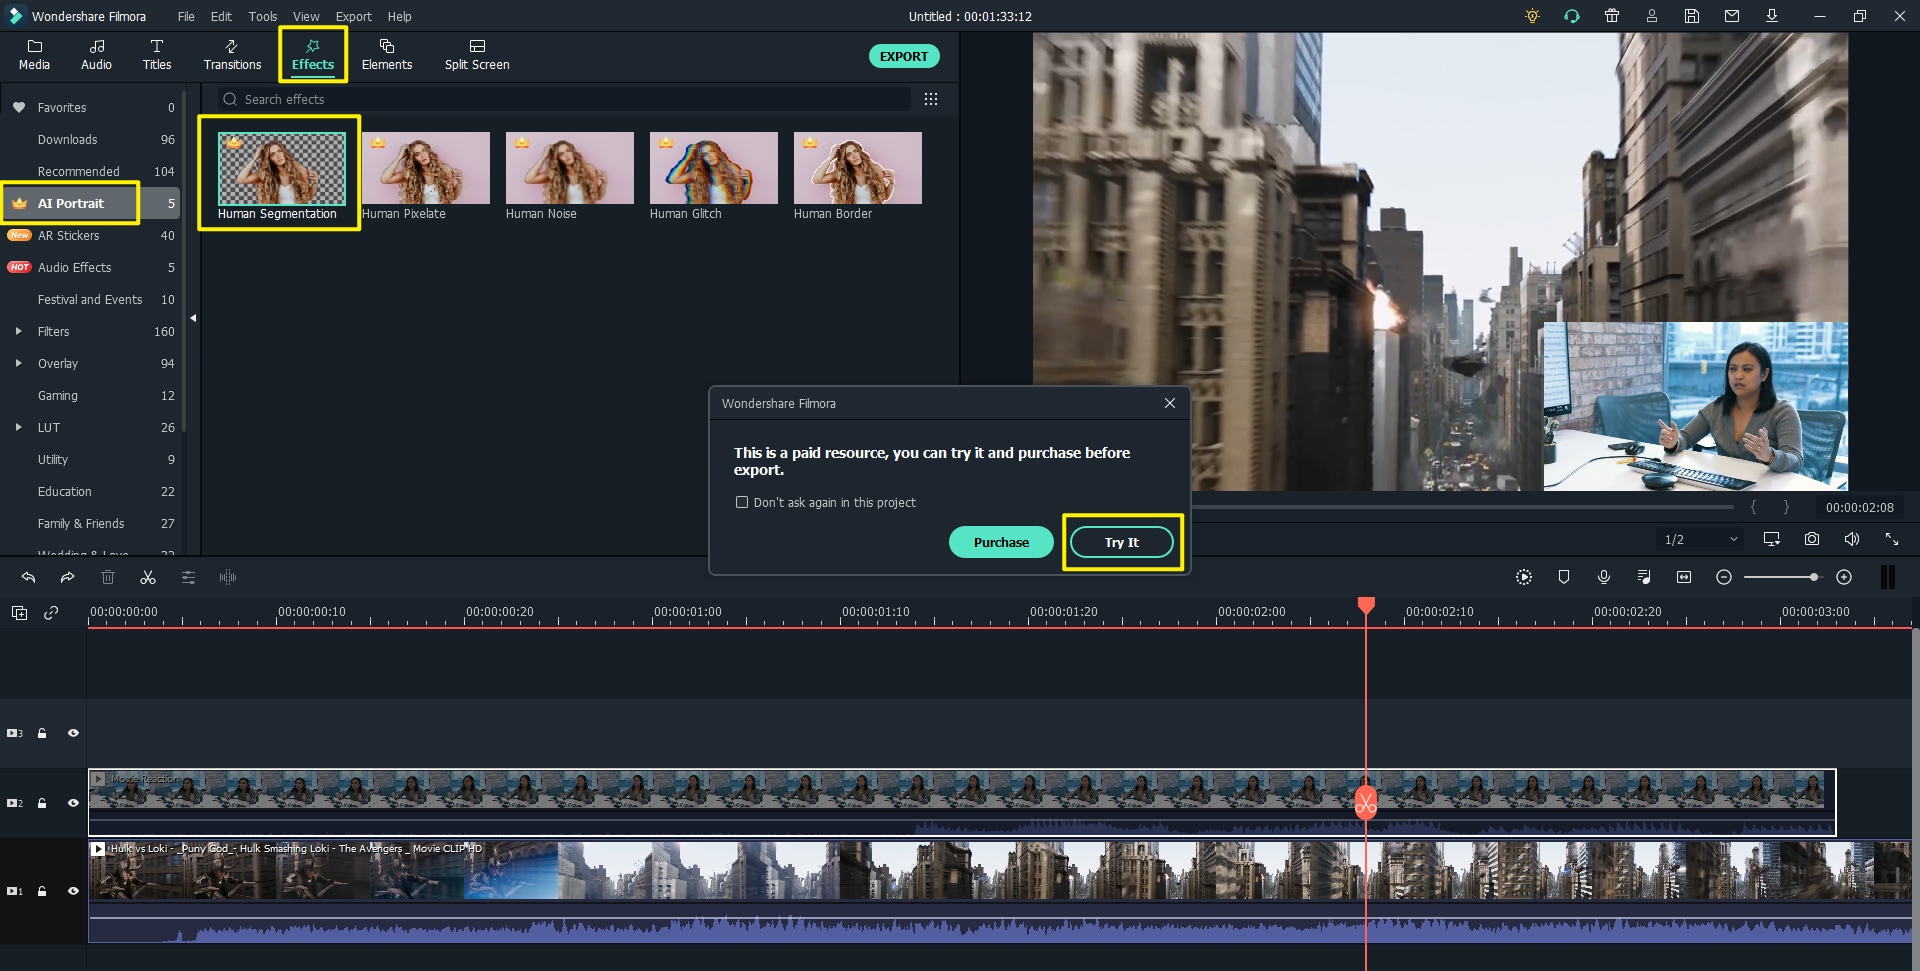
Step 4: Remove background of your reaction clip with AI Portrait Filter
As you can see, the background behind the girl in the reaction clip is kind of distracting. So your goal is to remove the background. Just choose Effects Menu - AI Portrait, under which there are multiple filter effects.
Drag and drop “Human Segmentation” filter. This effect requires you to pay for it, click “Try it" to continue.
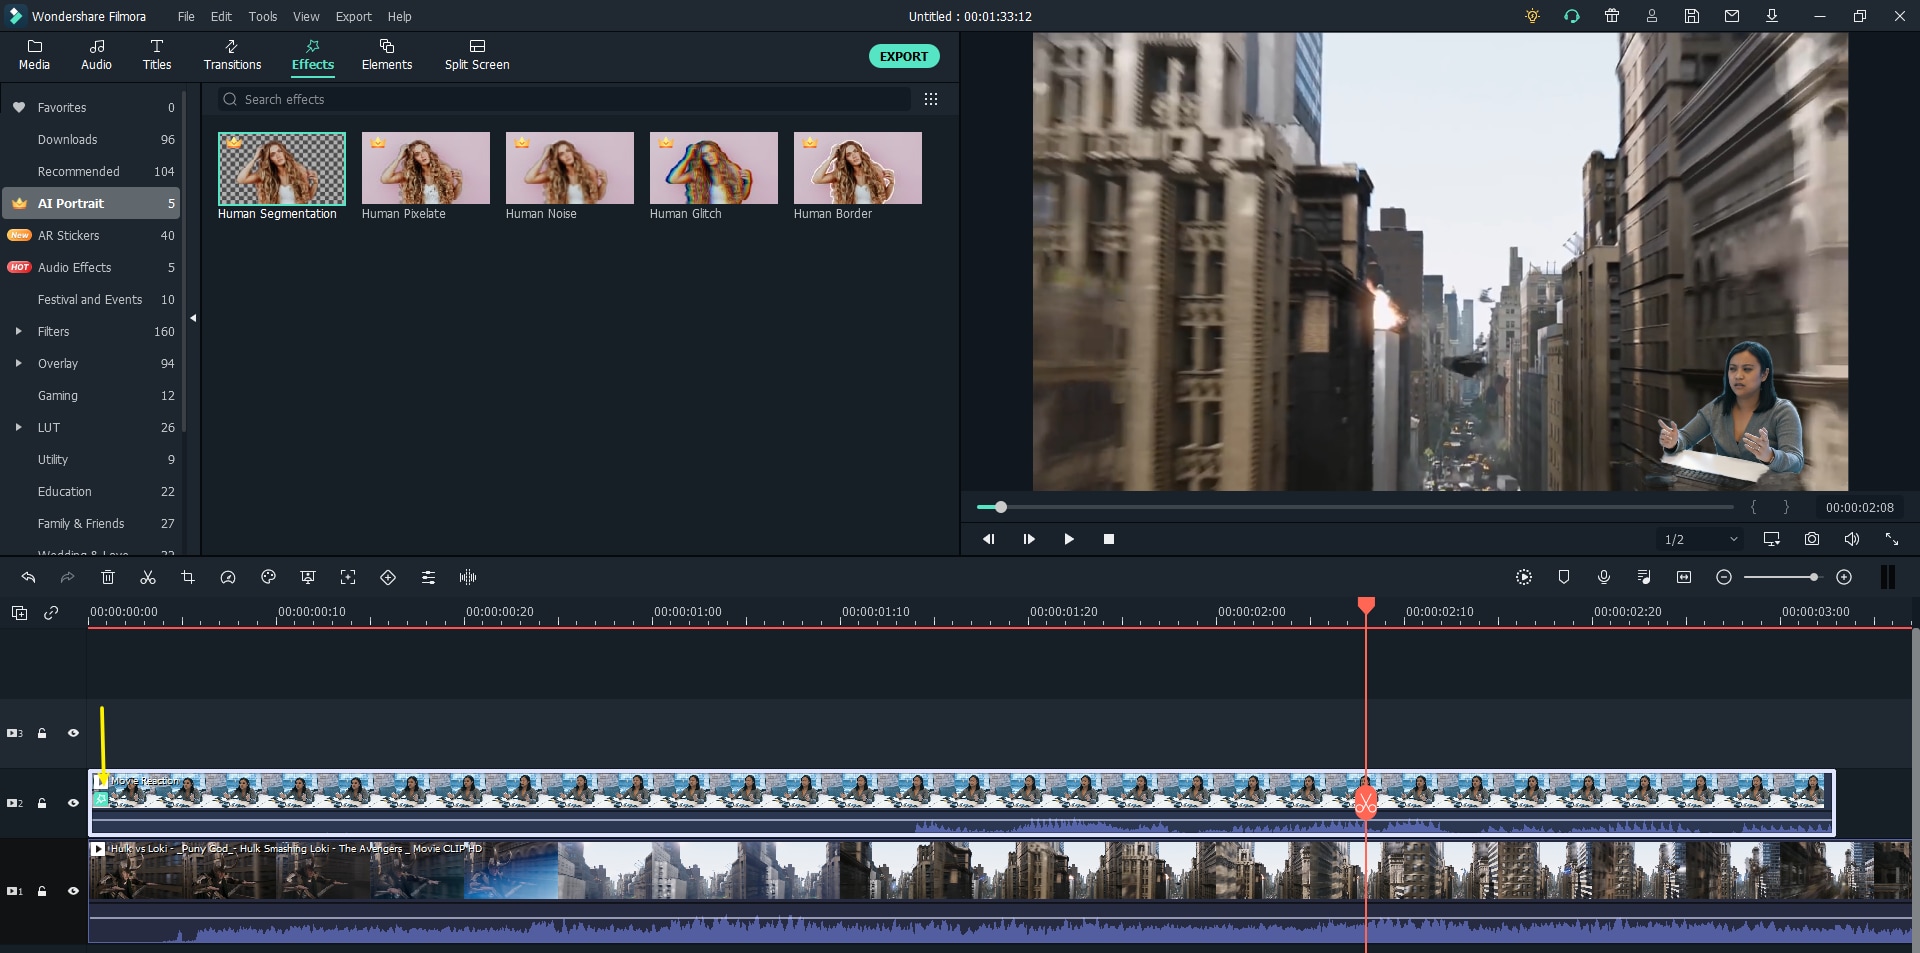
Then, drag it to the reaction clip and you will see a small green star icon on the clip. Congratulations! You have successfully removed the background.
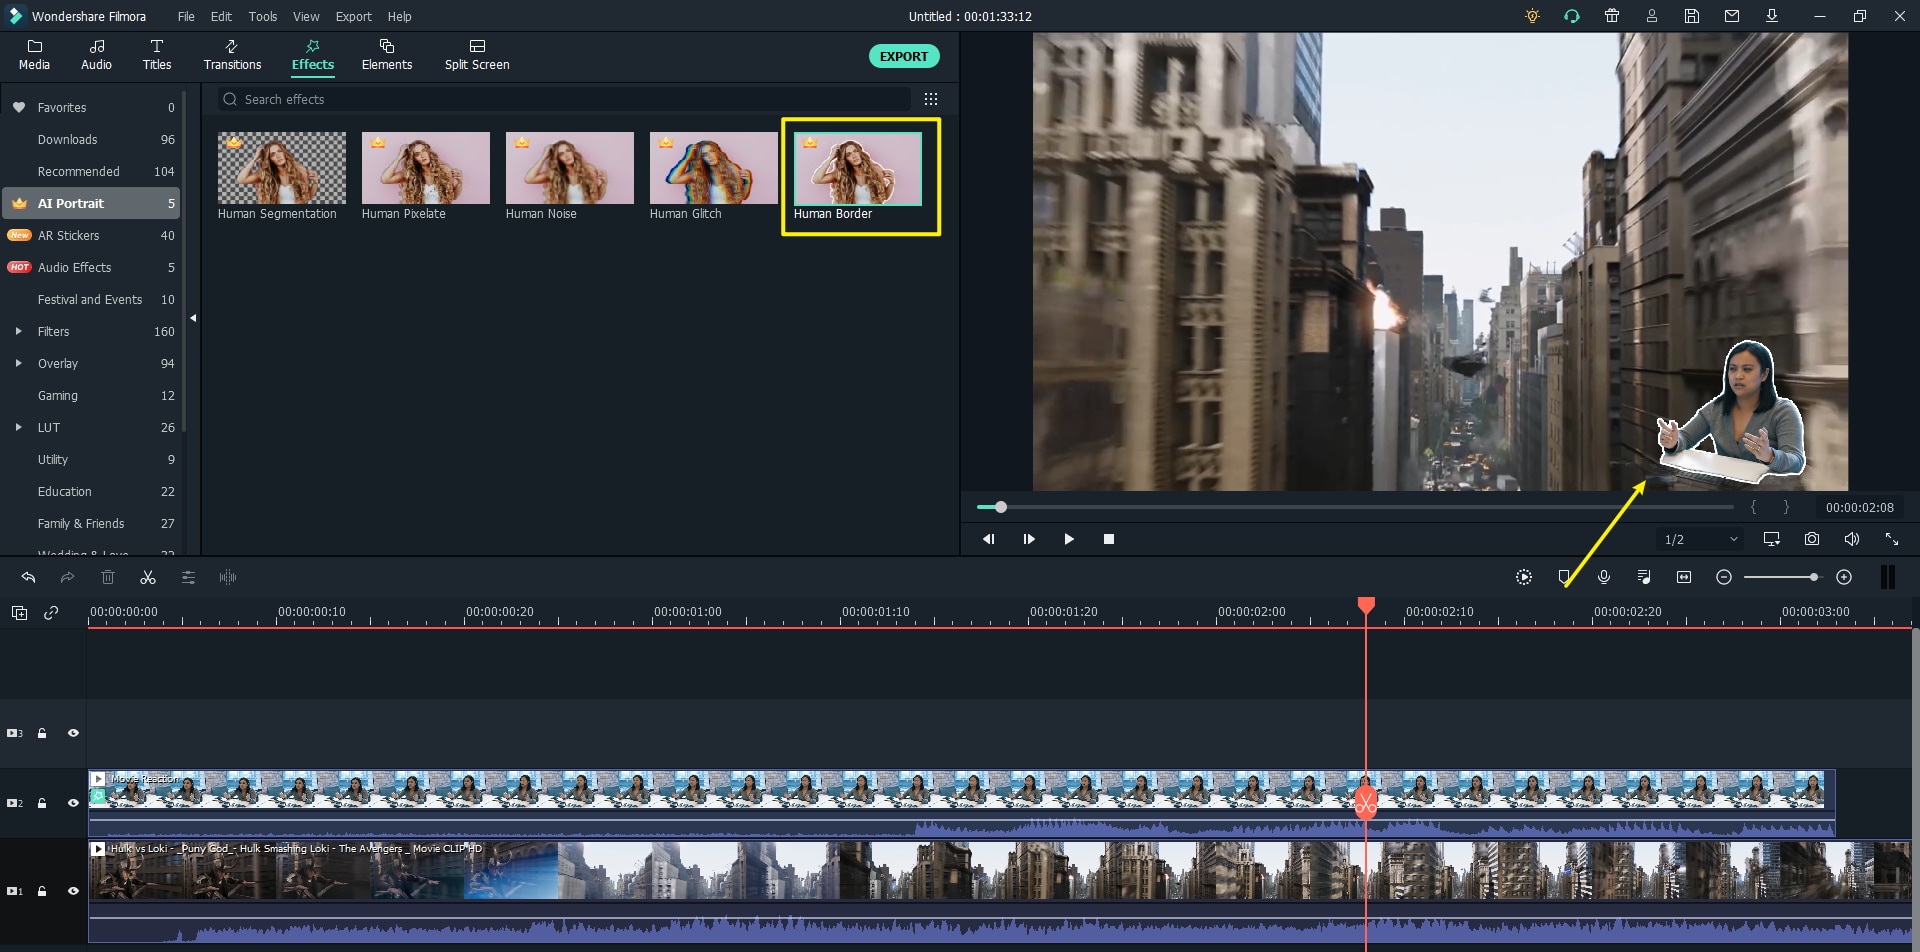
Step 7: Add border around the character
You can also add other effects to make the look of your video more stunning. Change your filter to "Human Border" and you can add a border around the character to make it look more distinctive from the movie clip.
Step 8: Use keyframe
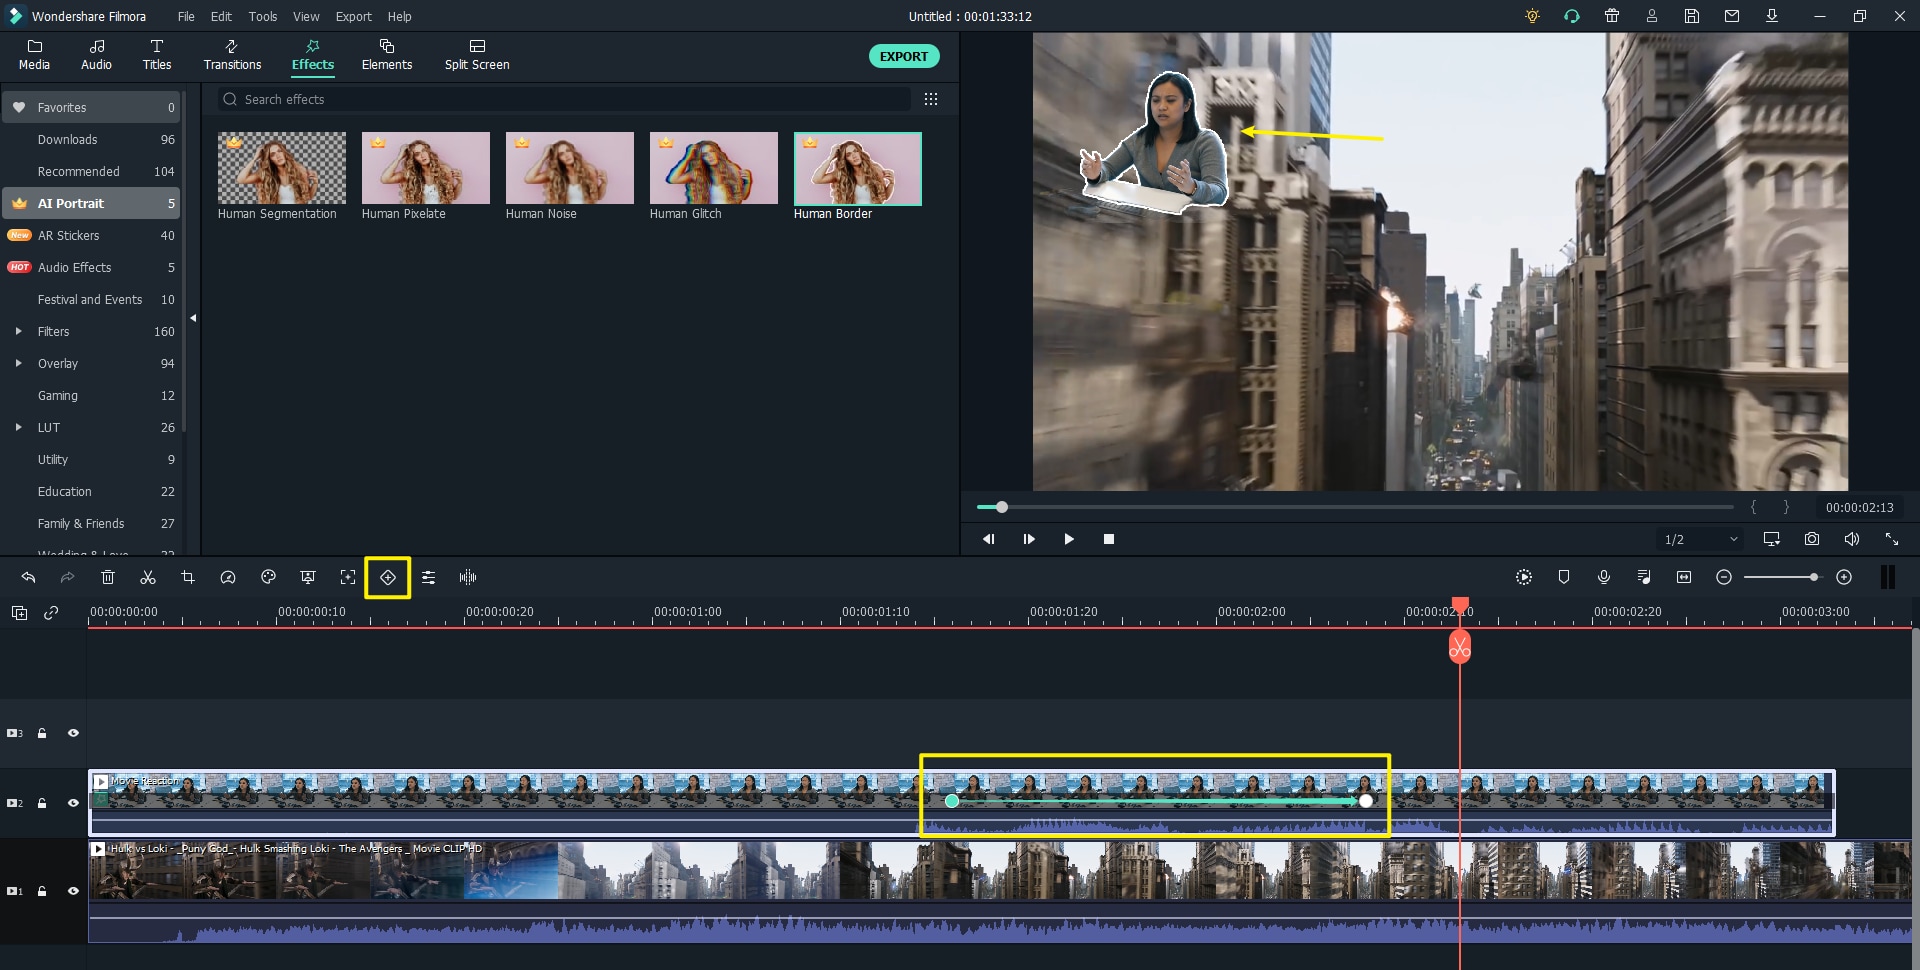
Keyframe is a location on the timeline that allows you to adjust the size and position of your reaction video. If you want to change the position and size of your video, you can easily do it by applying a Keyframe to it.
Go to the point you want to change in the timeline and click on the keyframe button above the timeline. Move your character to the bottom right corner. It will add another keyframe to the video in the timeline. Now, the person will change its position from the lower right corner to the upper left corner once it reaches that specific point in time.
Step 9: Export the video
You have successfully created a fantastic video for your YouTube channel, click the “export” button to export it and share your thoughts with your viewers.
Conclusion
Filmora is the best option to create a stunning reaction video for your YouTube channel. Using AI Portrait, you can save a lot of time and money. You need not worry about the green screen, stand, and other material. AI Portrait by Filmora can add amazing effects to make your reaction video appealing to your viewers.
If you are interested in Filmora, check the short clip below to learn some of its most latest new features, including AI Portrait, Auto Reframe, Audio effects, and more!
Frequently Asked Questions
How to make reaction videos on my phone?
Many Android and iOS apps provide their users with a reaction video app that allows users to record their responses using different features to make the reaction video more appealing. Here we'll suggest some of the best reaction video apps for mobiles that you can use to create appealing video. TikTok, iMovie, iReact, Reactoo, and Reaction Cam are the best reaction video apps to create an engaging reaction video on your phone.
If you want to make your video on desktop, you can use Filmora X as it offers advanced features like AI Portrait to add amazing effects to your reaction videos. You can follow our guide to make reaction video more appealing for your viewers.
How do I make a reaction video without copyright?
Reaction videos are popular as the viewers are interested to know what other persons think about a particular stuff. As a YouTuber, you are reacting on someone else’s content. So there is high possibility of getting a copyright claim. If you receive a copyright claim from the original creator, you might delete the video, and the money generated through this video might transfer to the original creator. You, as a YouTuber, must keep the knowledge of the fair usage policy before creating reaction videos.
We suggest you play safe by sending an email to the original creator, ask for their permission. Once they permit you to make a reaction video, no one can stop you. You're ready to share your reactions and opinions with your viewers.


