It is said that a picture is worth 1000 words, but obviously, videos are even more meaningful than pictures. It, therefore, makes sense to learn how to record your Mac screen as a better alternative to just taking screenshots.
But...
....how do I record video on my Mac?
This is a question that troubles lots of Mac users, but actually, you can get out of this trouble easily. The key point here is to find a reliable yet professional video recording software as your personal assistant.
Then, a new problem is coming soon - what is the best video recorder for Mac? And how can I know the program is suitable for me?
Take it easy!
This article is going to show all of you two different ways to record a video on MacBook. You can compare these methods and decide which one is better according to your own needs.
Now, let's start the recording journey.
- Part 1. How to Record video on MacBook using QuickTime
- Part 2. How to Record A Video on Mac with Filmora Video Editor
How to Record Video on MacBook using QuickTime?
As a Mac user, you might know that QuickTime is a built-in app on your MacBook. And this program provide users with the functions of video editing, playing and recording.
To record videos on Mac with QuickTime, you can follow the steps as below:
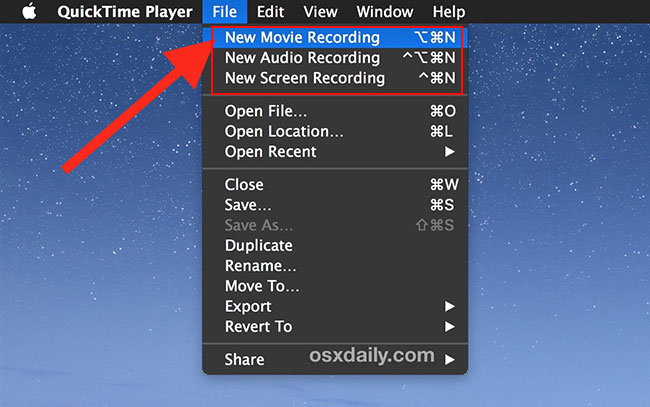
Step 1: Launch the QuickTime Player app on your Mac. When loaded, click "File" on the top menu and select "New Screen Recording".

Step 2: Now configure your screen recording settings. Open "Options" from the menu and choose whether to capture audio from your system or an external microphone as you screen capture. Here you can also choose to show mouse clicks appear as highlighted circles in your recording. In addition, you have the option to set the video recording quality to "High" or "Maximum".
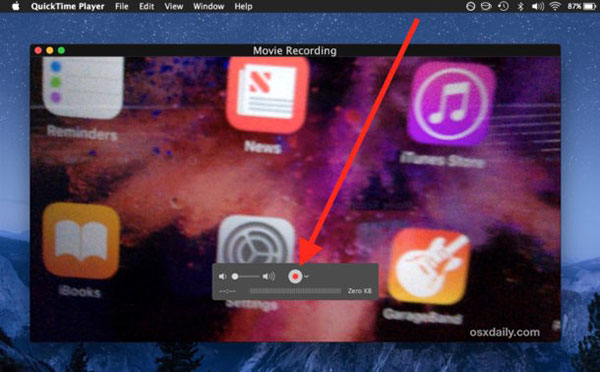
Step 3: Start recording your screen. To do this, simply click on the red "Record" button and then click once anywhere on the screen to start the recording process.

Step 4: Stop recording and save your video. When you're done recording, click Stop and then navigate to "File > Save", to save your video.
Editor's Pick: Record Video on Mac with Filmora Video Editor
As you can see, QuickTime is able to record screen on Mac well, but the facts have proved that still lots of Mac users wish to find an alternative tool to QuickTime.
Why?
Too many people complained that the QuickTime cannot do as good a job as a dedicated video recorder program. This program was mainly designed to play media so if you have higher demands, it is advisable to look for software that will not only produce a better screen recording but is also able to further process the recorded video using professional video editing tools.
So, Filmora Video Editor for Mac comes here for your reference. With it, getting screen captures, editing videos and creating impressive videos and presentations is incredibly easy. And you're also aboe to add graphic animations, filters, overlays, and transitions.
Filmora Video Editor for Mac (or Filmora Video Editor)is one of the best tools available today for recording high-quality screen captures. With this powerful video editor, you can not only easily record your screen on Mac, but also add text, highlights, titles and hundreds of exciting video effects to make your videos even more enjoyable to your audience.

Key Features:
- Record your Mac screen in full screen mode, custom screen size or target window according to your own needs. And you're allowed to define the recording video quality as you like.
- The recorded video can be splitted, edited, customized (like add transitions, filters, titles, etc.) directly in the program after recording.
- 1000+ special effects are provided for your choice.
- Export video to specific video format, device, or social platform like YouTube, Vimeo at your will.
Let's check how to record a video on Mac or PC with the Filmora Video Editor:
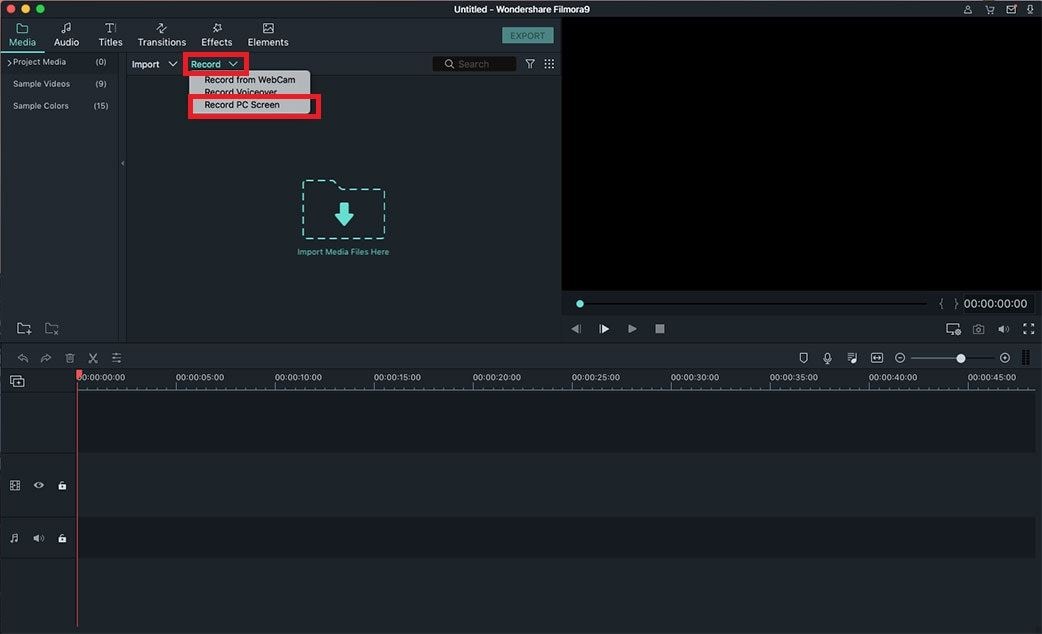
Step 1: Launch Filmora Video Editor and navigate to "File > Record > Record PC Screen".

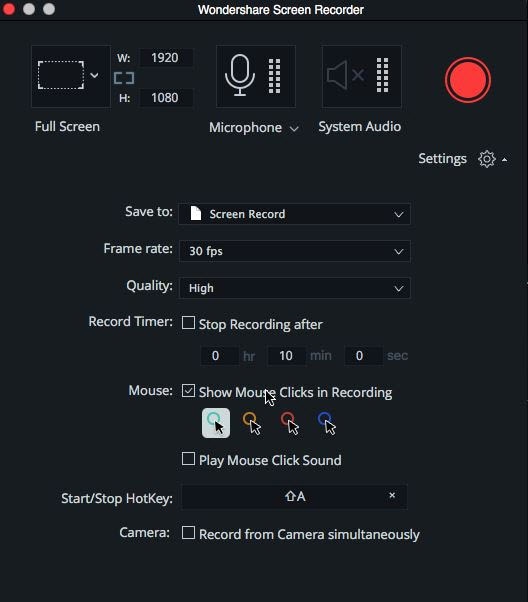
Step 2: You now have the option to either record the entire screen or define a custom area. You can also choose whether to record audio from your Mac or from an external microphone. More advanced settings can be accessed by clicking on "Settings".

Step 3: When you are satisfied with your settings, click on the "REC" button to start the process. Filmora will start recording after a short count down. You can now minimize the program and continue recording your screen.
[Attention]
The recorded video will be saved in the media library and you can drag and drop it to the timeline, and follow the below tutorials to edit your recorded video as you like:
- How to Edit Video Brightness Easily
- 100+ Free Video Transition Effects You Can't Miss
QuickTime vs Filmora Video Editor, Which One is More Suitable for Recording Video?
When comparing between the two programs, Filmora Video Editor is by far the better choice for screen recording. Because it works really well for creating video tutorials, capturing gaming action, making digital product demos, reviews and much more. Its powerful video editing tools can also be used to combine multiple screens captures to create a seamless video complete with intro, outro, annotations, call outs and even sound effects.
While QuickTime can also record your screen, it is hampered by its limited feature set and lack of support for many of the popular video formats. Furthermore, in order to access the screen recording feature, Mac users are required to pay a subscription fee of $29.99 to get QuickTime Pro.
So, in my opinion,
Until Apple improves its screen recorder and incorporates this feature into the free version of QuickTime, Mac users will definitely need a good third-party program like Filmora Video Editor to capture high-quality videos.
Now, you can click the below icon to take a free trial on this powerful video screen recorder for Mac (Filmora Video Editor also has a Windows version that can be used on Windows 10/8/7/Vista/XP).


