Miicrosoft PowerPoint is a powerful presentation software. This program uses slides to convey information rich in multimedia. It's very common tool in work. Sometimes, you may need to add some videos to your PowerPoint files. In case some of the videos are in the wrong direction. Here we will guide you how to rotate a vdeo in PowerPoint.
- Part 1: Simple Guide to Rotate a Video in PowerPoint 2010
- Part 2: How to Rotate a Video Before Inserting to PowerPoint
Part 1. Simple Guide to Rotate a Video in PowerPoint 2010
Step 1: Open PowerPoint, click "Insert" from the list of tabs and then click "Video" on the right. If you click the arrow underneath the icon, you can choose from different options, like inserting a movie file from you rcomputer, inserting a web video or searching the Microsoft Office clipart for a video.
Step 2: Browse to the location of the video files on PC, click the file to select it. When you're done, click the button to place the video in your presentation.
Step 3: Click on the video tools "Format" tab. Note that this tab is only visible if you have a video file selected.
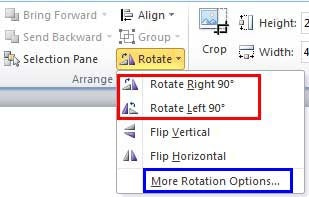
Step 4: Click the "Rotate" button in the Arrange section on the right. When click it, you'll see different roration options. You can rotate video file 90 degrees to the left or right. You can also flip the video horizontally or vertically. If you need to specify an angle, click "More Rotation Options". There you can type in a specific number of degrees to rotate the video in PowerPoint.

Part 2: The Best Video Rotator - Filmora Video Editor
Filmora Video Editor for Windows (or Filmora Video Editor for Mac) is an all-inclusive software that can breathe new life to your videos. It is designed for use by beginners and professional video editors. Filmora Video Editor is ideal for Mac and Windows users.

- Plenty of video editing options, such as split, crop, merge, and trim, etc.
- The ability to record a voiceover or computer screen and implementing those within your edited video, so you don't need to buy and download other software.
- Support for all commonly used video, audio and photo formats from any device (camcorders, smartphone cameras, and ordinary cameras)
- Split screen: To show 2 or more videos simultaneously on the screen.
- Options to share your videos to social media platforms and burn to DVDs directly from the program.
How to Rotate a Video Before Inserting to PowerPoint:
Step 1. Launch the Program
Launch the program by downloading it, and then install it to become functional on your Mac or Windows.

Step 2. Import Videos
Once you have the program on your PC, you can import the video files that you need to insert to PowerPoint so you begin your rotating process. Filmora Video Editor supports all media from camcorders, cameras and smartphones so rest easy knowing there won’t be cases of incompatibility with the videos you import from any of the devices.

Step 3. Rotate Video in 90/180 Degrees
Drag the video files to the timeline, click the “Rotate” icon above the timeline. You will see 4 options for rotating video files. Below is the detail description on Rotate feature of Filmora Video Editor:
Rotate video by 90 degrees anticlockwise;
Rotate video by 90 degrees clockwise;
Flip video horizontally;
Flip video vertically.

Step 4. Export the Video
When you finish the rotation, if you need more editing for the video, Filmora Video editor also provides lots of editing features for you. If you just want to save the rotated video. Simply click "Export" and select the format that you want to save the video.


