A lot of people ask this common question – "How can I slow down video in VLC Media Player? ", So if you have no idea how to do it in VLC, you have come to the right place. We all know that VLC media player is a free media player and streaming media server. It's available for both desktop operating systems and mobile platforms, so it's famous among people although not everyone knows how to use it as a simple video editor.
In this article, you are going to learn how to slow down video in VLC and save it for future usage. There is nothing to worry about if you don't know the process. You can learn the default system by using VLC media player and also learn to use the best alternative of VLC to control video speed. So without wasting anymore time, start following this article in a step by step process.
How to Slow Down Video in VLC
Many people don't really know how to slow down video in VLC and save. This part is the most basic way to teach you how to do it easily. The easiest way to learn how to control video speed in VLC is by following the below methods.
Slow Down or Speed Up Video:
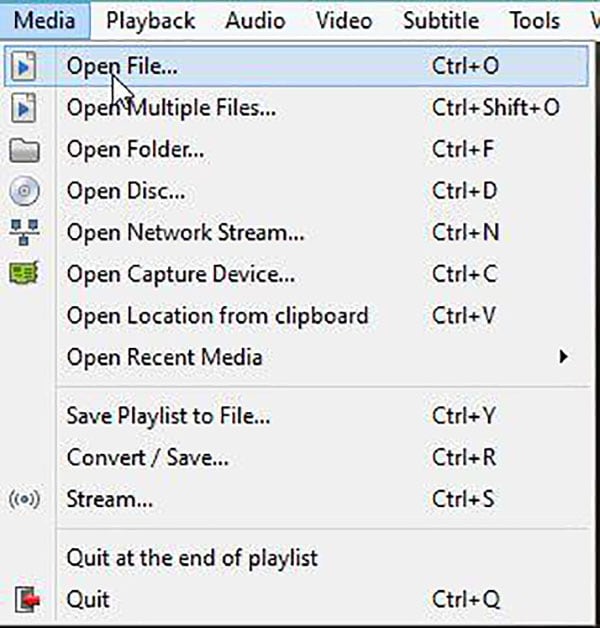
Step 1: First you need to start the VLC media player in your computer and open the video file from the media tab.
Step 2: Then you need to click on "Playback" option from the menu bar and go to "Speed". You will find 5 options to control the speed of your video which are – faster, faster (fine), normal speed, slower, and slower (fine). You can choose any of these speeds according to your need. If you want to speed up the video, you can choose faster or faster (fine). If you want to slow down the video, you can choose slower or slower (fine).
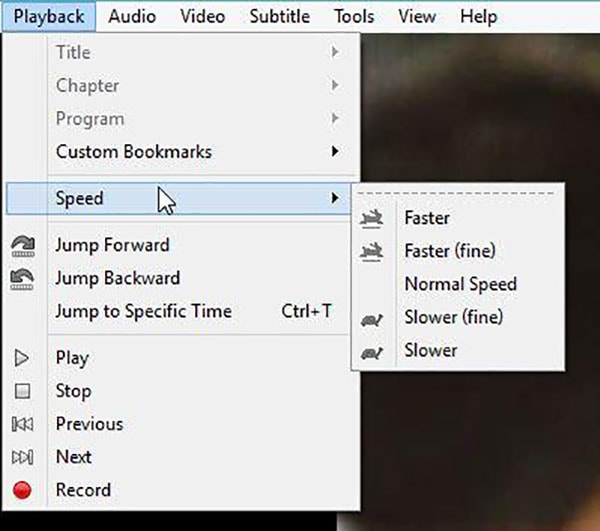
Step 3: Now you can play the video and check if your video has become faster or slower as you have expected.
Loop Video in VLC:
Step 1: First you need to launch VLC player in your computer and open the video file that you want to loop. You can add multiple video files to the playlist if you want to loop them together.

Step 2: To loop a single video file just click on the "loop" button. If you want to loop multiple video files, you can toggle the button to loop one or all. Keep toggling until you get your result.
Step 3: Your video or videos will be on loop until you stop it.
Save Video in VLC:
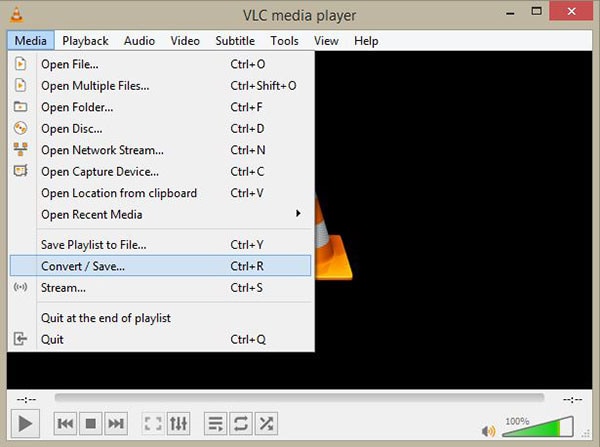
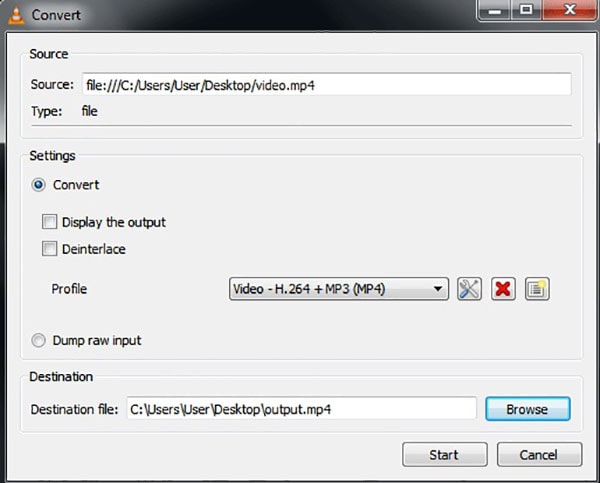
Step 1: To save a video after changing or editing it, click on the "Media" button from the menu bar and select "Convert/Save".
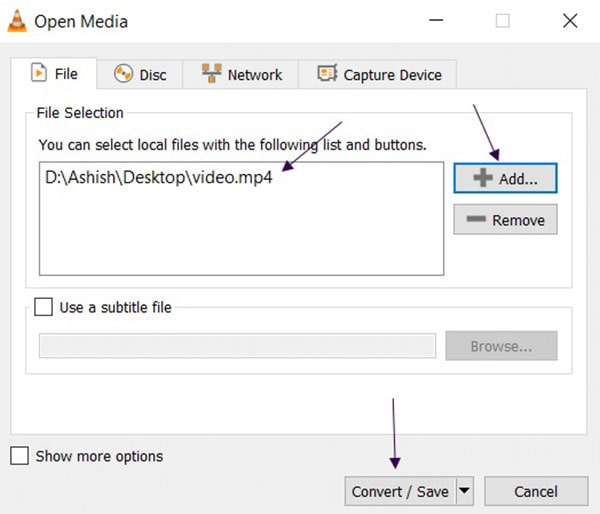
Step 2: A new window will open and now click on "Add". You need to browse and select your video. Then click on "Convert/Save" button.
Step 3: Now you need to click on the profile dropdown menu and choose a video format. Then browse and save the destination folder where you want to save your video. Finally click on the "Start" button to convert and save your video.
VLC media player is good to use, it is simple for beginners to start editing video. But somehow there are still lots of limites you may want to know about.
Limits of VLC Media Player:
1. Sometimes VLC media player faces unexpected errors and gets closed automatically.
2. It can't be used as a music library as it's a video player.
3. You can't change or customize the interface too much so you are stuck with the default interface.
4. Sometimes when you are playing MKV or other videos VLC may face no sound and subtitle not loading error.
5. Some format of videos will need codec settings before playing it using VLC media player.
To solve these problems you may encounter, we recommend a really great alternative of VLC media player - Filmora Video Editor.
The Best Alternative of VLC - Filmora Video Editor
It's totally normal if you don't know how to slow down video in VLC, but the best VLC alternative is Filmora Video Editor or Filmora Video Editor for Mac. It's the easiest video editing software where you can import any video, photo and audio files from iPhone, iPad, Android, camcorder, cameras, other devices, and also from various social media websites. You will be able to control each video with great features, filters and effects any time you want.
Sometimes you want to trim the illegal portion from video and quick or slow which requires a long time if we have no idea about basics. Now you do not have to worry about these issues, because we will enable and solve this problem. Let's start.
Key features:
- It has all the easiest video editing features such as rotating, trimming, splitting, cropping, joining videos etc.
- There are advanced features like pan & zoom, play reverse, stabilize video, color tune, enhance, scene detach, green screen, tilt shift etc.
- It has audio editing options like trimming, splitting, fade in and out, adjusting pitch, adjusting volume etc.
- Provide more than 200 video effects and make your videos look great.
- It allows you to use the music library with a huge number of free music files that can be used in your project.
How to Slow Down Video in Filmora Video Editor
Filmora Video Editor is the best software that anyone can use, it is simple and applied. Following the step by step guideline below, you will earn the process easily and apply it anytime you want. You can easily slow down your video with its Uniform Speed function in a few clicks. Moreover, you can control video speed freely with its advanced Speed Ramping function, by adjusting the speed of any parts of your video.
Step 1: Start the Software
First you need to download, install and launch the software in your computer. Then click on "Import Media Files" button to browse and import video from your computer. Otherwise you can drag and drop any video to the file importing window.

Step 2: Speed up or Slow Down Video
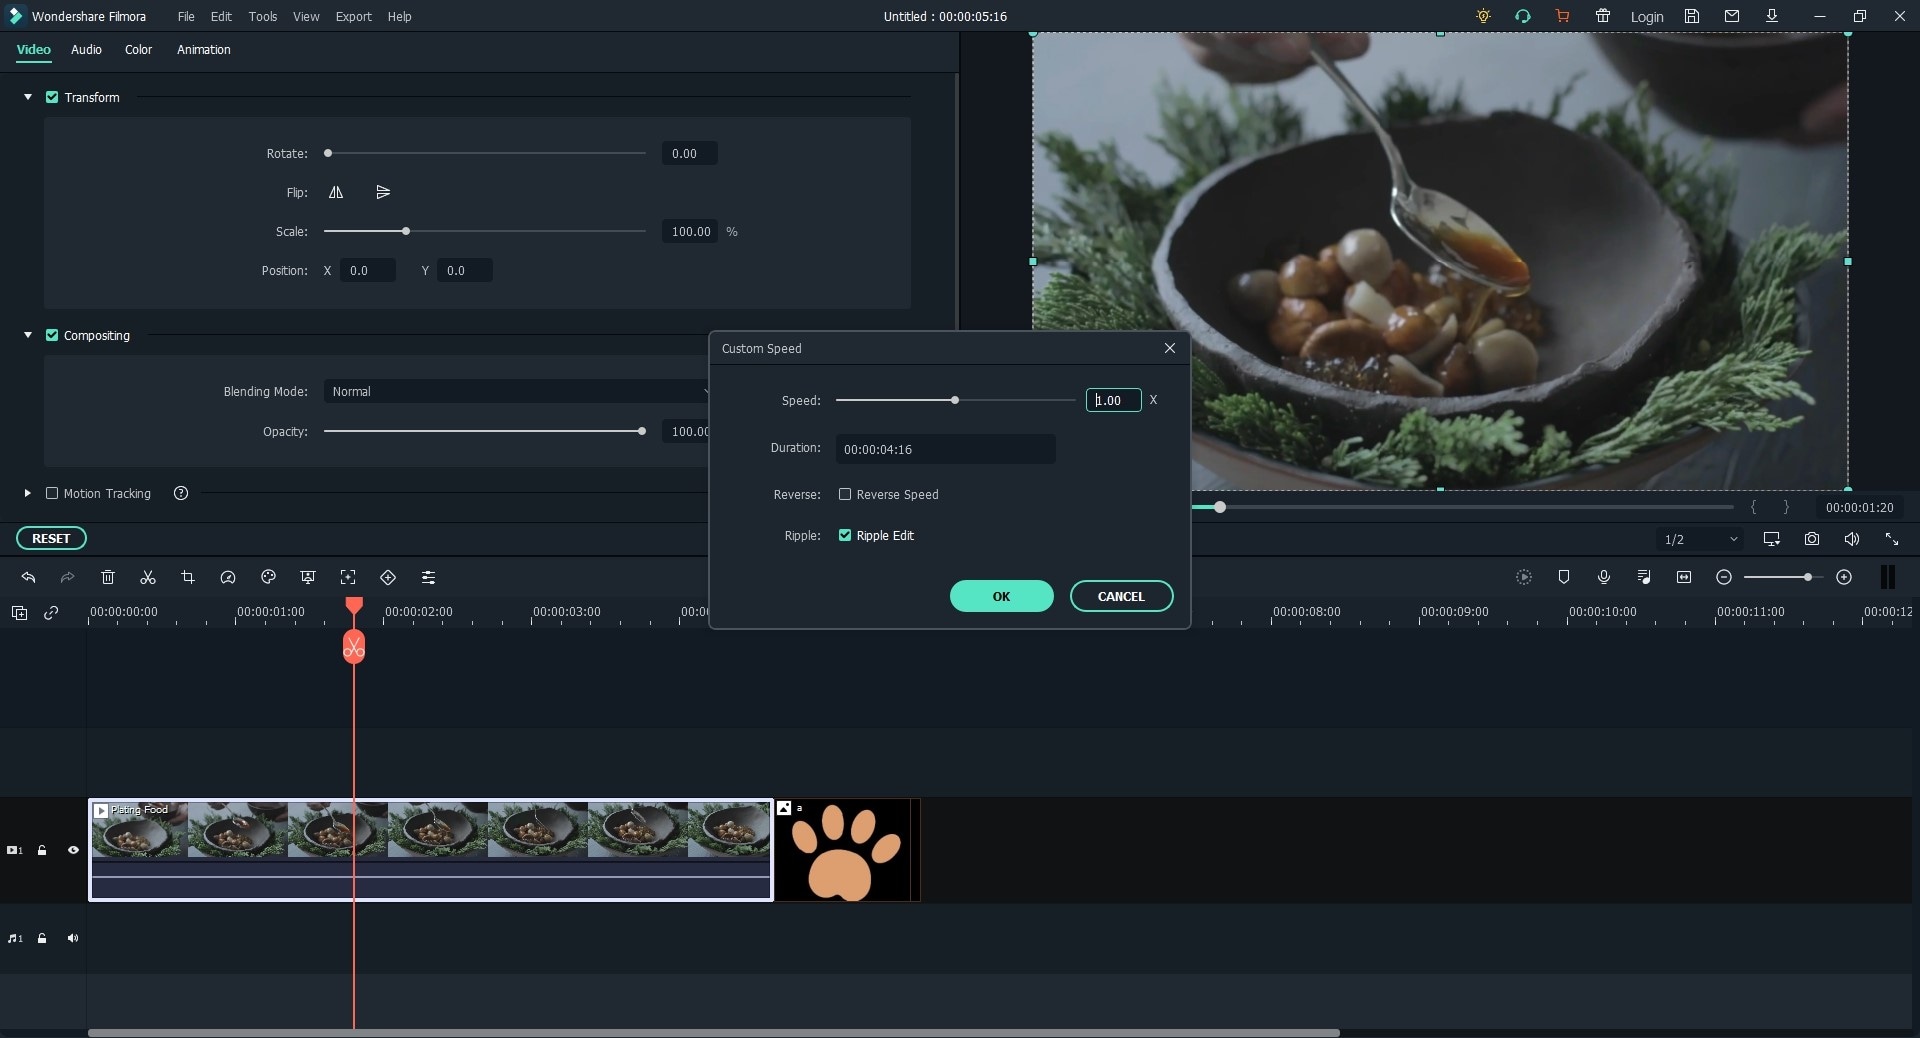
Next you need to drag and drop the video into the editing timeline to start the main editing process. If you want to speed up or slow down the video file, you need to right click and click on "Speed and Duration". You can also press "Ctrl + R" button from your keyboard. The "Custom Speed" window will pop up in your screen and you need to move the slider right to speed up your video or slide it left to slow it down. You can preview the speed and adjust it just the way you want.
Step 3: Export and Save File
After you have edited the video, you need to click on the "Export" button to save the final video file in your computer. You can choose your desired output format, rename your file, choose output location folder etc. Finally click on the "Export" button from this window to finish the process.

You can follow the default method from this article to easily solve your problem anytime. But it's obvious that VLC media player is not a video editor. So there will definitely be some drawbacks if you don't know how to slow down video in VLC and save. If you want a successful result in an easy way where you will be able to control your video just the way you want, then Filmora Video Editor is the best tool that you can use. So using Filmora Video Editor should definitely be your first choice when you don't know how to control video speed in VLC.


