How do you add and edit text in iMovie?
In audio-visual presentations and digital storytelling, text plays an important role in effectively conveying information. Matter-of-factly, such videos are hardly complete without texts.
Thankfully, numerous software/applications exist for easily adding text in video. We’ll start with iMovie, and then introduce a more advanced way to help you do text editing.
Well, let’s quickly sweep through the steps involved in adding text to video using iMovie.
Quick Way: Add Text in iMovie in 3 Easy Steps
There are various kinds of text templates that can be added to a video using iMovie; and each text template has a fixed position and a motion effect. The Title Text, for example, is placed in the middle of the screen. There are other types like Third Callout and Credits Text. Third Callouts (like when writing a new speaker’s name) are usually placed close to the bottom and to the left or right of the screen, while Credit Texts are usually aligned at the middle of the screen.
Alright, let’s go straight into the steps involved in adding text in video using iMovie. Go on; launch iMovie and get started.
Step by Step on How to Add Text in iMovie
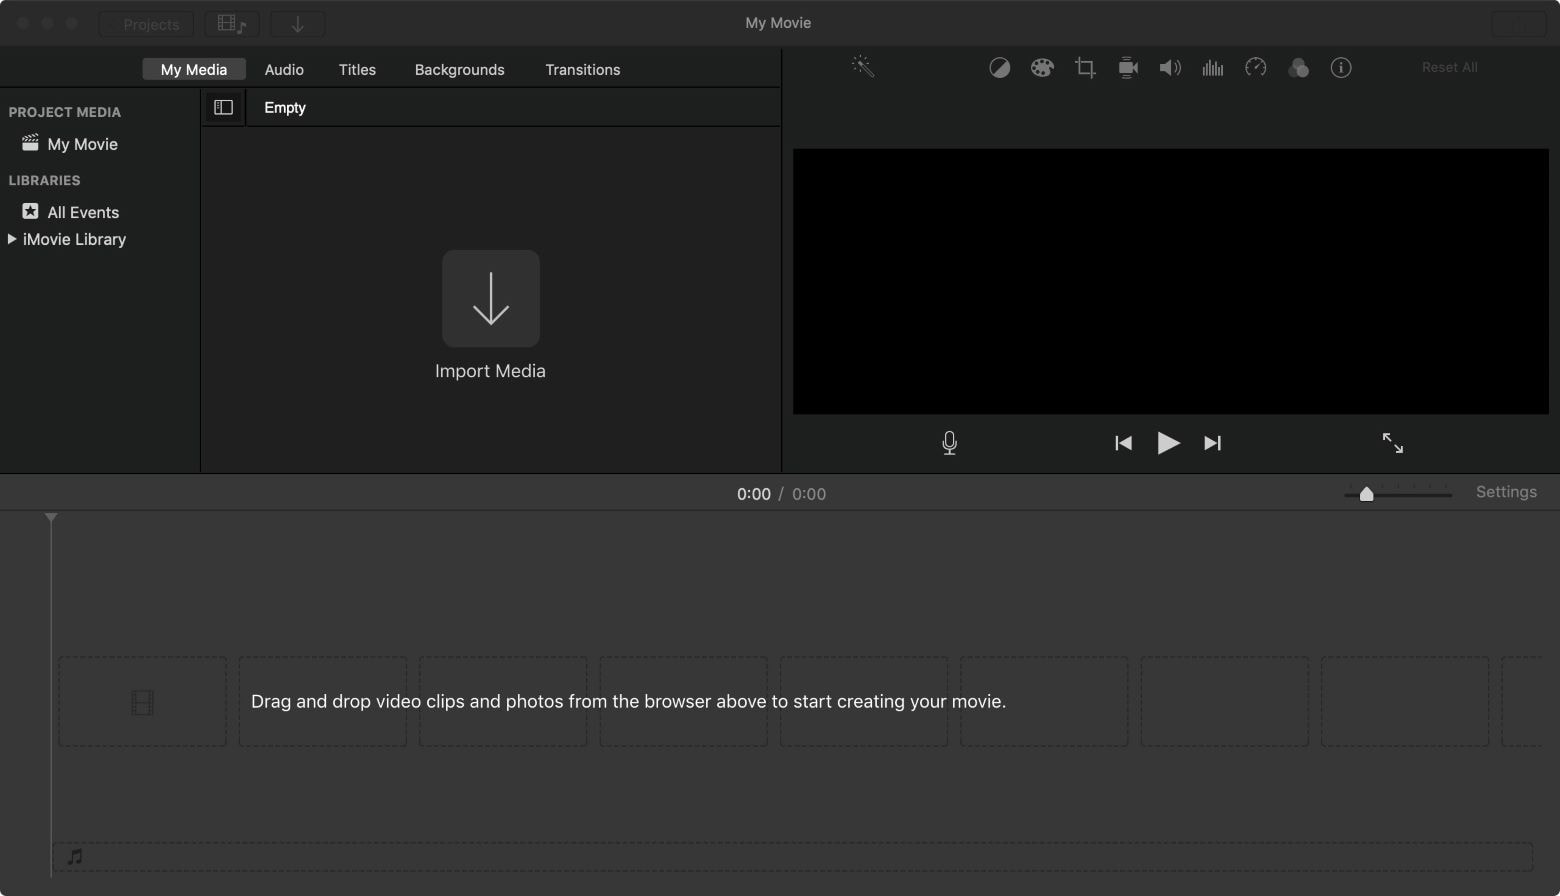
Step 1: Add your media file and drag it to the timeline
After launching iMovie, simply click on the Create New button to start a fresh project. In the new window, you’ll find the Import Media icon, click on it. After that, navigate the file tree and select your media file.
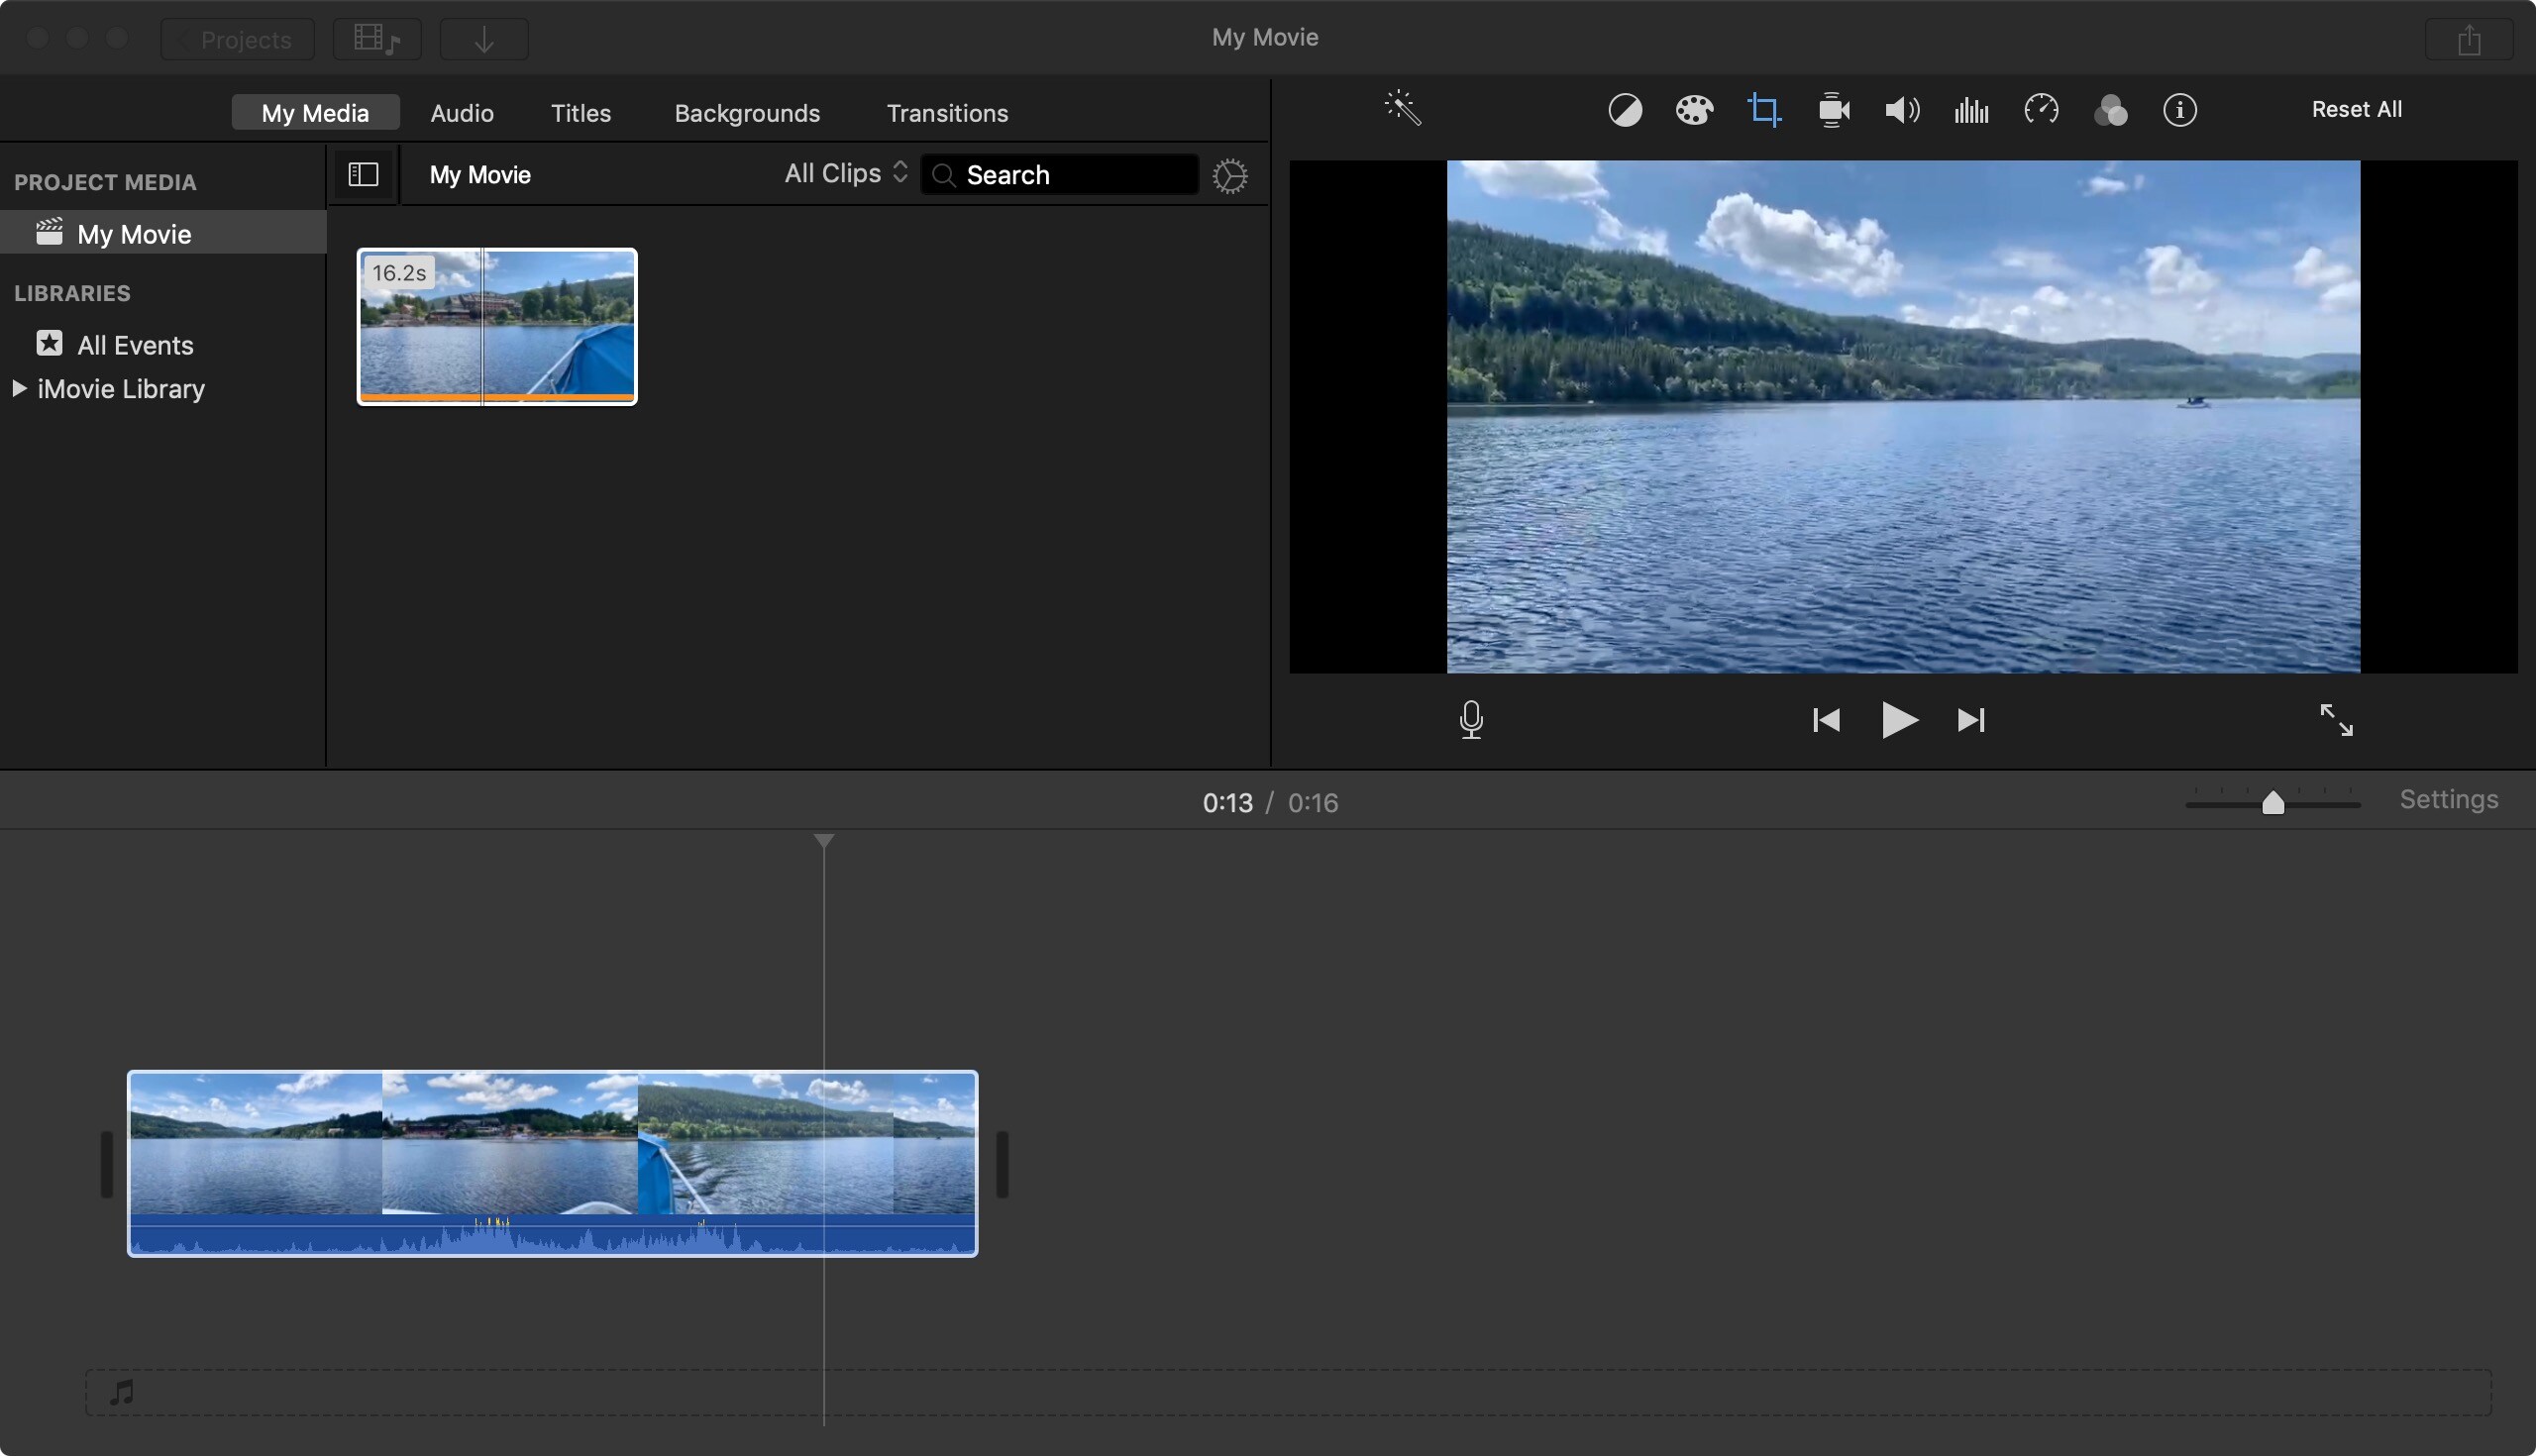
Next, you simply drag and drop your video to the timeline (the bottom section of the software). Your video will be represented on a frame-by-frame basis on the timeline. This is especially useful as you may need proper timing to add text to your video so they’ll appear and disappear exactly when they should.
Step 2: Add Text Layers
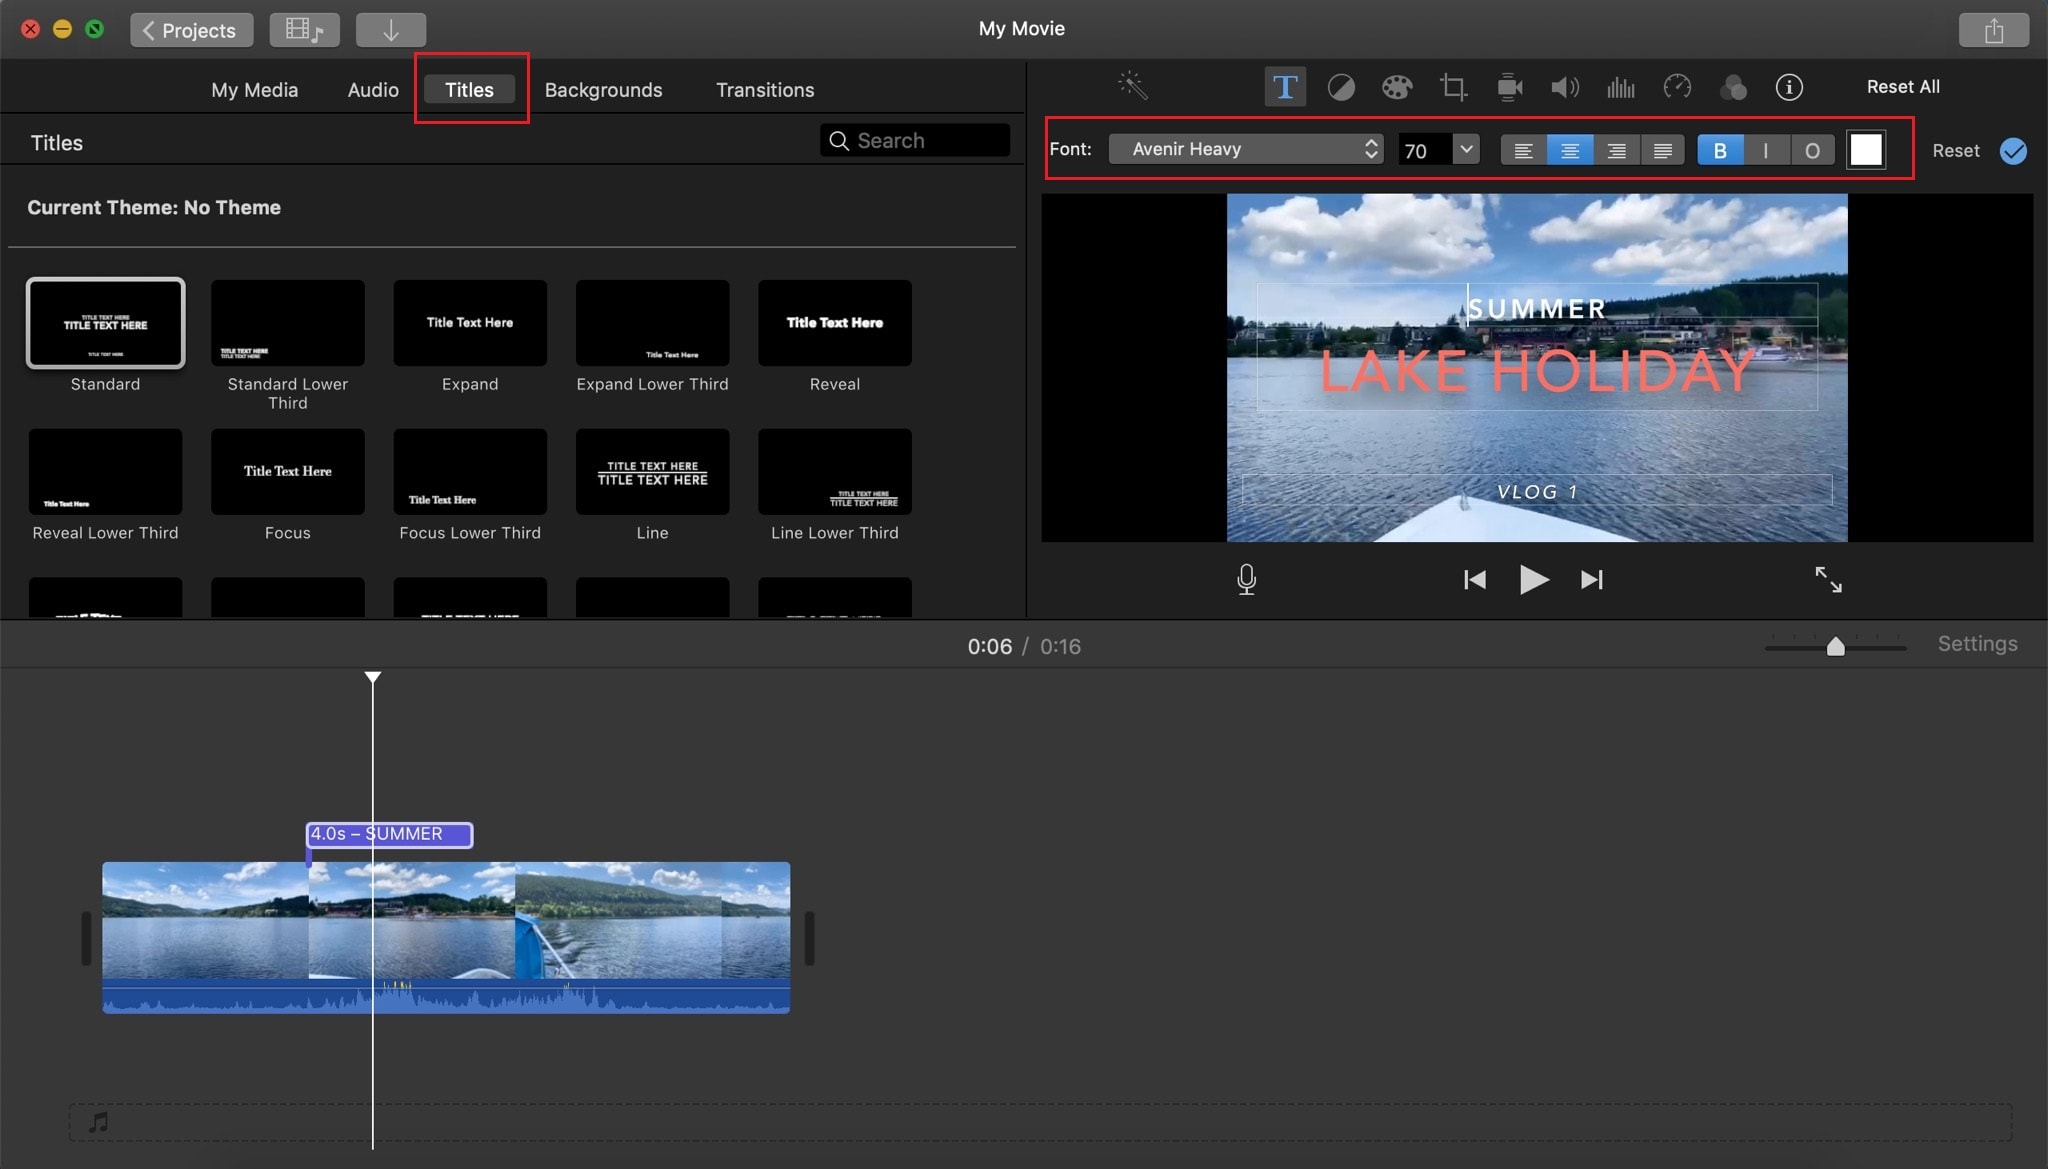
Select Titles after My Media and Audio from the top menu. A good number of styles are available, simply choose the title that best suits your needs. Notice what happens as you move your pointer across them? That’s a way to preview them before selecting. Double-click on your choice to load it into your video in the timeline. Drag and drop at any position in the timeline to fix the text at that moment in the video.
Step 3: Customize Text
You can customize your text however you want it. For example, you can drag your text to any position within the video frame. Navigate the picture frames in the timeline to add texts at certain moments in the video. More text options are available atop the video preview section. Use the text controls there to change font size and styles, text-align and many more. Simply save your video when done.
Adding text in iMovie is quite easy, isn't it?
But you will find it diffcult to edit text at the same time. There is not much editing you can do apart from changing the fond, size, color, etc of the text template in iMovie.
So, if you need a more flexible and creative software to add text in video, don't hesitate to read on.
An Advanced Way to Add Text in Video with Filmora Video Editor
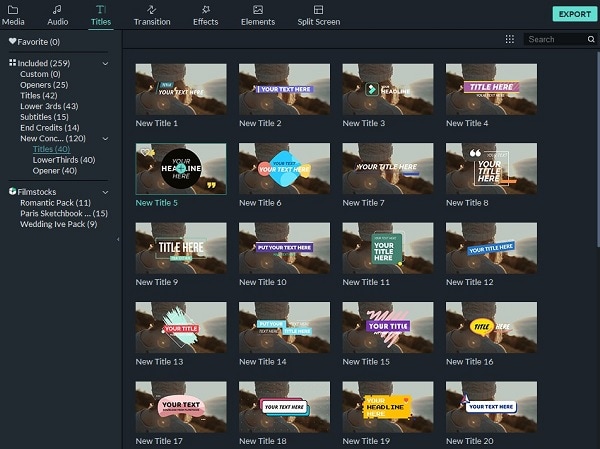
Alternatively, you could use Filmora Video Editor for Mac to add text in video with more flexibility. Filmora brings powerful video tools and features to end-users in a simple way suitable for both beginner and amateur film producers. It is capable of seamlessly adding text to your video among other functions. For text on video, Filmora pretty much has it all (100+ templates available). Here’re the types of video texts available on Filmora:
• End credits
• Subtitles
• Animated openers
• Lower thirds
• Custom design (engineer it—just in case you didn’t find exactly what you want)
Let's follow these simple steps to add text in a video using Filmora:
Step 1: Import your video, drag it to timeline
After launching Filmora, you either create a new project or open an existing one. Drag and drop the video you want to add some texts to the project files or hit Import to manually select the file.

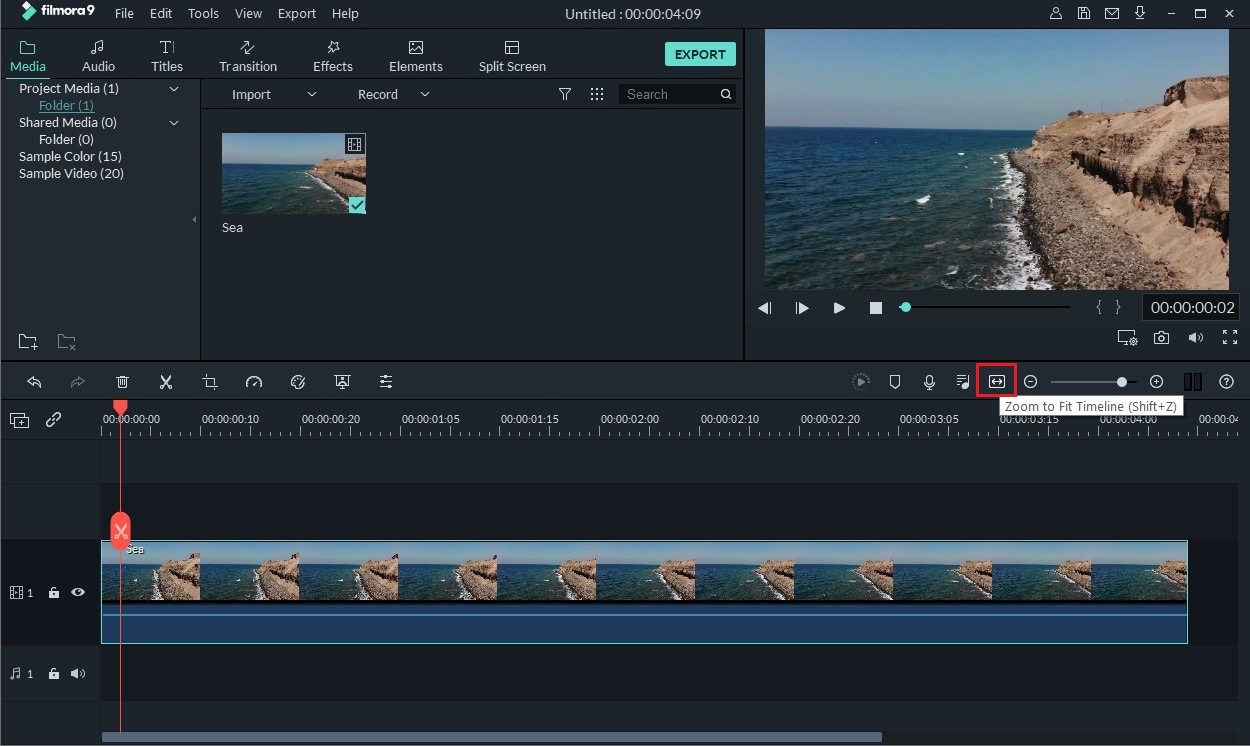
After that, simply drag the video (now in project files) to the timeline. Click Zoom to Fit Timeline, then the video will be displayed frame by frame In the timeline…this enables you to navigate moments in the video and add texts to specific moments.
Step 2: Select a text template
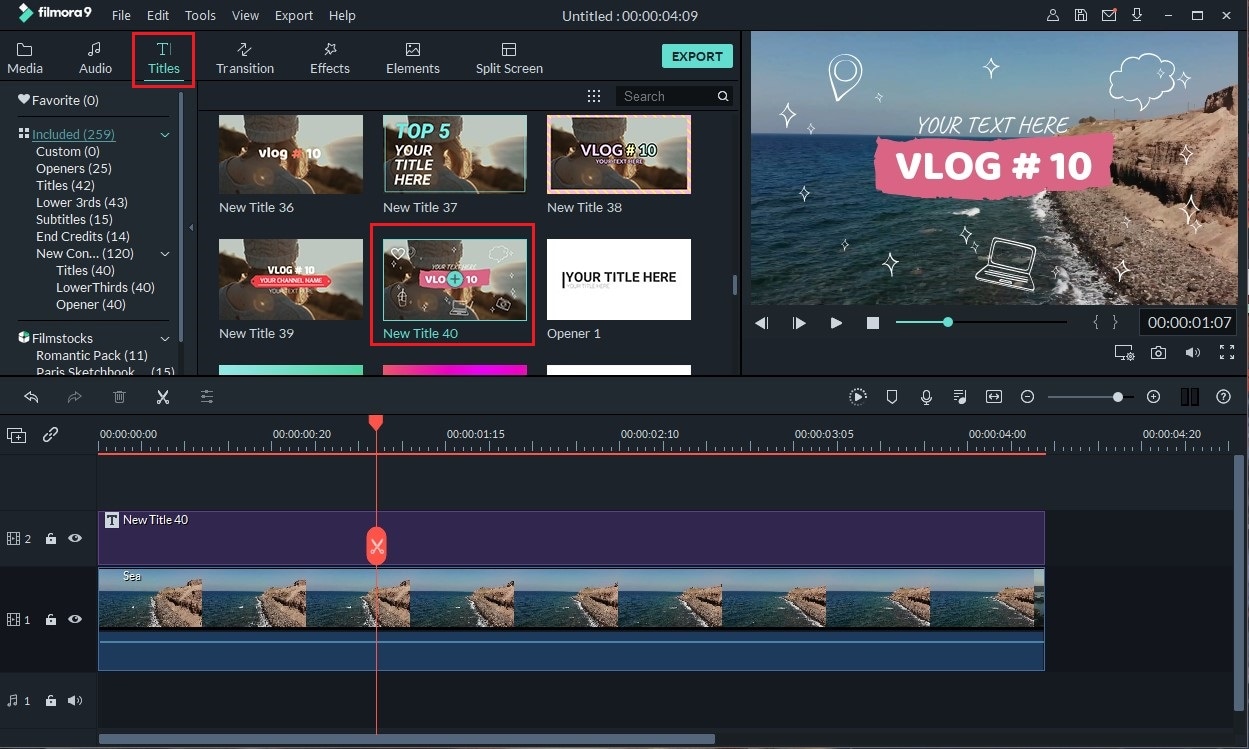
Atop Filmora, you’ll find Titles just after Media and Audio. Open it, there you’ll find a bunch of text templates ready to be added to your video. From the sidebar, navigate the various text types available e.g. Subtitles, Openers, End Credits, etc. Once you’ve decided on a template, drag and drop it on any position in the timeline to insert it at that very moment.
Step 3: Customize your video texts
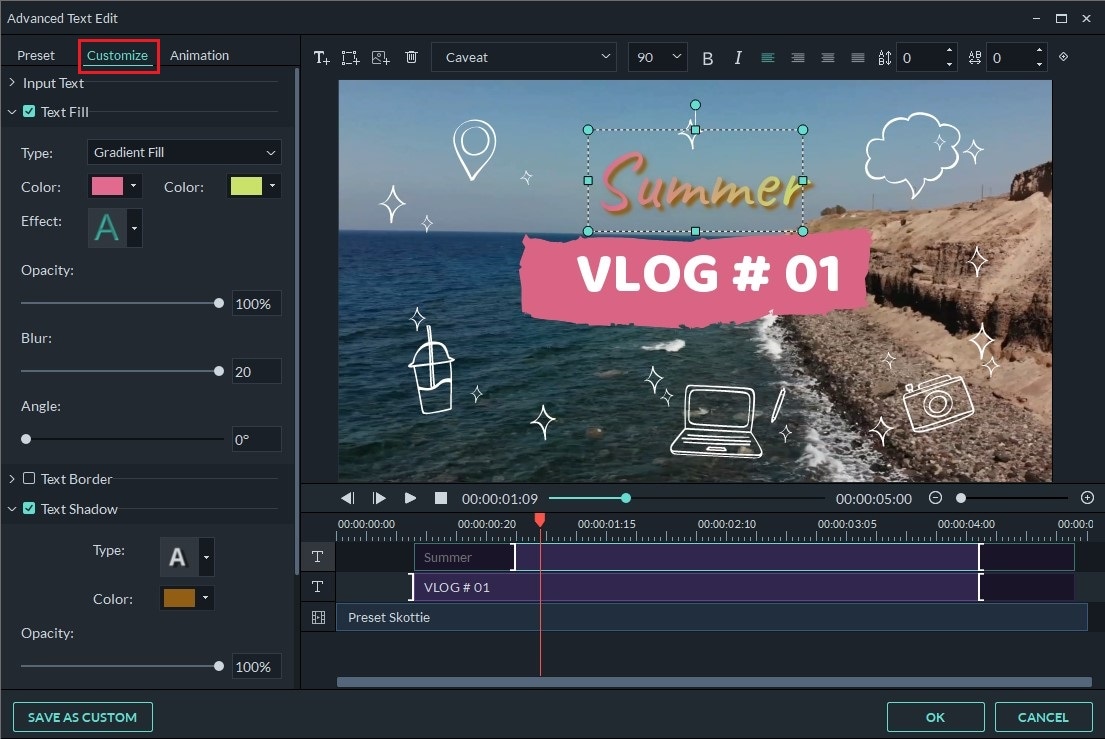
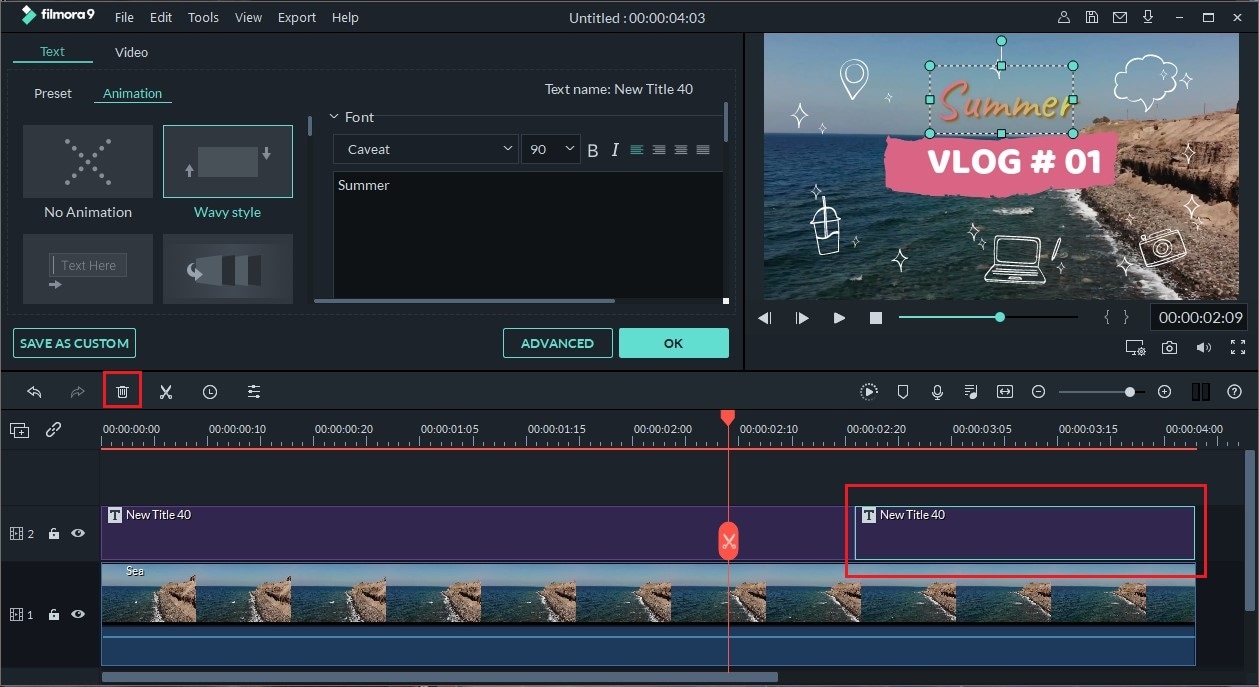
Double-click the text and select ADVANCED to edit it. You can further modify its colour (brightness, hue), font size, orientation, position, etc.
In Animation, you can set the movement of the text.
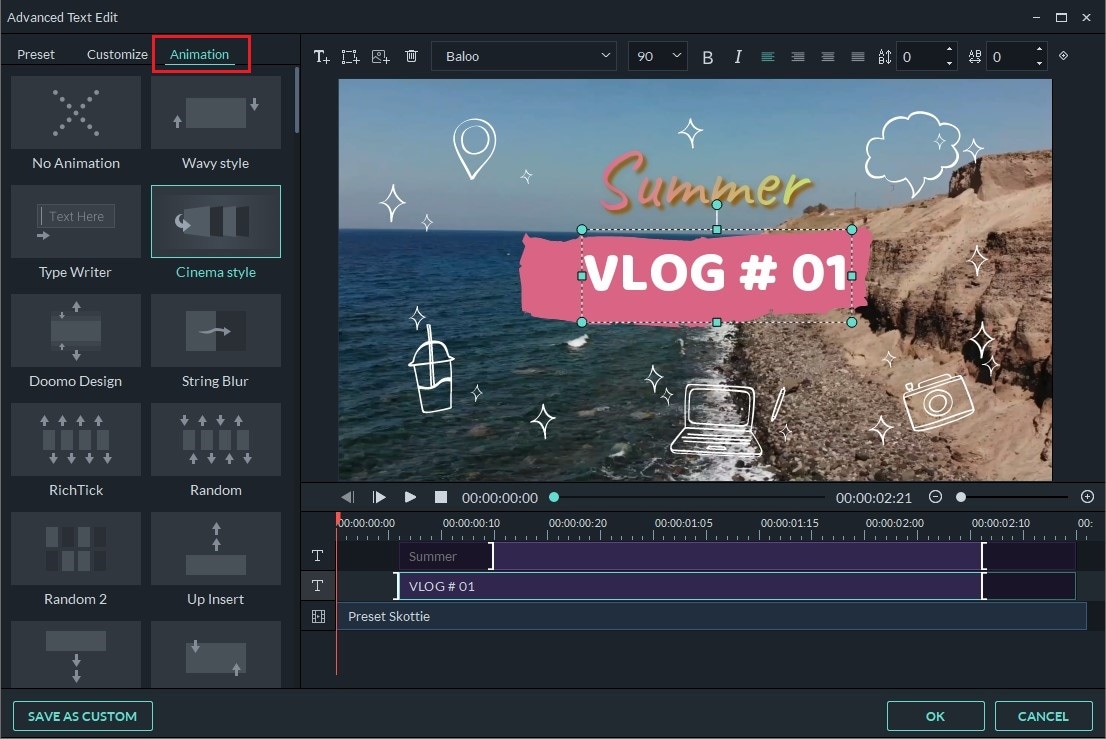
If you want to modify how long the text shows (duration of text), simply drag the edge of the text thumbnail; its length is directly proportional to the text duration on the video.
To delete unwanted text templates, right-click on the template and click Delete from the items in the menu. The delete option can also be seen in the menu above the timeline after selecting any component in the timeline.
Step 4: Finally, you export the video
When satisfied with your work, simply preview and Export your video! A variety of options are available; YouTube, Vimeo, Your device/DVD. A wide range of video formats is also supported by Filmora. For the DVD option, you don’t need to install any extra burning tools, just make sure your disk is inserted and you’re good to go!

Conlusion
Adding text in video isn’t so difficult after all. In this tutorial, iMovie and Filmora were used to achieve this. Both are great video editing tools with similar interfaces—which makes one easily substitute another.
While iMovie is available only on macOS, Filmora is available for both Windows and Mac platforms.
If you want to learn more about text editing, here are some pratical tutorials of Filmora for you:
- How to Create Animated Titles
- How To Add Scrolling Text to Video


