You know that how irritating it’s to see that the software that you’re using to rotate your videos isn’t working properly. I’m talking about Adobe Premiere Pro rotate video not working. In case you’re facing the same problem, this post is a real savior to solve this.
- Part 1: How to Rotate Video in Adobe Premiere Pro
- Part 2: Rotate Video with Adobe Premiere Pro Alternative
- Part 3: Adobe Premiere Pro Rotate Video Not Working Fixed
Part 1: How to Rotate Video in Adobe Premiere Pro
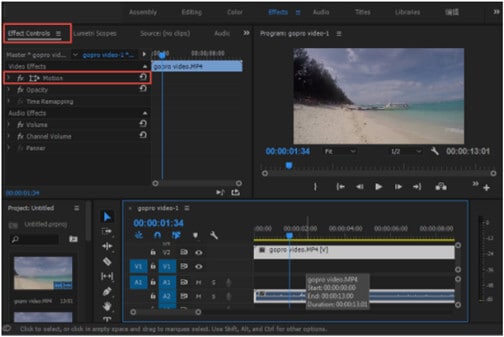
Step 1. First of all, start the program on your PC.
Step 2. Then, open the video that you’ll need to rotate.
Step 3. Now, highlight the video and you’ll see different options.
Step 4.After that, go to the “Motion” button.

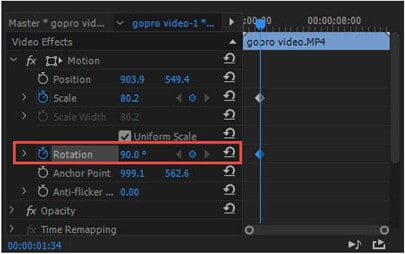
Step 5. You can see that the “Rotation” icon is there to rotate your video. Use the icon to rotate the video according to your preference.

Step 6. Set the rotating degree by using the arrows. There are many other options there to take the ultimate advantage of your video editing. So, these are the easy steps to rotate video in Premiere. This reveals that the Premier Pro rotate video works very smoothly.
Part 1: Rotate Video with Adobe Premiere Pro Alternative - Filmora Video Editor
If you are encounter Adobe Premiere Pro rotate video problems, you can get help from alternative to Adobe Premiere Pro. We’re safe to say that Filmora Video Editor for Windows (or Filmora Video Editor for Mac) is such a nice tool that can be the best alternative to Adobe Premiere Pro to dealing the purpose of rotating video. The video rotation operation is as simple as a breeze. Just folow the below steps to rotate video.

- It is the easiest video editing software with basic and advanced tools.
- You are allowed to edit videos, photos and audio in any format.
- You can apply various video effects to personalize your video.
- It lets you save video in any format or burn to DVD for collections.
Below is a step-by-step procedure on how to rotate a video with Filmora Video Editor:
Step 1. Launch the Program
After download and install the program on the PC, next thing is to launch the software. And choose "FULL FEATURE MODE" to enter next step.

Step 2. Import Videos
Then, hit the “IMPORT MEDIA” button to import the video that you’ll have to rotate. Filmora supports 5 ways to import media files.

Step 3. Rotate The Videos
Now is the time to rotate the video. To do this, you have to click on the “Rotate” icon situated above the Timeline. It’ll show a pop-up windows named the “Video Inspector”. There are many options available in the window to rotate your video. Rotate the video according to your need and then, click the “OK” tab.

Step 4. Export Video
This is the last part where you’ll have to save or export the video that you’ve just rotated. Hit the “Export” button which will bring a pop-up window. There are options for choosing the video format as well as the destination where you’ll send it. Do this and finally, click on the “Export” button. Filmora Video Editor supports uploading video to YouTube, Facebook and Vimeo directly or burn DVD from the program.

Part 3: Adobe Premiere Pro Rotate Video Not Working Fixed
Problem #1: It freezes, sometimes.
Solution: Delete the preferences file and reset the program.
Problem #2: May crash when upgrading to the latest version.
Solution: Create a new project and import your videos there.
Problem #3: Unwanted deletion of aged files.
Solution: Upgrade to the latest version.
Problem #4: Error message while playing videos.
Solution: Update the drives to the latest version.
Problem #5: Video captions can’t be edited.
Solution: Follow: Window > Workspace > Reset to Saved Layout.


