"I want to fill the video player like the original without black bars on the sides and the top. I am sure someone can help me as this is very annoying when it rarely happens with videos I work on."
Just like the above video creator, you will notice that when you transfer videos and play it on online sites like YouTube or other media players you will notice black bars in the videos. Today the black bars are commonly known as letterboxing which are caused by when you use different aspect ratio or when you set up videos incorrectly. In this article, we shall show you how to remove black bars from video.
- Part 1. Why Do Your Video Have Black Bars
- Part 2. How to Avoid Black Bars When You Making Videos
- Part 3. What are the Right Aspect Ratios for Different Platform
- Part 4. How to Remove Black Bars from Video [Win & Mac]
Part 1. Why Do Your Video Have Black Bars
Now that you have learnt know what are black bars are and many ways on how to remove black bars from videos, it is now time to understand what causes black bars. The black bars appear on your videos if you transfer video in wider aspect ratio (16:9) to standard aspect ratio (4:3) while maintaining its original ratio is when you see black bars appear.
Another reason that you could be seeing black bars on your videos is because you have recorded the video on your phone while playing it or if you are using a video player that is not of the same aspect ratio as the video.
Part 2. How to Avoid Black Bars When You are Making Videos
The black bars do nor just appear on media players but also on sites that have embedded videos or sharing sites like YouTube. So how do you avoid black bars?
1. Use the right media player
To avoid black bars, you need to use the right media player that supports the same aspect ratio as your video. For instance, if you are using a Windows Movie Player, you can adjust the settings of the aspect ratio to match the source of your video
2. Adjust online settings
For embedded videos on a website, you will notice that some videos are not responsive to a device. It is, therefore, important to use responsive video plugins such as FlowPlayer Plugin, or you can adjust the aspect ratio manually.
3. Adjust YouTube settings
To avoid black bars on YouTube Videos, you need to get the right YouTube aspect ratio. After uploading your video, go to edit button and set the following tags: yt:crop=16:9, yt:stretch=16:9 and yt:stretch=4:3.
Part 3. What are the Right Aspect Ratios for Different Platform
If you think removing black bars from video is a waste of time, you need to know more about how to avoid black bars on videos, you need to create videos that are of appropriate aspect ratio to a social media site or a device. Today, there are different social media sites and each supports different aspect ratios. However, if you do not know the aspect ratio of each site, we have broken it down clearly below:
• Snapchat: 9:16 (1080 x 1920)
• Twitter: 16:9 (max upload 1080p)
• Instagram: 16:9 or 9:16 (max upload 1080p)
• YouTube: 16:9 (max upload 4k - 3840 x 2160)
• Facebook: 16:9 or 9:16 (max upload 4k - 3840 x 2160)
Part 4. How to Remove Black Bars from Video
If you want to crop out black bars in video you need to use video editing software such as Filmora Video Editor for Windows (or Filmora Video Editor for Mac). This software is featured with a cropping option. Other than that, it has zoom option that allows you to zoom in then crop videos accurately and then zoom out. Moreover, as you edit the video or images or audios you will be able to preview before saving them.
Step-by-Step Guide on How to Remove Black Bar with Filmora for Windows
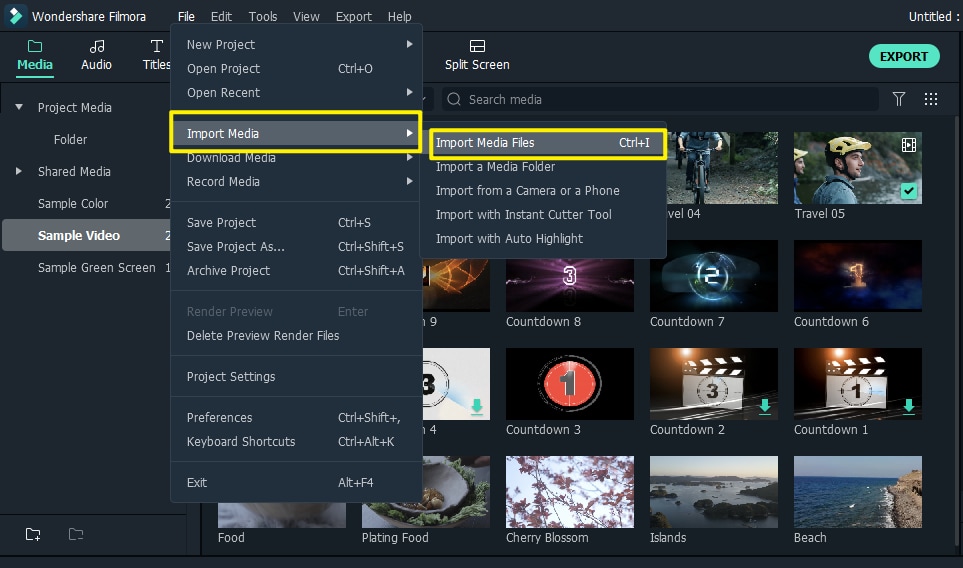
Step 1. Open Filmora Video Editor for Windows and import your media file
Open Filmora and import the media files you need by clicking the "Import Media" button from the "File" menu. Then, you're free to drag-and-drop the files to the timeline.
Step 2. Remove the black bar of the video
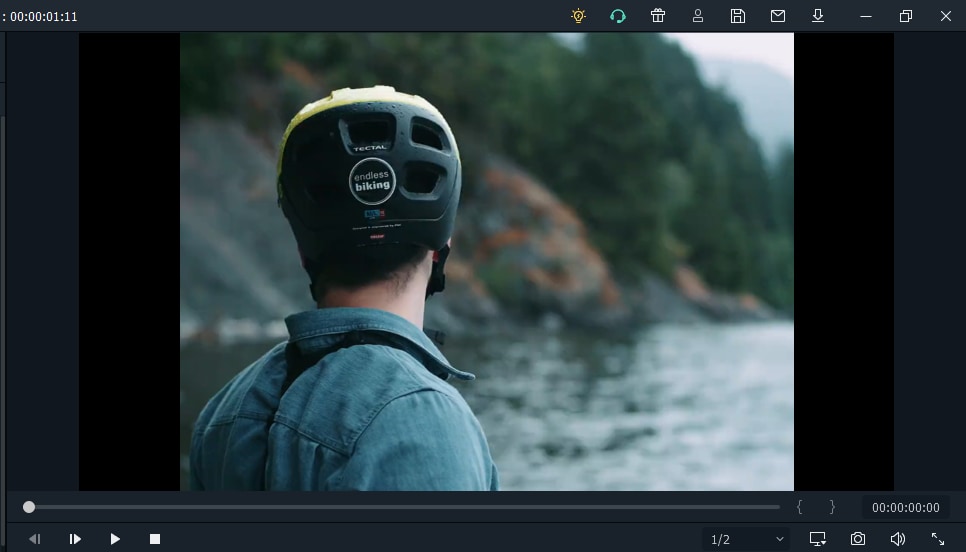
As you can see, there are black bars on the sides of the image. To deliver a better watching experience, we need to remove black bars from the video. Here I will introduce 2 actionable and easy methods for you.
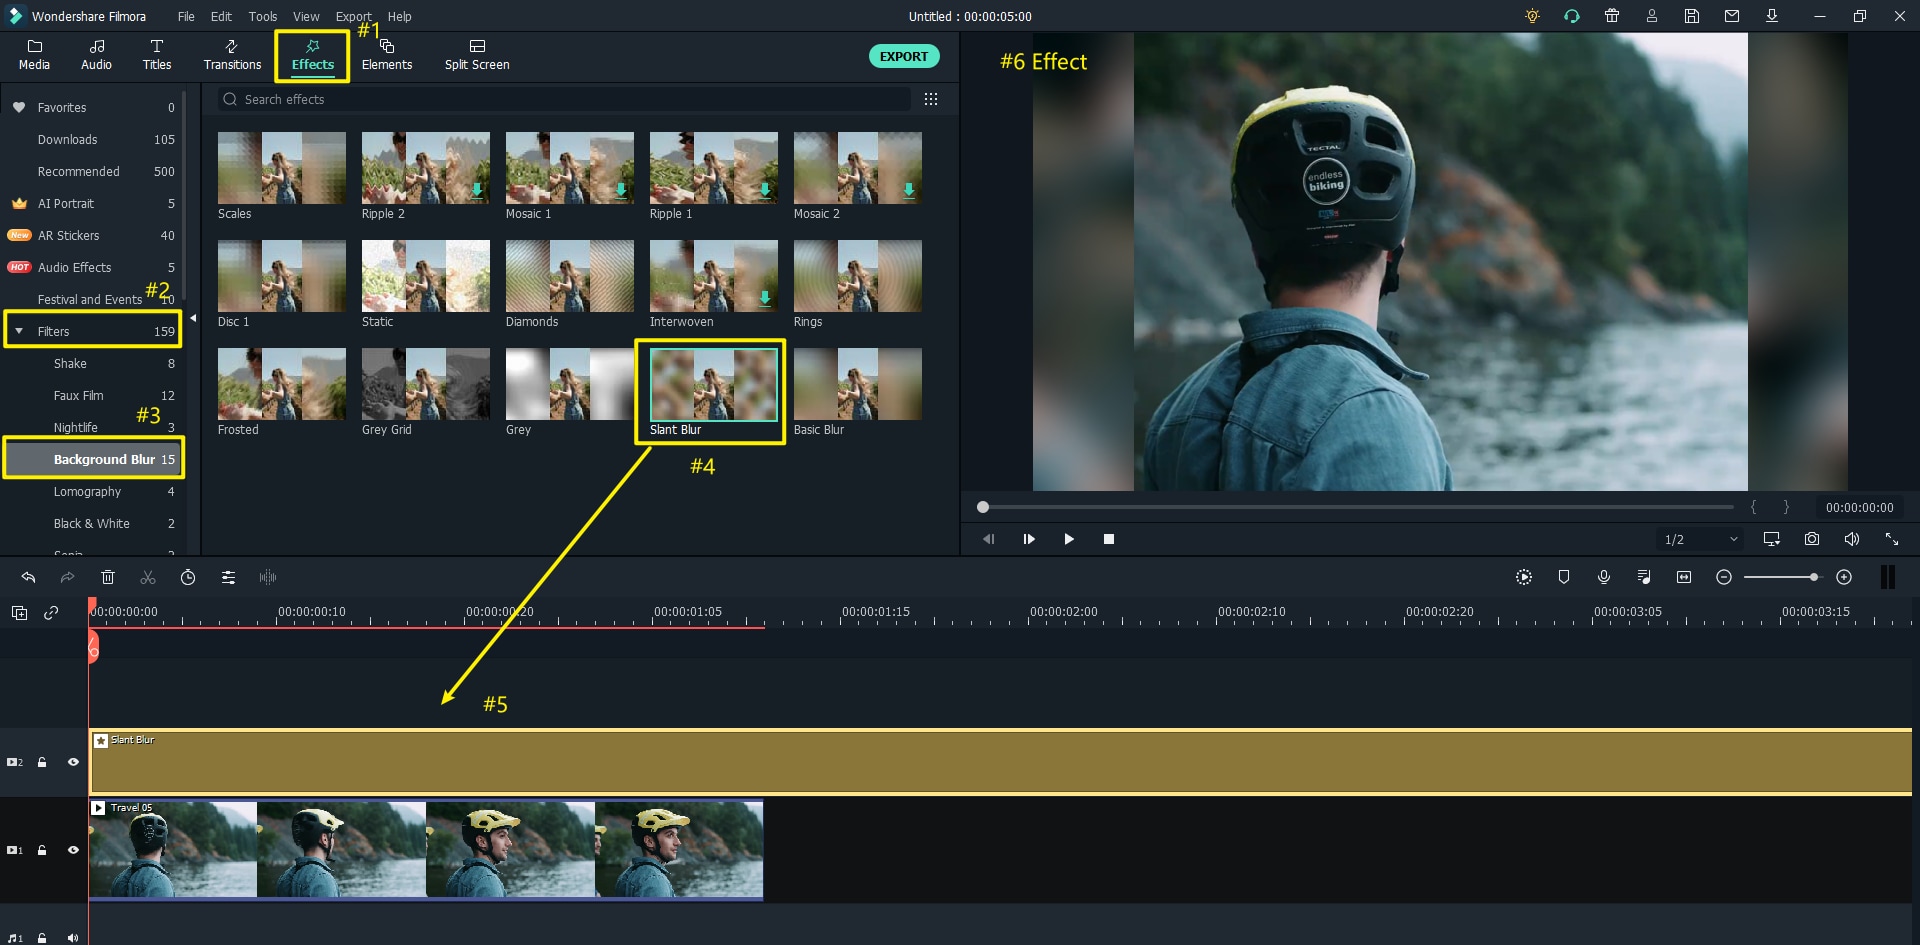
Method #1. Use Background Blur Effects to remove black bar.
The easiest way to remove it is to use the default blackground blur effects in Filmora. Choose it from Effects - Filters -- Blackground Blur. As you can see in the preview window, there are two transparent mosaic bars around the video, and it's better than the original black bar. There are up to 15 different popular background blur effects in Filmora, which are all well-designed. You can always find the one you like from them.
Method #2. Duplicate the same clip and place them appropriately to cover the black bar.
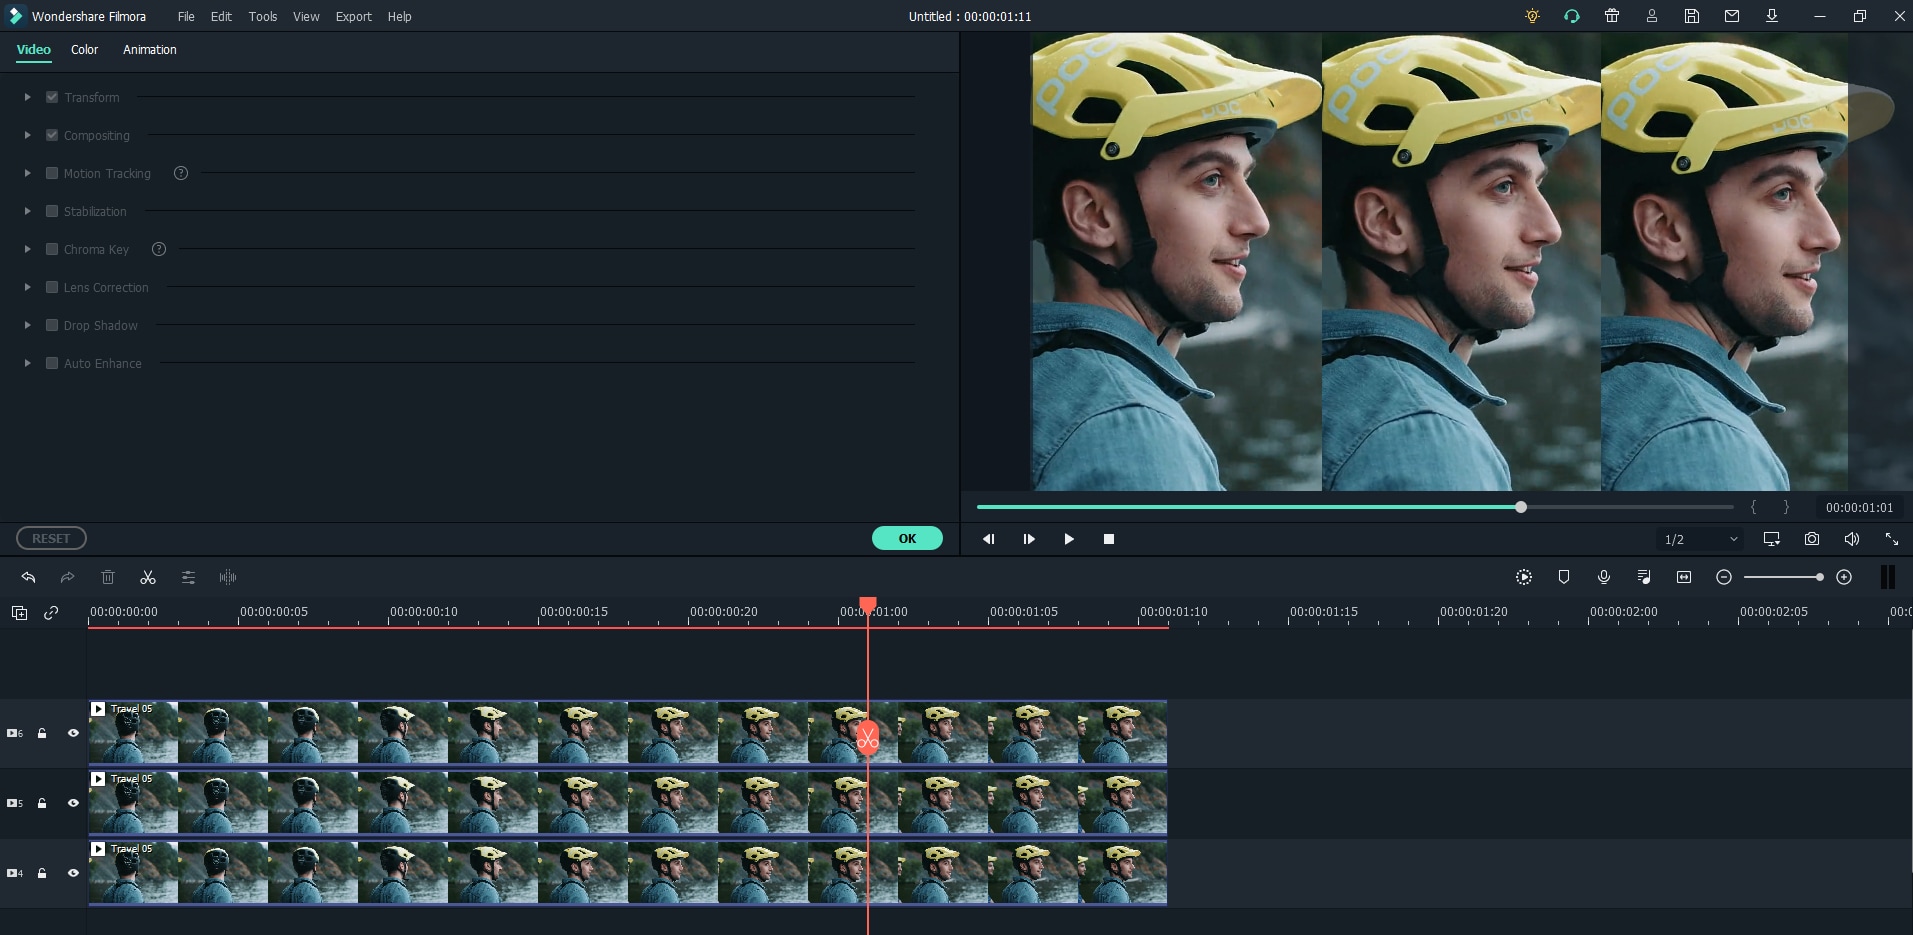
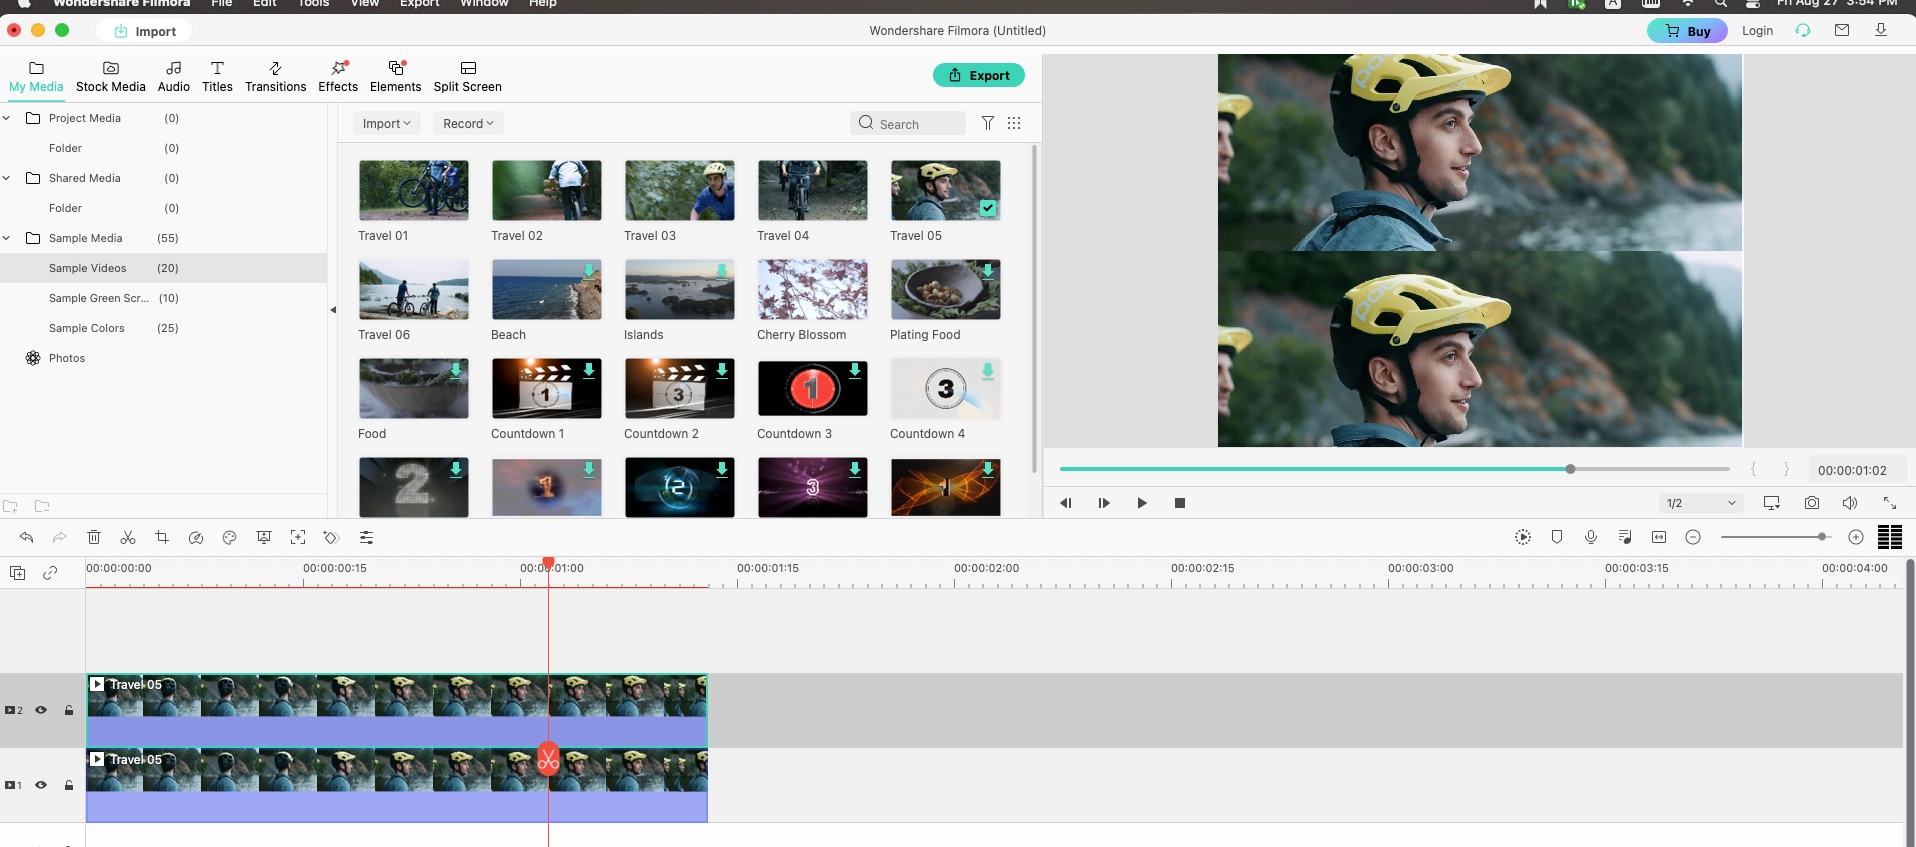
The second solution is to make several duplications of the orginal clip and use them to fill the black areas. Firstly, duplicate your video and put it on top of the original clip. As you can see in the picture below, now we've got Clip #1 and Clip #2.
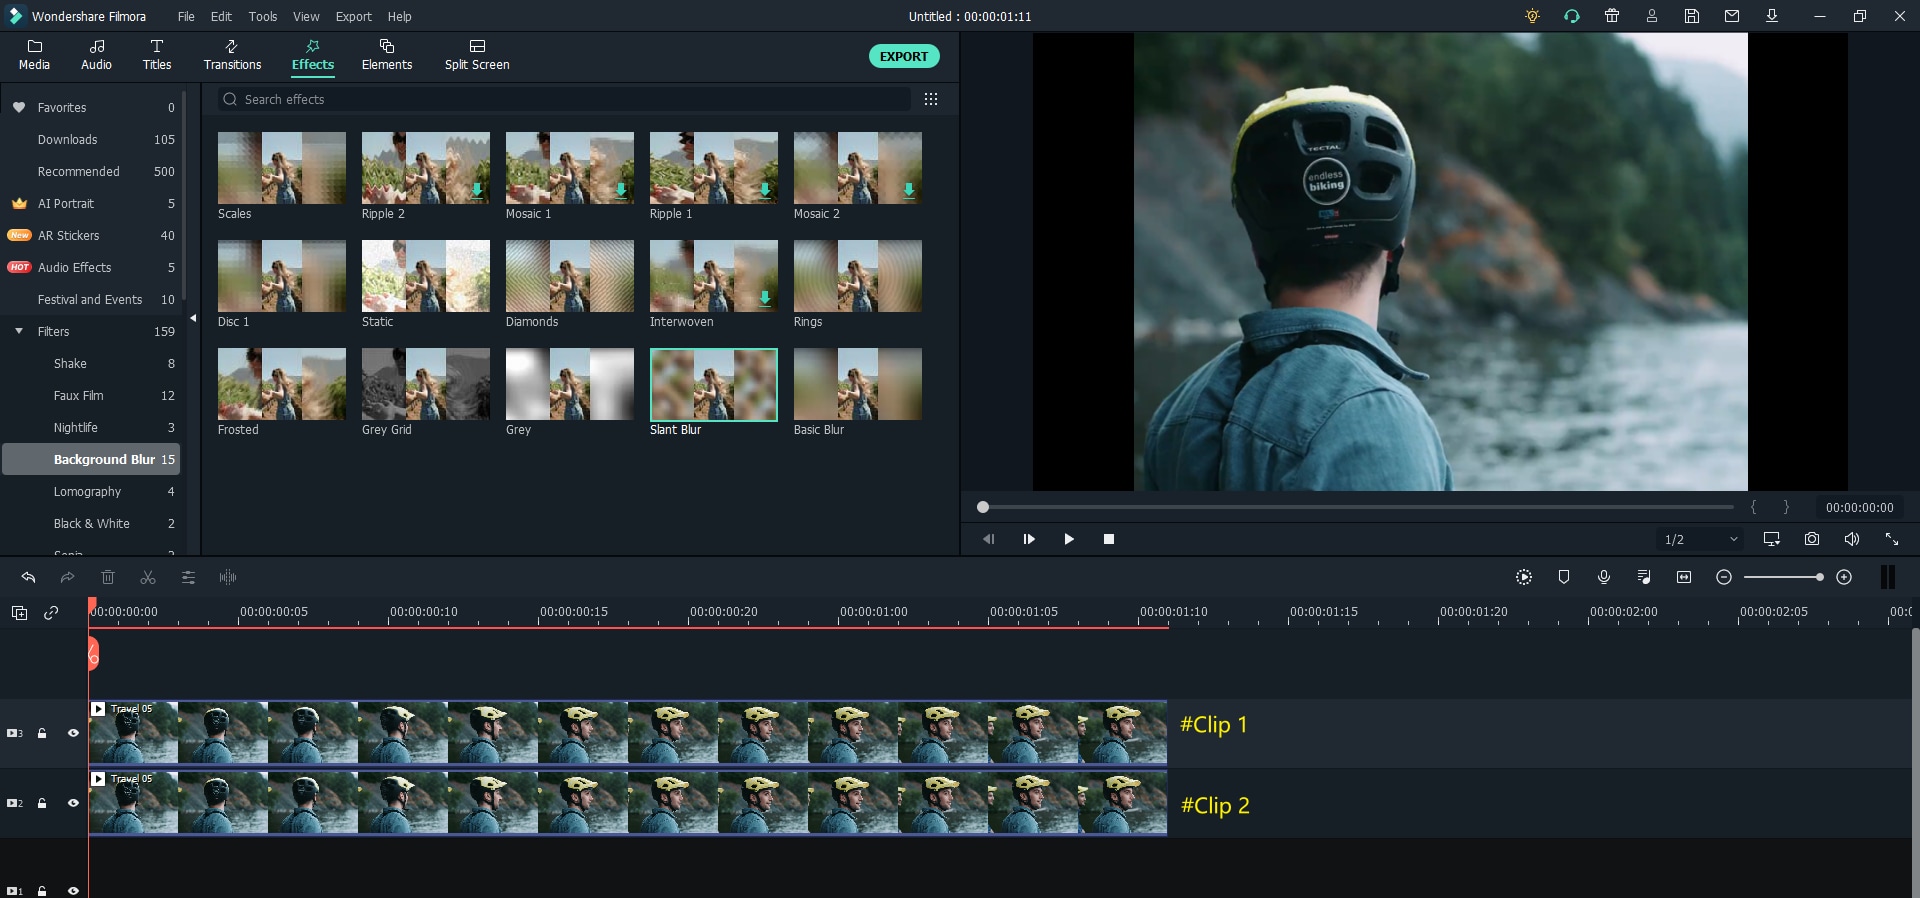
Secondly, click either clip to show the "adjustable frame" around the image. Now you can resize the video and relocate it.
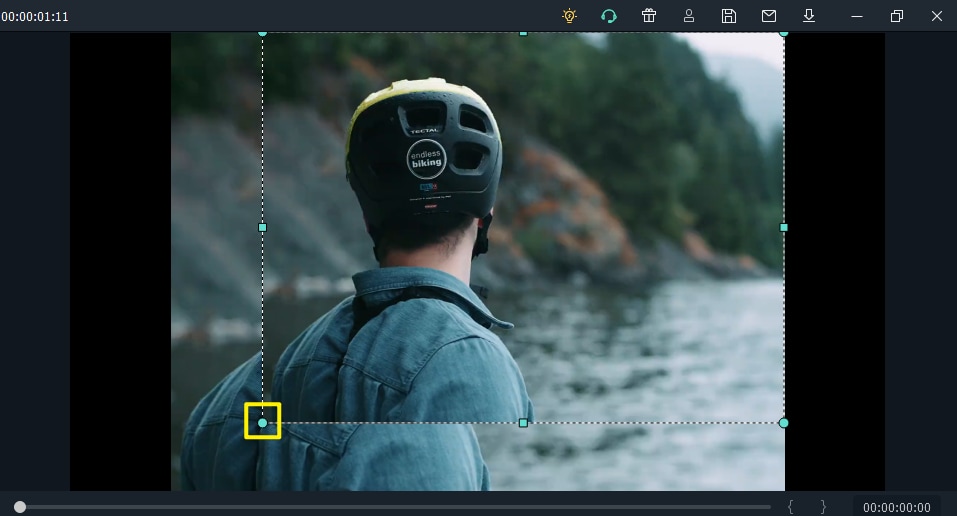
Once you move the clips into the right place, the black bar will disappear. And this is also one of the most popular methods that is used by TikTok, Instagramers.
Step-by-Step Guide on How to Remove Black Bar with Filmora for Mac
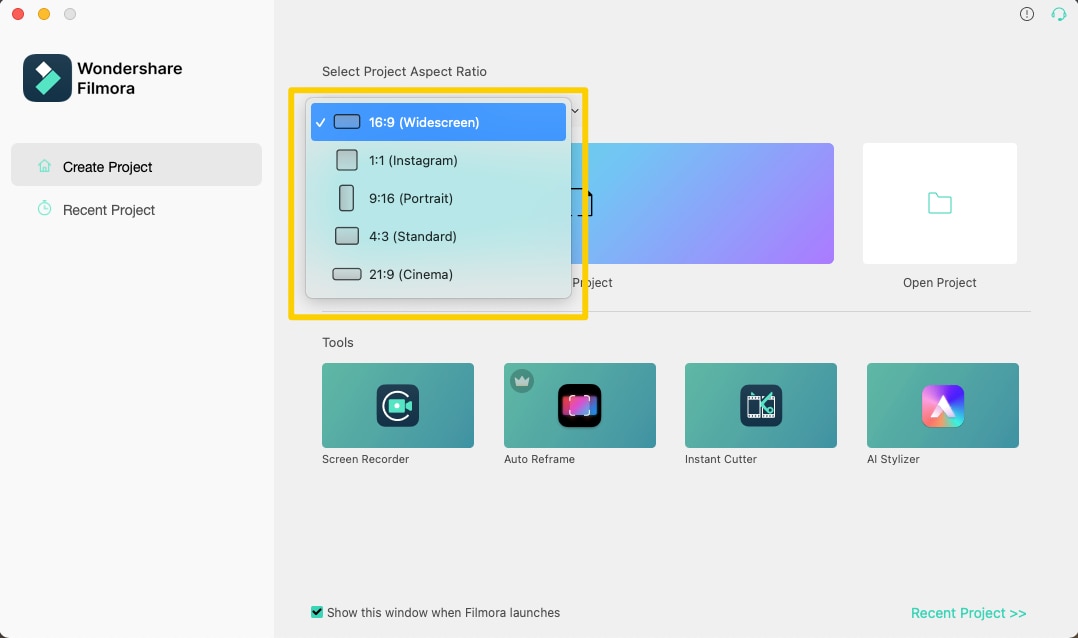
Step 1. Open Filmora Video Editor for Mac and select the aspect ratio for your project
Simply launch Filmora Video Editor for Mac, create a new project. Select the aspect ratio from the listed options: 16:9 (Widescreen); 1:1 (Instagram); 9:16 (Portrait); 4:3 (Standard); and 21:9 (Cinema). Of course, you can change the aspect ratio at any time during your editing through the "Project Settings" Menu.
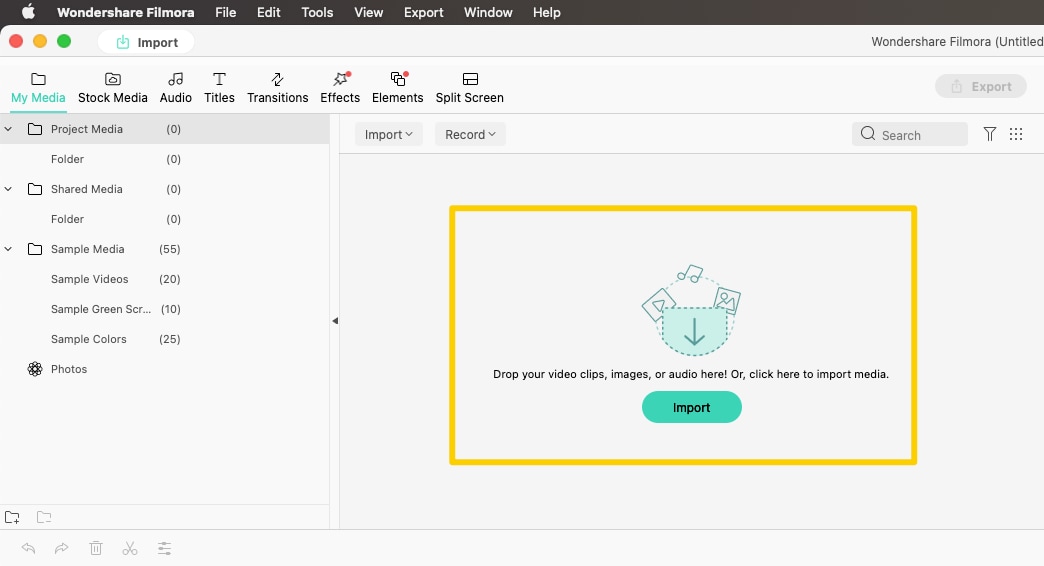
Step 2. Import your media file.
Import the media files you need by clicking the "Import" button on the main interface. Then, you're free to drag-and-drop the files to the timeline.
Step 3. Remove the black bar of the video
The removing step is the same with that used on windows system.
Method #1. Use Background Blur Effects to remove black bar.
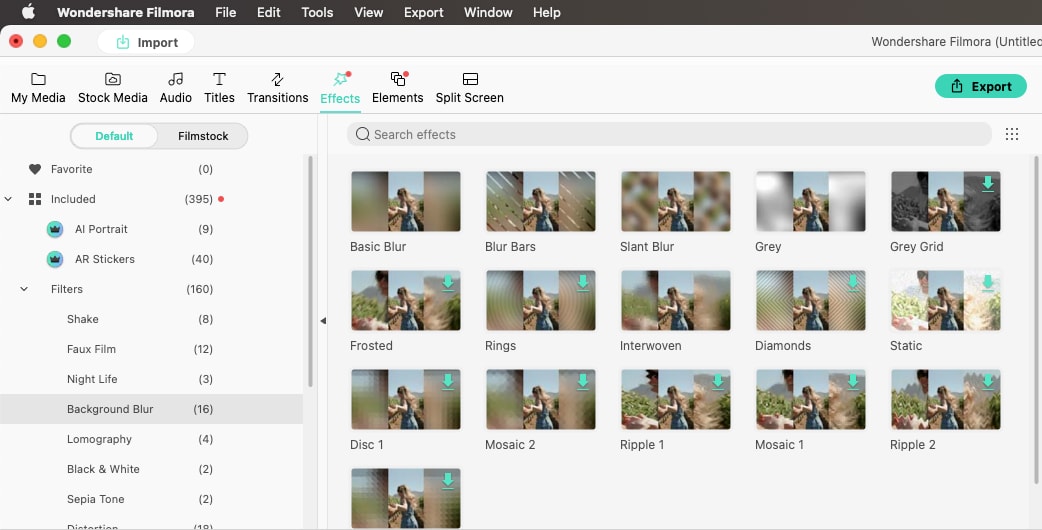
The easiest way to remove it is to use the default blackground blur effects in Filmora. Choose it from Effects - Default- Background Blur -- the blur effects you like most (here I use the "Blur Bars" one). As you can see in the preview window, there are two transparent bars (with twill pattern) around the video, and it's better than the original black bar.
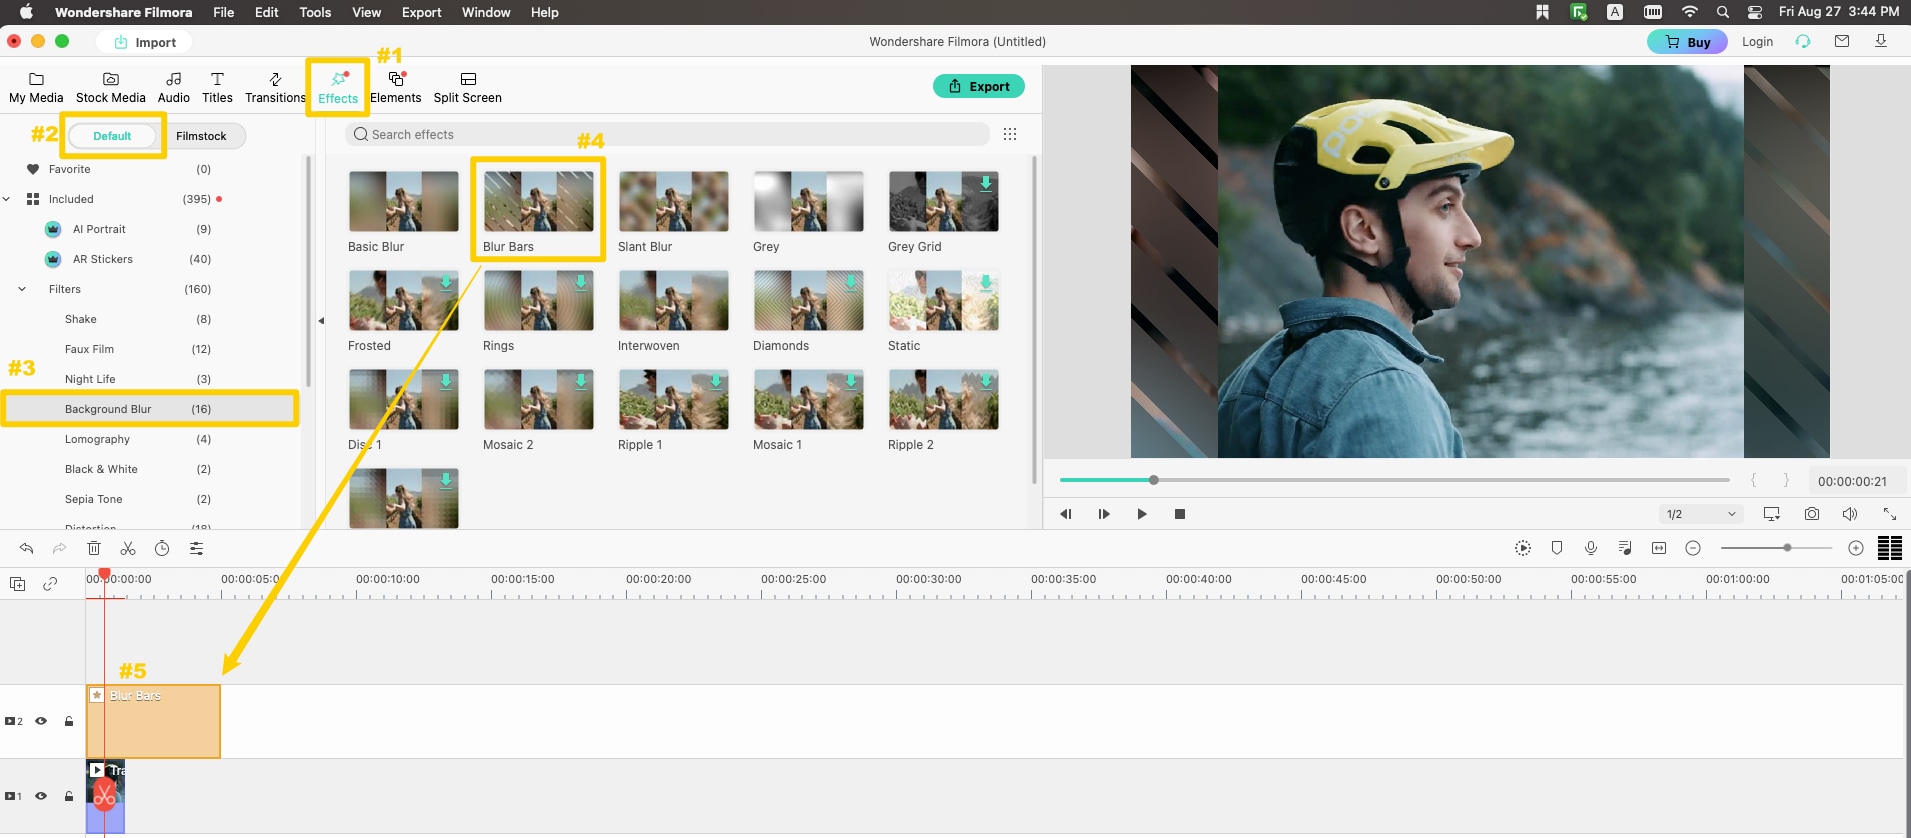
There are up to 16 different popular background blur effects in Filmora (as shown below), which are all well-designed. You can always find the one you like from them.
Method #2. Use multiple same clips to replace the black bar.
The second solution is to make several duplications of the orginal clip and use them to fill the black areas. Firstly, duplicate your video and put it on top of the original clip. As you can see in the picture below, now we've got Clip #1 and Clip #2.
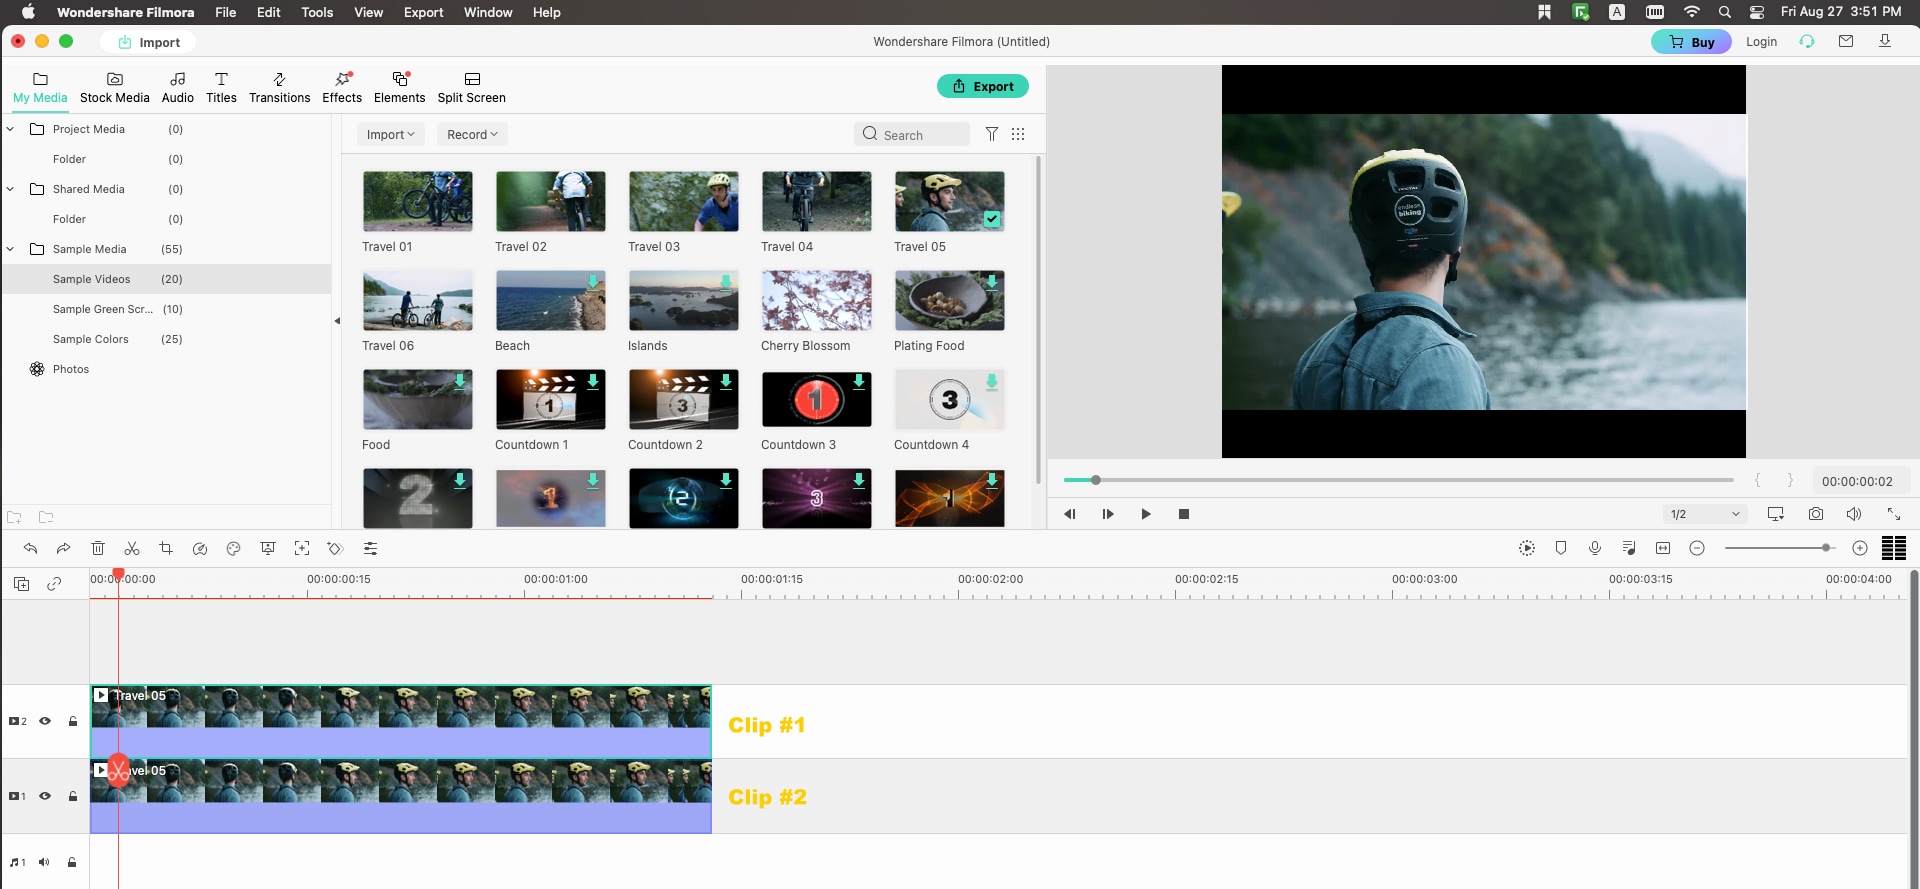
Secondly, click either clip to show the "adjustable frame" around the image. Now you can resize the video and relocate it.
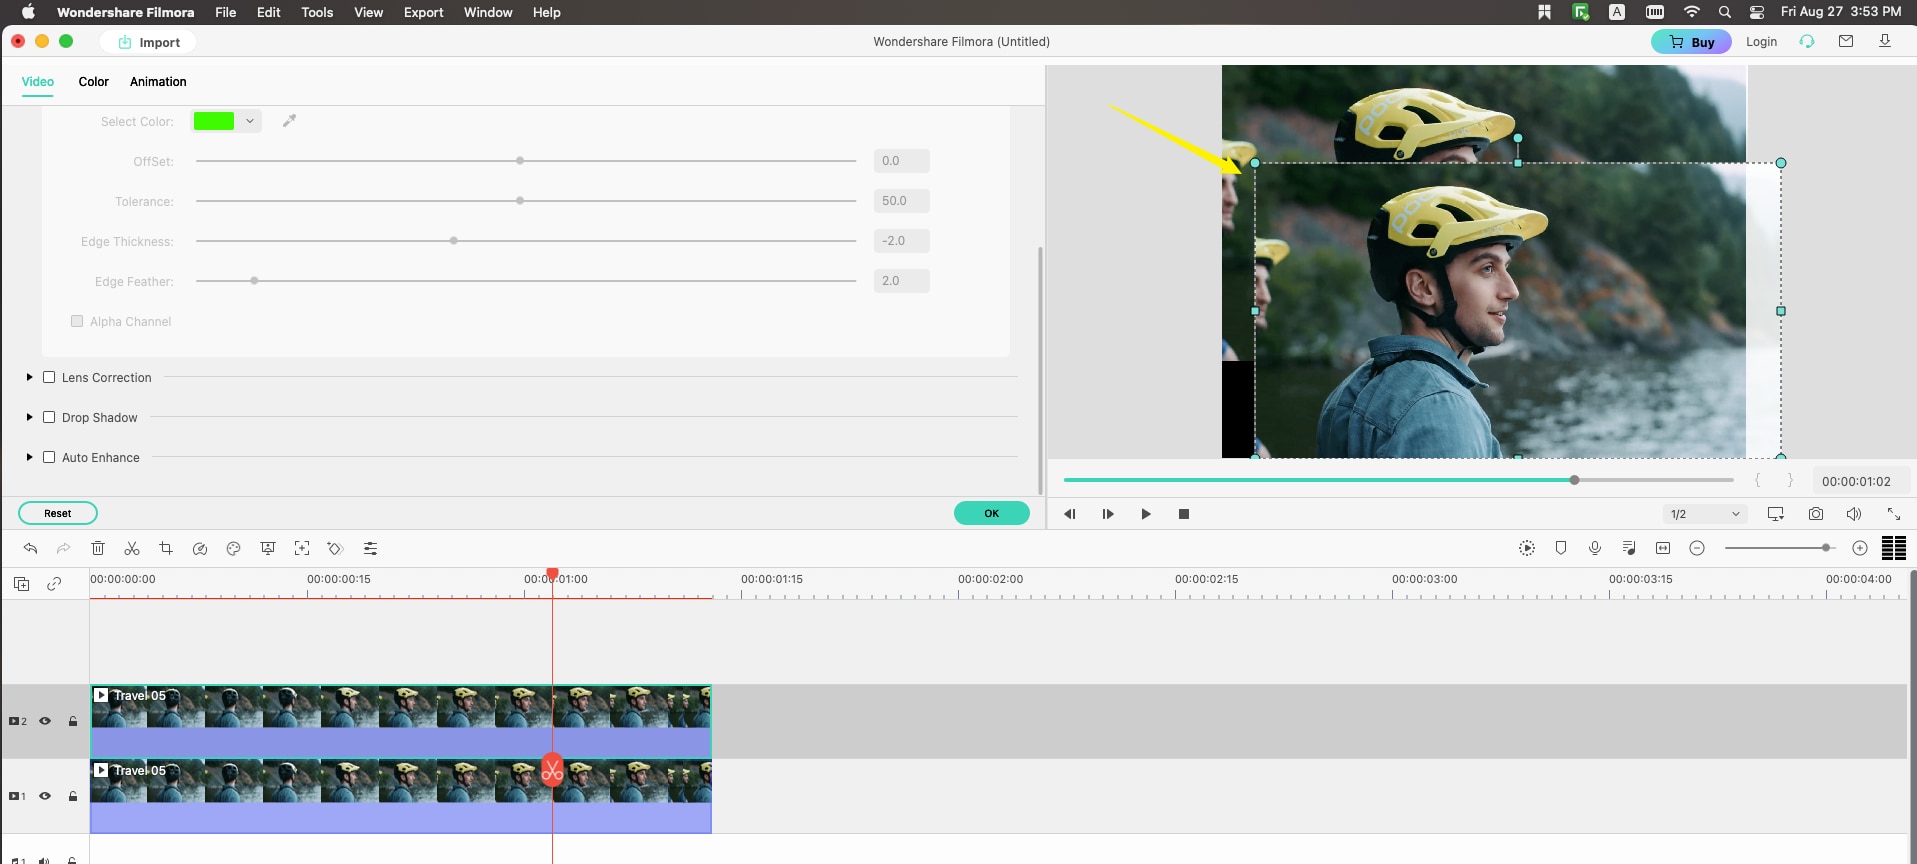
Once you move the two clips into the right place, the black bar will disappear. And this is also one of the most popular methods that is used by TikTok, Instagramers.
The Finish Line
To sum up, we have seen that the black bars appear due to playing or creating videos that are of different aspect ratio to your media player. Therefore, you need to remove black bars from videos by creating compatible aspect ratio with a social media site or device using Filmora Video Editor. This software allows you to set aspect ratio, blur the black bars and crop out black bars successfully and effortlessly.

Key Features of Filmora Video Editor:
- The software supports almost all available videos, images, and video formats. Besides, it also supports GIF files and 4K resolution videos.
- Allows to import images and clips from Facebook, Twitter, and other social media channels.
- The app also provides advanced functions, such as the audio mixer and picture-in-picture support, and basic functions.


