How do I remove green screen background? Is it possible to remove green screen in Photoshop? When we capture a video or image with green screen background, such as elgato green screen, we need to do video editing to remove the green screen background and replace it with new background. Photoshop is a well-known and professional image creation and editing tool from Adobe. And Photoshop also has the ability to help you to remove green screen background from the image. In this guide, we will share tips on how to remove green screen in Photoshop.
- Part 1. How to Remove Green Screen in Photoshop
- Part 2. Why Need An Alternative to Remove Green Screen
- Part 3. An Easier Way to Remove Green Screen
Part 1. How to Remove Green Screen in Photoshop
Below is step-by-step guide on using Photoshop to remove green screen.
Step by Step Guide on How to Remove Green Screen in Photoshop CC
Step 1. Import the green screen image to Photoshop
Launch the Photoshop program and import the image with green screen background.
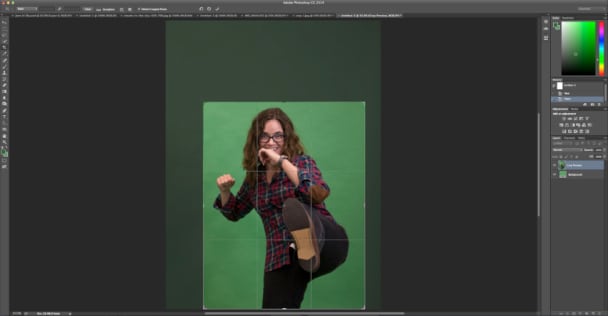
Step 2. Crop the excess part of the image
Now it is time to remove unwanted part from the image. You can use the crop control to do that or just crop out the unwanted space. And then simply press the "Enter" to confirm the cropping.
Step 3. Do color control
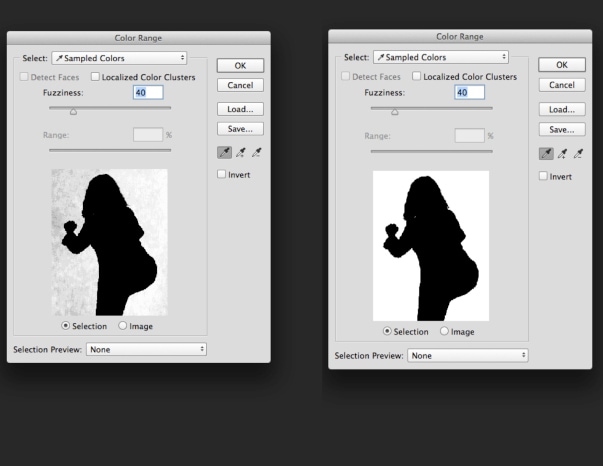
Go to the "Select" menu and click on the "Color Range" option. And use the eyedropper tool to do the green screen removal. Just press the Shift key and click and drag around the areas with green color that you want to remove. When done perfectly, you can see the effect in color range window shows white. It is able to press the Alt button and click on the areas where you think has overdone.
Step 4. Inverse and refine edge
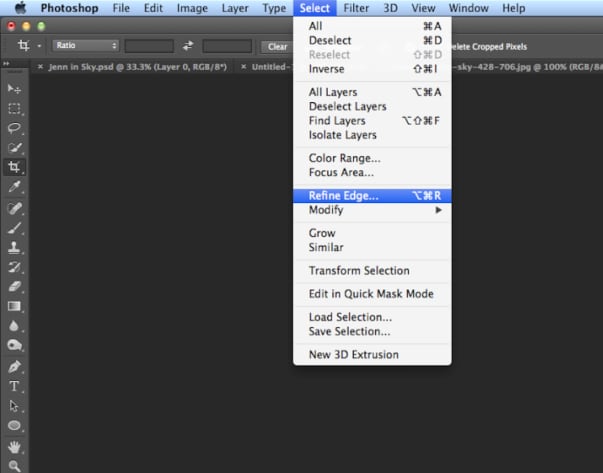
Move to the "Select" menu again and click on the "Inverse" option. And then back to the "Select" menu and click on the "Refine Edge…".
Step 5. Adjust smoothness of the edge
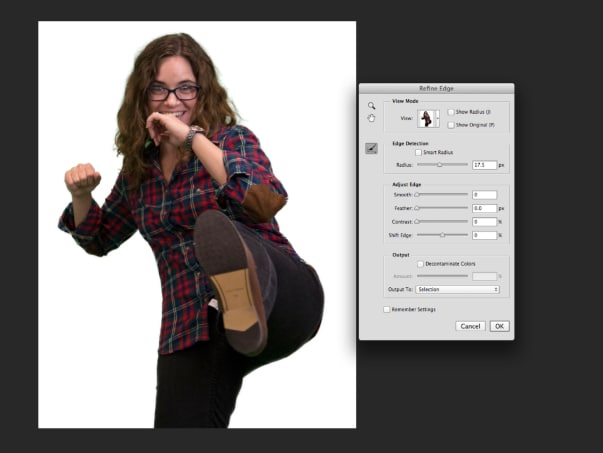
In the "Refine Edge…" window, you can make the edge smoothness with different sliders. And then click on the "OK" button to confirm.
Step 6. Delete green screen
Lastly, go back to "Select" > "Inverse", and press Delete on your keyboard to completely remove the green screen. Now you can copy or drag the image to any new background you want.

Turn long videos into viral clips. Effortlessly transform lengthy videos into engaging, shareable clips.
Part 2. Why Need An Alternative to Remove Green Screen
Photoshop becomes a standard when it comes to edit and create images. However, the program file for Photoshop is too large to install on a less storage computer. And since it is very professional with multiple features and tools, it is hard for many people to handle it. Also the Adobe product line has many limitations, especially when it bring out the new product Creative Cloud in 2013, which motivate the development of Photoshop alternatives, such as Sony Vegas and Filmora Video Editor. If you are a beginner, we highly suggest you to use Filmora to remove green screen background.
Part 3. An Easier Way to Remove Green Screen
Filmora Video Editor for Windows (or Filmora Video Editor for Mac) is specially designed for beginners to edit and make videos, images and audio tracks. It comes with the feature of green screen, as well as deleting green screen from the background. And there are multiple easy-to-handle and advanced video editing tools to help you to do any changes on your media files. You simply import the videos and pictures captured by your phones or cameras, and start your editing as easy as ABC.

Key Features of Filmora Video Editor:
- The software supports almost all available videos, images, and video formats. Besides, it also supports GIF files and 4K resolution videos.
- Allows to import images and clips from Facebook, Twitter, and other social media channels.
- It is easy to enable the green screen effect to your video and remove green screen if needed.
- You can apply filters, texts, faceoff, transitions, split screen, elements, and 300+ effects to videos.
- It is able to customize your video by trimming, cropping, rotating, splitting, combining, and more.
- You are able to import videos and images in any format and have multiple export options.
[Tutorial] Steps to Remove Green Screen with Photoshop Alternative Software
Since Filmora Video Editor is easy to use, the beginners and technical newbies can do the video editing without hassle. Just follow the below steps to do so.
Step 1. Run the Filmora Video Editor
After you set up the video editing software on your PC, launch the program. And in the main interface, you can click on the "FULL FEATURE MODE" to enter the video editing window.

Step 2. Import videos or images to the program
When it comes to import media files, you can click on the "Import Media Files Here" button and select the videos or pictures to load them to the program. The files will be added to the media library window.

Step 3. Remove green screen
Drag the video or image with green screen to the timeline. And right click on the video to select the "Green Screen" option, which will open a new window for editing the background.
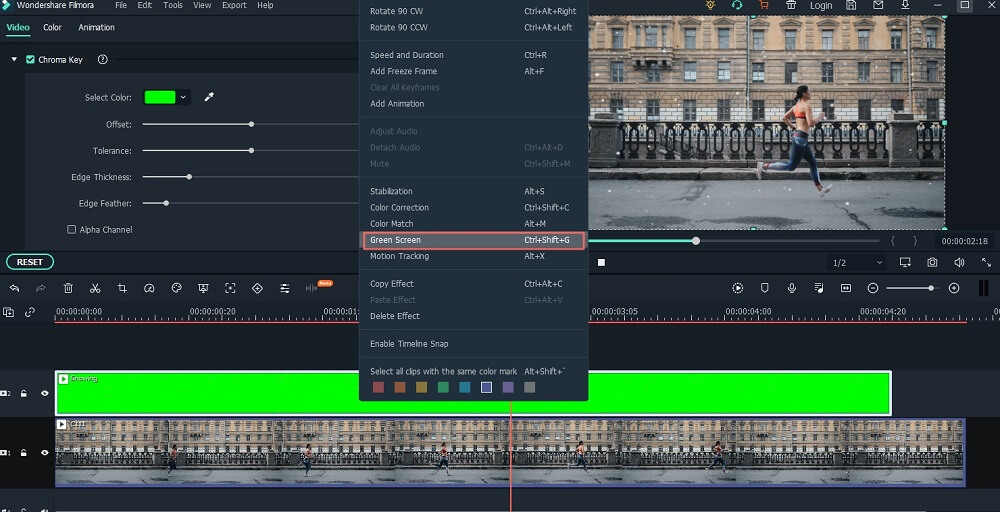
And you can move to the "Mask" menu, and select the color to a new one. And it has the ability to adjust the intensity level. When you are satisfied with the background color, click "OK" to confirm the change. After this step, you can copy the video and enable a new background you want on the video.
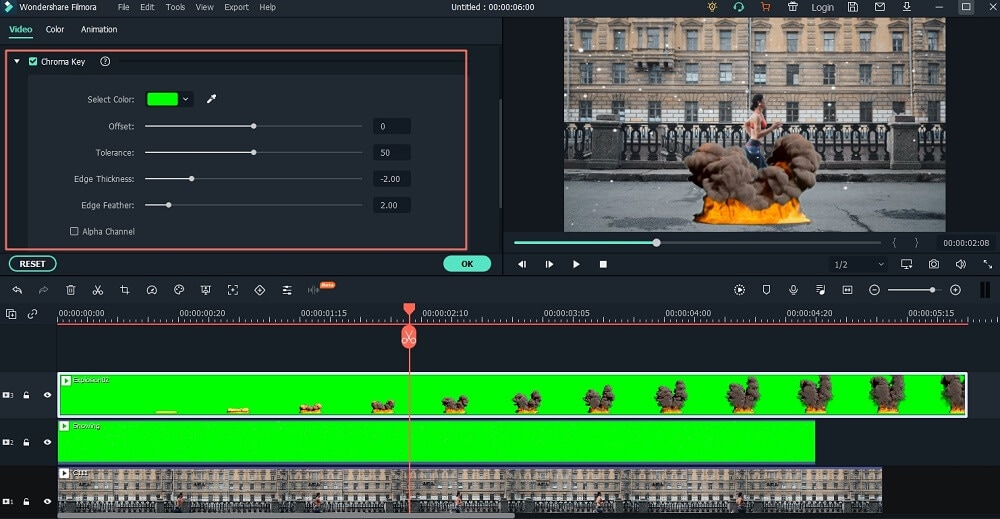
Step 4. Export the new video
On the top right window, you can click on the play icon to preview your change. And then click on the "EXPORT" button to save the video. You can select any video format as the target output. Or it is possible to export the video to your mobile devices.

When shooting videos in green screen, you can use Filmora Video Editor which is easier to remove the green screen background and add new background to create your own film compared to Photoshop CC. Just download and have a try.


