How to rotate a YouTube video left or right 90 degrees, 180 degrees or at any other degrees?
You might find it impossible to flip YouTube videos after upload and you want to rotate a video for YouTube but don't know how to do it exactly? Well, take it easy. You're going to learn the easiest yet efficient way to rotate a YouTube video in this post.
The best part?
Even though lots of apps have the ability to rotate a video, but the facts have proved that not all of them allows users to rotate a YouTube video in any degrees as they like. Thus, after testing hundreds of video rotater software on the Internet, including free, online, app, and desktop application, finally I have picked up below 2 program as the best option for you.
Now, let's get stared...
If you want to know more ways to rotate a video, you can read another post - how to rotate a video in 6 ways.
- Method 1 : How to Rotate YouTube Video with Filmora Video Editor
- Method 2 : How to Flip YouTube Video with YouTube Video Editor
How to Rotate YouTube Video with Filmora Video Editor?
Filmora Video Editor (or Filmora Video Editor for Mac) is the highly recommended video editor to rotate or flip YouTube video. It is easy-to-use, and specially designed for the beginners who are new in the video editing area. What's more? This program allows users to rotate a video in any degrees as you like.
Now, let's have a brief look on the key features of these powerful YouTube Video Rotater software.

- Rotate a YouTube or any types of video by 90, 180, 360 or any degrees as you like.
- Split, join, cut, edit videos, images and audio files at the same time.
- 1000+ video effects to improve the video quality and performance.
- Support almost all popular video, audio and image formats, including mp4, avi, wmv, 3gp, mp3, gif, etc.
Steps on Rotating YouTube Videos within 3 Simple Steps
Step 1. Launch Filmora Video Editor
Download, install and launch the program. You can click on the "New Project" to ensure that full fledge functionality is enjoyed.

Step 2. Import YouTube video to the program
On the main interface there is import file tab. Click "Import Media Files from Here" and import the file from the dialogue box that opens. You can also directly drag and drop the YouTube video files to the main interface.

Step 3. Rotate YouTube videos
Press the settings button on top of timeline. The dialogue box which opens has all the related rotating functionalities. Set the rotation angle to rotate the video as necessary. You can also double click on the video in the timeline. Set the rotation angle on the dialogue box which appears.

Using the buttons, rotate your video and after accomplishing the rotation, click on the "OK" button of the pop-up window. If you want to flip YouTube video, you can locate the "Flip" option and click the icon to mirror the video as you like (See how to flip a video horizontally or vertically).
In case you wish to customize the YouTube video for different purposes, you might also want to know:
- How to Combine YouTube Videos
- How to Make An Amazing Video Intro for YouTube
Step 4. Save or Export video
Press the "Export" button on the main tab of the video. Set the format in which the video is to be exported. Here you can also upload the rotated YouTube video to YouTube again. Press export or OK to export the video and the process ends here.

You can also use this YouTube Video Rotater to edit a video as follows:
- Overlay Videos to A Video with the Best Video Overlay Software
- Making A Time-lapse Video from Beginng to the End
- Create A Split-screen Video with Split Screen Video Editor
How to Flip YouTube Video with YouTube Video Editor?
You can also mirror YouTube video online with YouTube Video Editor. The steps which are to be followed to rotate video using YouTube video editor are as follows:
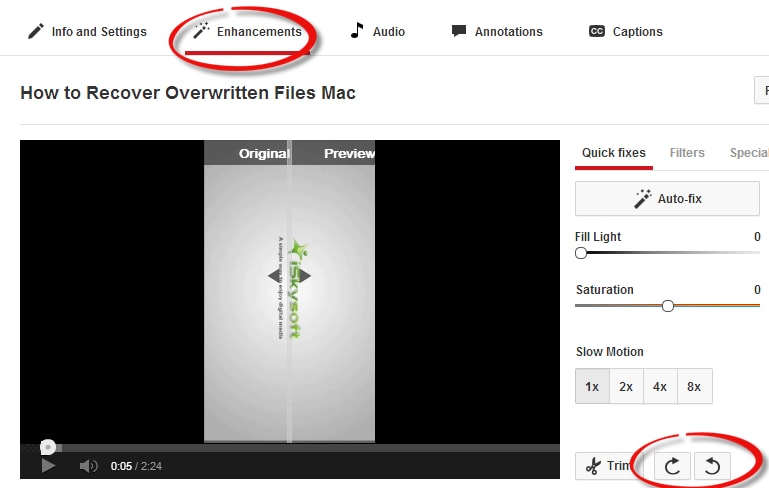
Step 1. Sign into your YouTube account. Click on the dropdown which appears once the profile picture is clicked. Here the desired video can be selected. Then click the "Edit" button which is found beside the video.

Step 2. Click on the enhancements tab which is found under the edit section.
Step 3. At the lower right part there is an arrow located. This can be used to rotate the video clockwise and counter clockwise.

Cons of using YouTube Video Editor:
- The editor requires internet connection to work. It cannot work offline.
- If the account password is hacked then the changes made are destroyed.
- The editor is complex and not user friendly, and it only allows users to rotate a video clockwise and counter clockwise.
Final Thought
Above are 2 ways for you to rotate YouTube videos, which one are you ready to try first?
In my opnion:
Filmora Video Editor or Filmora Video Editor for Mac could be the best option for you. Because it is easy to use, practical, and can be worked no matter you're online or offline. And the project file can be saved in the local disk for further editing as you like.
If you don't know where to start, just click the below icon and start your rotating journey with Filmora Video Editor.


