If you are not comfortable with audio playing in your video, it is very easy to extract it using Windows Movie Maker and many other programs. Separating audio from video with Windows Movie Maker can be for both good and bad reasons. One of the reasons why people want audio separated from video is to make it easy listening to. These days, young people are fond of walking around with mobile devices and having the audios separated will allow them enjoy even while on the go.
- Part 1. Does Windows Movie Maker Separate Audio from Video?
- Part 2. How to Separate Audio from Video in Windows Movie Maker
- Part 3. Best Way to Separate Audio from Video with Windows Movie Maker Alternative
Part 1. Does Windows Movie Maker Separate Audio from Video?

Windows Movie Maker has all the capabilities of extracting audio from video. That is one of its standout features and you can have it installed to your computer as an alternative to third-party tools that are sometimes frustrating.
There is no special expertise needed for you to extract audio from video in Windows Movie Maker. All you need is having the basics for video editing and how to use a software program. There is an array of awesome and free tools for video editing in the market that you can choose to use. They all have unique features and audio extraction is among those. Once you have chosen a program allowing for audio extraction, you can follow the given tutorial to remove audio from video with ease.
It will be challenging for you if you don’t use the tutorial and it’s your first time. Go through the tutorial, grasp all the key details about each step involved and you will have an amazing experience. Your chosen software program for separating audio from video must be downloaded first from a reputable online site and then installed to your computer. Windows Movie Maker is the ideal program to use and it has its merits as well as demerits. Just make sure you follow the instructions all through.
Part 2. How to Separate Audio from Video in Windows Movie Maker?
It is very easy to separate audio from your video files using Windows Movie Maker. The program comes with a user-friendly interface and presence of a timeline that makes editing even easier and more enjoyable. Whether you are an experienced user or you are trying it out for the first time, the following steps will come to your aid:
Step 1. Install the program. Download Windows Movie Maker from the internet and install to your computer. Make sure the installation process is perfect because any mistake will render the extraction process ineffective.
Step 2. Launch program. Click on “Add Videos and Photos” option and you will be able to browse through for the video file that you want to separate audio from. Once it has loaded, click on “File” then “Save Movie”. After that, scroll downwards until you get the “Audio Only” option to click.
Step 3. Name file. Once the audio has been extracted from video, give it a suitable name and save to the selected destination in your computer. It will be saved as MP4/AAC by default or any of the compatible formats. Your video is now ready to play on any platform including mobile devices.
Part 3. Best Way to Separate Audio from Video with Windows Movie Maker Alternative
Filmora Video Editor is one of the effective and highly preferred Windows Movie Maker alternative video editor. It should be your choice if at all you are keen on seperating audio from video. It also has some outstanding features that make Filmora Video Editor a force to reckon with in the industry. There are assorted editing tools to use, it performs color correction through adjusting contrast and brightness and there are animated templates as well as faceoff which are good for making green screen without hassle.
Key Features of Filmora Video Editor:
- Ability to produce top-quality videos as it comes with Video Stabilization tools.
- Lots of basic editing tools includes changing video orientation and speed.
- A comprehensive Media Library for easy management of projects.
- Various special effects including split screen, green screen, and face-off features are also available.
How to Separate Audio from Video with Filmora Video Editor
Step 1. Download and Install the program
Download Mac or Windows version of Filmora Video Editor according to your operating system. After that, you can install the program and open it on your computer.

Step 2. Import Video
Next, click on “Import” button and then select “Import from Files” and choose the appropriate video that you want to detach audio from the video. Upload the video by clicking “Open” and the file will appear on the program window.

Step 3. Separate Audio from Video
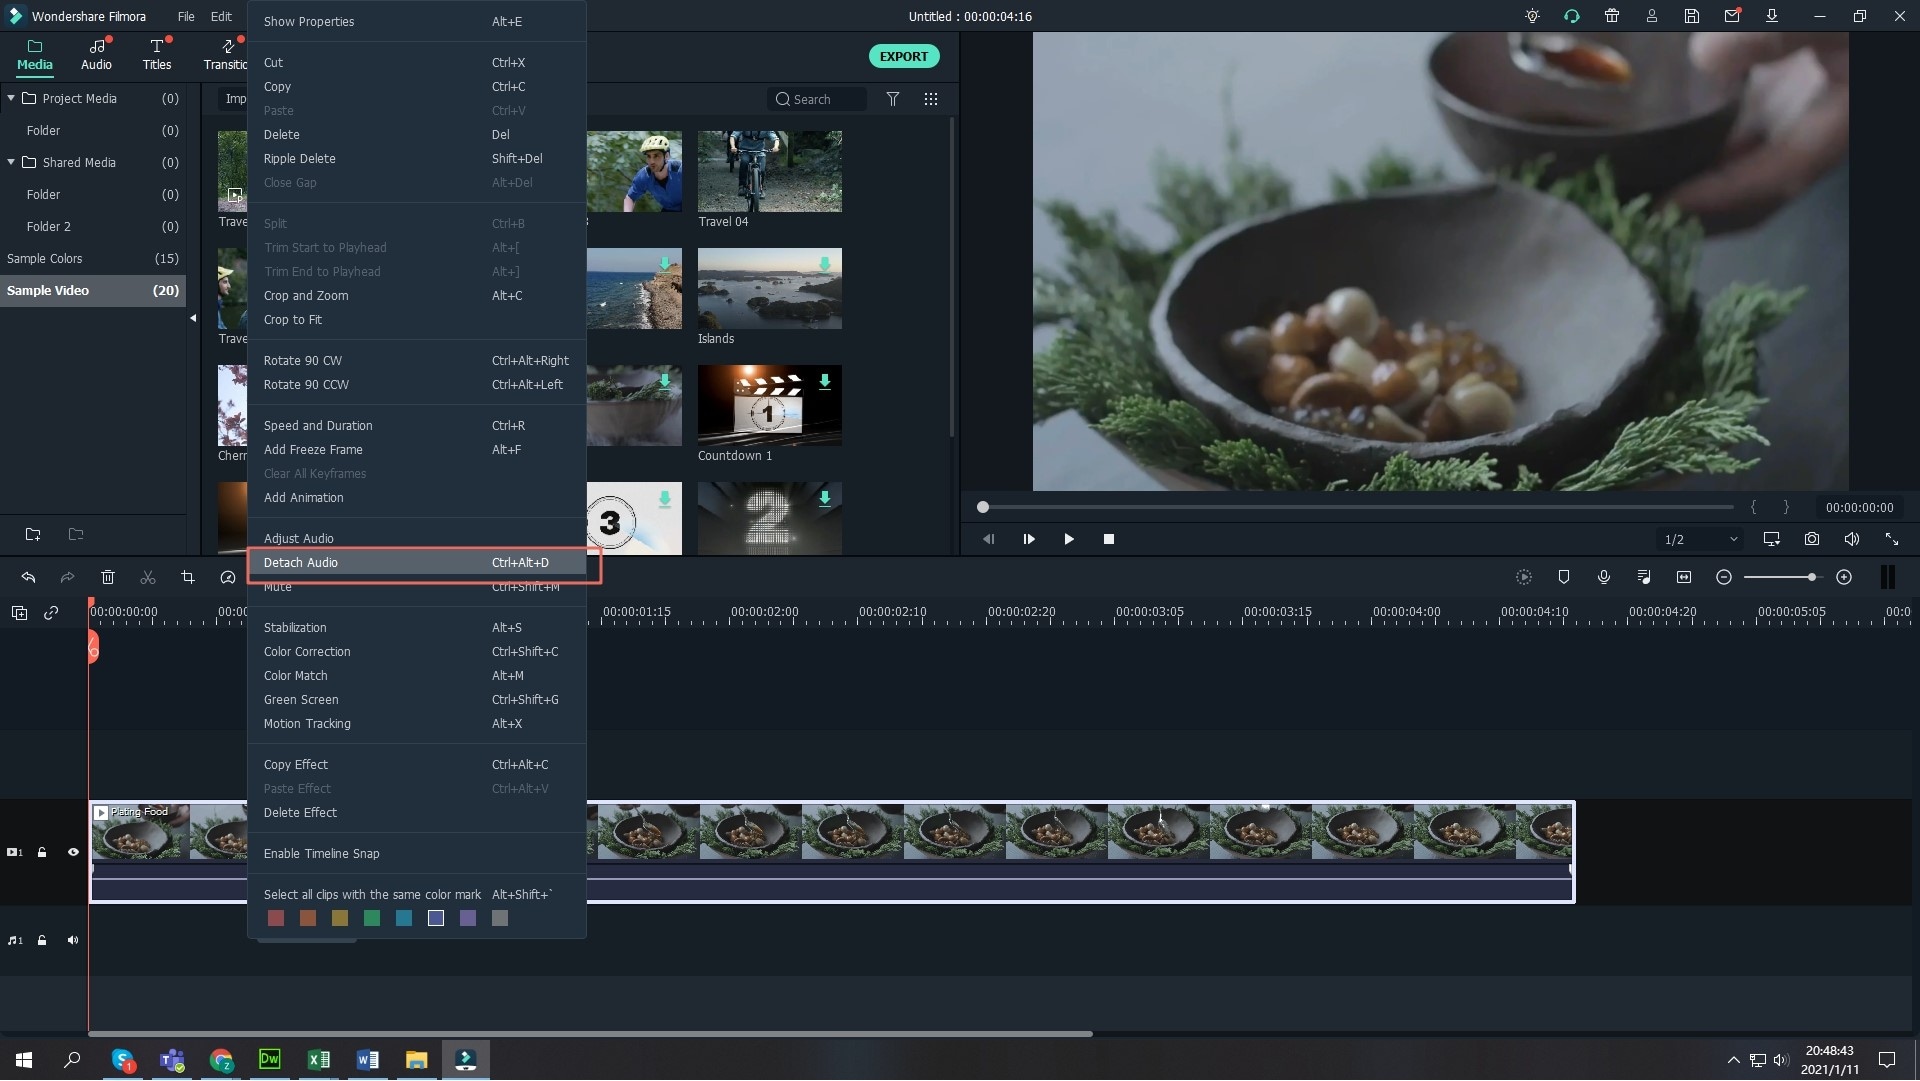
From there, you can now drag the video to the timeline at the bottom of the window and begin editing the video. To separate audio from the video, right click on the video and then select “Detach Audio” option. The audio will be separated and it will appear on Music track. You can right click on the audio to delete it or edit it.

Step 4. Save the File
Now that you have separated and deleted the audio from the video, you can go ahead and save your project. Click on “Export” button and you will get option to convert to a preferred format, upload it online, save it to a device or burn it to a DVD format. For this case select “Output” choose a format, rename the file and export to your computer. The edited video will be available on the folder that you chose.


